


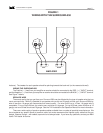

Surround-550THX speaker
page 4
the matching brackets can be attached to the speaker. The bracket that attaches to the speaker must point down,
and the bracket that attaches to the wall must point up. In both cases, the face with the printing must face out.
Then determine where you will locate your Surround-550s. See Section 5 below for guidelines on where to locate
the speakers. Then, using the template sheet enclosed (which is reproduced on the next page), mark holes on the
wall where the brackets will be permanently mounted. Ideally, one set of these holes should go into a wall stud, to
give you the greatest strength. First, locate the center of the stud.
Tape the four corners of the template sheet to the wall in the location you have selected, using a carpenter's level
to make sure the line marked "LEVEL TEMPLATE TO THIS LINE" is level. The template sheet has locations marked
for the two mounting holes needed to attach the wall bracket to the wall.
Once you are absolutely certain that you have the correct location, you are ready to drill the pilot holes. Go ahead
and drill right through the paper template into the wall. Re-check your measurements (especially making sure the
holes will be level) at least once before drilling.
WARNING: IT IS POSSIBLE THAT ELECTRICAL WIRING MAY BE LOCATED BEHIND THE WALL IN THE
LOCATION THAT YOU HAVE SELECTED. BE EXTREMELY CAREFUL ANY TIME YOU DRILL INTO A WALL.
If you are mounting the bracket to a wall stud, drill two 3/32" holes per bracket. Remember that the wallboard
material is 1/2" or 5/8" inches thick, and you will drill through this before meeting the stud. If you are mounting the
bracket to drywall with the plastic anchors, drill two 1/4" pilot holes per bracket. Once all holes have been drilled,
remove the template from the wall. Press the plastic wall anchors into the 1/4" pilot holes until they are flush with the
wall. Tap them gently into place if necessary.
Once the holes are drilled, place one bracket against the wall, making sure that the "tongue" (the portion that
will engage the bracket on the speaker cabinet) is facing away from the wall and pointing up. Using the two
#6 - 1 3/4" wood screws provided, fasten this bracket to the wall. BE VERY CAREFUL. DO NOT FORCE THE
PLASTIC ANCHORS THROUGH THE WALL OR OVERTIGHTEN THE SCREWS. Install the second bracket in the
same fashion.
That's it! All that is left for you to do is attach the speaker wire to the input terminals (Section 5, below), and,
from the top, gently slide the speaker into place against the wall. Do the same for the other channel.
4. THE M&K HIGH-FREQUENCY PRISM SYSTEM
Your Surround-550 speakers utilize M&K's exclusive High-Frequency Prism System to optimize imaging and
coverage of sound throughout the listening area. This system is designed to take into account the effect of the curved
mesh metal grilles on your speakers. Therefore, your Surround-550s are designed for the best sound when the grilles
are in place. We recommend that you leave the grilles on the speakers for all listening.
You will note that the tweeter in your Surround-550s speakers is mounted at a slight angle (4.7 degrees). This
mounting is an integral part of the High-Frequency Prism System.
When the speakers are mounted properly, the tweeter will be angled away from the listening position. That
means that the surround channel speakers should be mounted with the tweeter angled towards the back wall of the
room (when the speakers are mounted on the side walls), and with the tweeter angled toward the closest side wall
(when the speakers are mounted on the back wall of the room).
When the speaker is mounted in this fashion, its stereo imaging and coverage of sound are optimized for a very
wide listening window that extends from the on-axis position towards the center of the room. If the speaker is mounted
with the tweeter pointed in the other direction, its sound quality will be adversely affected.
5. SURROUND-550 SPEAKER HOOK-UP
LEFT CHANNEL SPEAKER / RIGHT CHANNEL SPEAKER
Your Surround-550s come in two versions - a Left Channel speaker and a Right Channel speaker. It is critical
that the correct speaker be used in each channel.
On the back panel of the speaker, there is an arrow with the printed nomenclature "Point Arrow Towards Screen."
To correctly install the Surround-550s, be sure that the arrow printed on each speaker is pointed towards the television
screen. The arrows will not be visible once the speaker is installed.
To confirm that the speakers are correctly installed right and left, check the angle of the tweeter (see Section