TERMINOLOGY AND CONTROLS
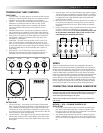
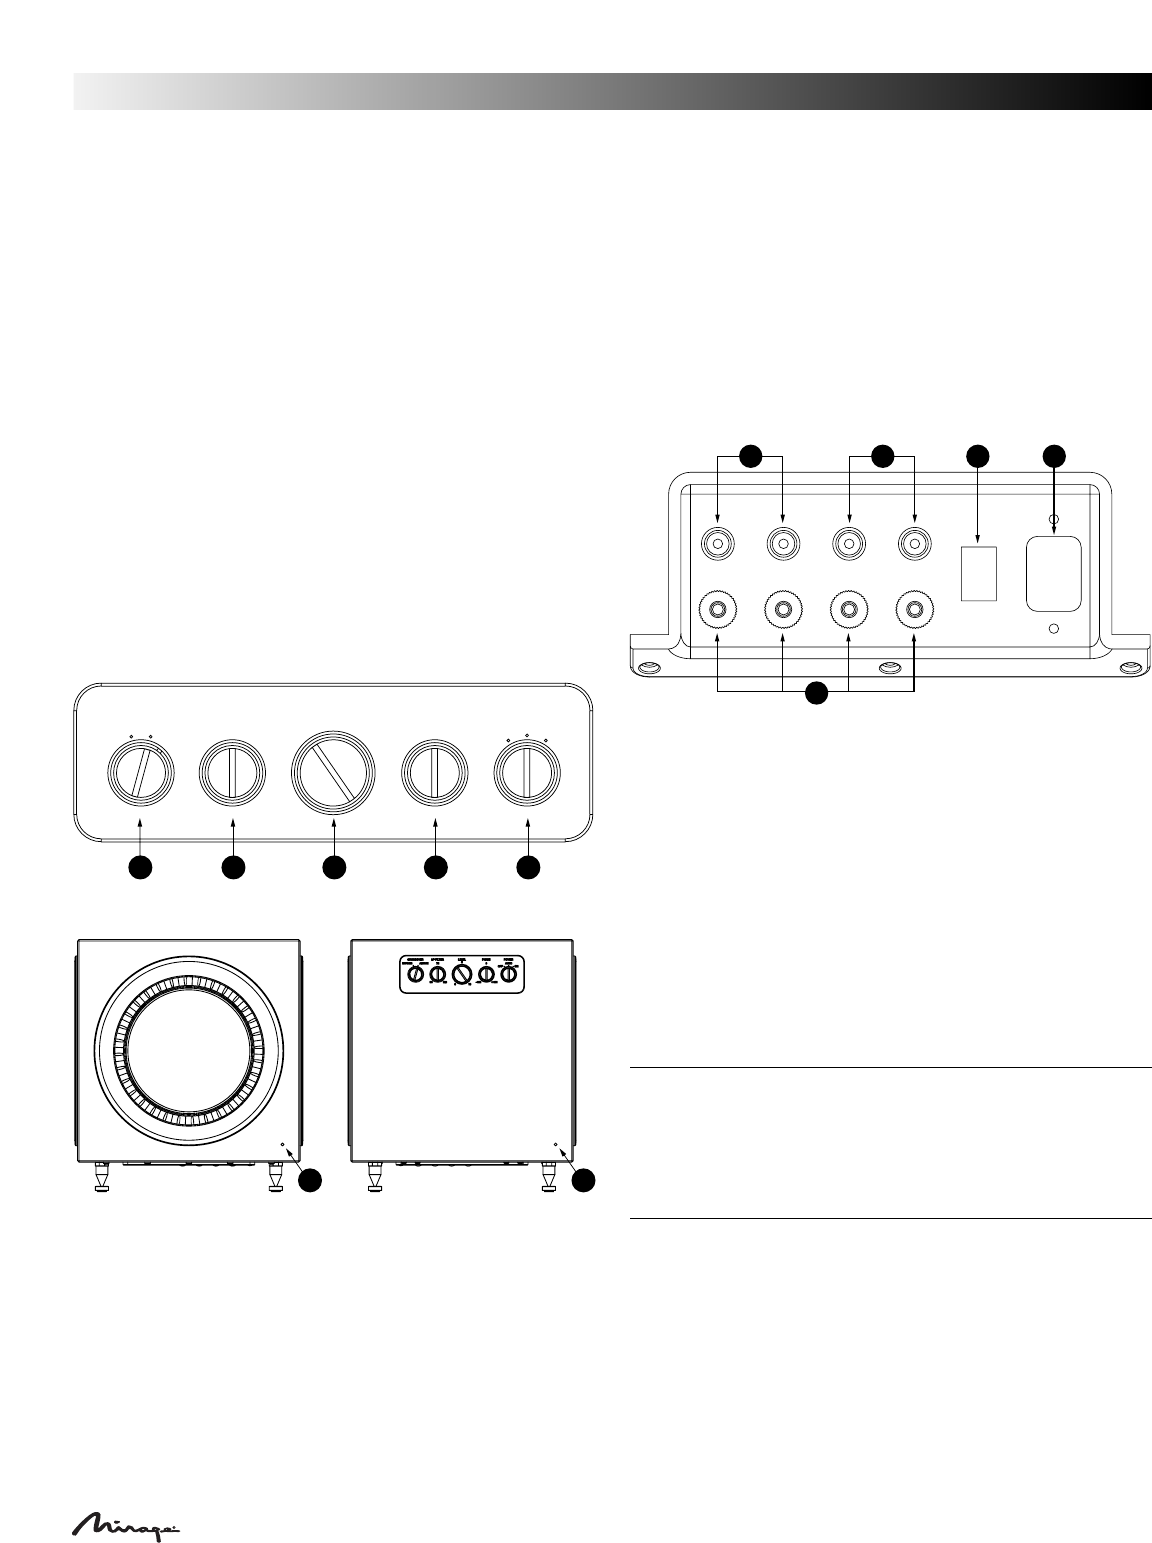
FRONT PANEL
1. Crossover Mode – This switch allows for the selection of either crossover
Activated or Crossover Bypassed. (Please see the connections section for
suggestions on which mode is appropriate for your installation.)
2. LP FILTER – This control allows for the adjustment of the low-pass filter.
Adjustments can infinitely be made from 30Hz to 150Hz. This will
determine the highest frequency that the subwoofer will reproduce.
This control will only function when Crossover Mode (#1) is set in
Active mode.
3. Subwoofer Volume Control - This knob can be adjusted to control the
level of output from your subwoofer. The level chosen should allow the
subwoofer to blend its output with that of the rest of your audio system.
4. Phase Control – This allows for the infinite adjustment of the phase of
the subwoofer, in relation to the speakers used in your system, from -
180 degrees to +180 degrees.
5. Power Mode – This switch can be set to either On, Off or Auto. If the
switch is in the Off position, the subwoofer will not power up. If the
switch is in the On position, it will constantly remain on. If the switch is
set to the Auto position, when a signal is present the subwoofer will turn
on and will automatically turn off several minutes after a signal is no
longer present.
6 Status Indicator – The LED found on the front and rear panels will
illuminate in blue when the subwoofer in functioning. If the unit is in
Auto mode and is not receiving a signal, the light will remain off.
BOTTOM PANEL
7. Sub Low Level Inputs – These inputs are an RCA type LFE/stereo/mono
input. If you are connecting your subwoofer to a pre-amp/processor with
a LFE or Subwoofer pre-amp output, connect a single RCA cable to the
LFE/Left input. If you are connecting your subwoofer to a stereo pre-amp
or processor, such as in a stereo music system, use stereo RCA cables and
connect to both the LFE/Left and Right inputs.
8. Low Level Outputs – These outputs are an RCA type stereo output. These
outputs feature a high-pass filter at 80Hz, 6dB per octave. These should
be connected to the inputs on your power amplifier, when using a stereo
music system.
9. High-Level Input – These are 5-way binding post type speaker connectors.
The High-Level inputs are designed to be used on receivers or amplifiers
that do not incorporate any RCA type subwoofer outputs. If your receiver
is equipped with an RCA type subwoofer output, these speaker level
inputs should not be utilized.
10. Main Power switch. In the off position the subwoofer will not function. In
the on position the subwoofer is receiving power. You must select the
front Power Mode switch to the correct position before the subwoofer
will operate.
11. Power Cord connector. Connect the power cord from you’re A/C outlet to
this input. Connecting your subwoofer to a surge protector or line
conditioner is always recommended. Do not connect the power cord
to the switched or unswitched outlet of your receiver as this
could damage your subwoofer and receiver.
SPIKES
Spikes are included with every speaker and are designed to decouple the
speaker from the floor. With the speaker upside-down (be sure to protect the
speaker surface when doing this), insert the spikes into the threaded insert in
the base. Using the supplied wrench,tighten the nut on each spike,to ensure a
sturdy and stable footing is established. The nuts also allow for the speaker
balance to be fine tuned when the speaker is standing up,ensuring the speaker
is level and plumb. If your flooring is hardwood or a hard surface like tile,
laminate flooring, etc, the included protective discs are designed to be placed
between the spike and the floor, with the padded side down, to protect your
flooring. Simply lay the protective discs on the floor and position the speaker
so the point of the spike fits into the hole in the top of the protective disc.
CONNECTING YOUR MIRAGE SUBWOOFER
CAUTION: All power should be turned off to your system before any
connections are made. Careful attention should be taken to ensure that all
electronic components are not connected to an AC source. Not doing so
could result in potential damage to the system.
There are two mutually exclusive methods to connect your subwoofer to
your receiver.
METHOD 1 – RCA – FOR HOME THEATER OR LFE
APPLICATIONS
1. On the rear of the receiver/pre-amp there should be a single RCA type
jack marked “Subwoofer/Pre-Amp Out”. Connect a single RCA cable
from that jack to the LFE/Left Input (#7) on the bottom of the subwoofer.
A standard male to male RCA cable is needed.
2. After connecting the single low level Sub In (#7) connection, plug your
MIRAGE
®
subwoofer into an AC outlet. Do not use the AC outlet on the
rear of your receiver. After plugging in the unit, switch the Main Power to
On.
owners manual
3
CROSSOVER
BYPASS
ACTIVE
LP FILTER
75
30
120
LEVEL
5
PHASE
0
POWER
AUTO
0
10
-180
+180
OFF
ON
1 2 3 4 5
9
7 8
10 11
6 6


