Page 11Sequel II User's Manual
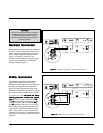
Figure 1Figure 1
Figure 1Figure 1
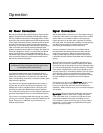
Figure 1. Standard Connection. One channel shown.
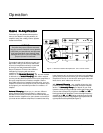
Figure 2.Figure 2.
Figure 2.Figure 2.
Figure 2. Bi-Wire Connection. One channel shown.
Warning!Warning!
Warning!Warning!
Warning!
Turn your amplifier off before making or
breaking any signal connections! The
chassis is earth grounded and can
present a short circuit to your amplifier if
contact is made!
Standard ConnectionStandard Connection
Standard ConnectionStandard Connection
Standard Connection
Please take note of the jumper clips installed
under the 5-way binding posts. These clips
attach the high and low frequency sections
of the crossover together. Leaving these in
place, connect the (+) wire from your
amplifier to either Red binding post and the
(-) wire from your amplifier to either Black
binding post (See Figure 1).
Bi-Wire ConnectionBi-Wire Connection
Bi-Wire ConnectionBi-Wire Connection
Bi-Wire Connection
This method of connection replaces the
jumper clips installed under the 5-way
binding posts with individual runs of speaker
wire from your amplifier. This doubles the
signal carrying conductors from the audio
amplifier to the speaker, thus direct-coupling
each portion of the crossover to the amplifier.
To bi-wire you must f
irst loosen the 5-wayirst loosen the 5-way
irst loosen the 5-wayirst loosen the 5-way
irst loosen the 5-way
binding posts and remove the jumperbinding posts and remove the jumper
binding posts and remove the jumperbinding posts and remove the jumper
binding posts and remove the jumper
clipsclips
clipsclips
clips. Connect one set of wires to the
HI+HI+
HI+HI+
HI+
and
HI-HI-
HI-HI-
HI- binding posts of the Sequel II. Then
connect a second set of wires to the
LO+LO+
LO+LO+
LO+
and
LO-LO-
LO-LO-
LO- binding posts. Next, connect both
sets of wires to the appropriate terminals on
your amplifier. Please take care to connect
both (+) wires to the (+) amplifier terminals
and both (-) wires to the (-) amplifier terminals.
This is known as a parallel connection (See
Figure 2).


