


65
ENGLISH
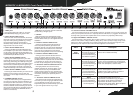
14. Digital FX LEVEL control
This controls how much of the chosen effect
gets mixed in with your unaffected (dry) guitar
tone. Want to hear more of the DFX you’ve just
selected? Then simply turn this control up!
Important Footswitch Note: Using the
supplied two-way footswitch, you can switch the
selected DFX on/off.
15. REVERB LEVEL control
This control lets you add a lush Reverb to your
sound – from a subtle hint to cavernous and all
points in-between. Designed by our in-house
digital experts, this custom designed Marshall
Reverb is highly musical and always sounds
natural – it never gets harsh or ‘fake’ sounding.
Important Footswitch Note: The supplied
footswitch does NOT switch the Reverb on/off.
16. MASTER VOLUME control
As its name suggests, the Master Volume
control determines the overall volume of your
amplifier. So after setting-up the relative volume
of Channels 1 & 2 the overall level can be
adjusted without affecting your all-important
Clean/Overdrive balance.
17. FDD (Frequency Dependent Damping)
switch
Marshall’s proprietary FDD circuit accurately
mimics the way an all-valve amplifier interacts
with the loudspeaker(s) and adds a width and
depth to your sound which has been
unachievable in an affordable solid-state
amplifier... until now! To engage FDD simply
press this switch in.
18. EMULATED LINE OUT &
HEADPHONES jack
This jack can be used as either an Emulated
Line Out or as a Headphone output. This means
you can use this socket to connect your amp
directly to your multi-track recording machine
and you’ll get a great, speaker emulated guitar
sound direct to disk or tape. Alternatively you
can plug your headphones in here for a killer,
speaker-emulated sound!
TIP: How to practise or record in ‘silence’:
The Clean Channel GAIN control (2) and the
Overdrive Channel VOLUME control (12) will
control the level of the headphone and line out.
The speaker output can be adjusted
independently using the Master VOLUME
control(16). Setting the Master VOLUME
control(16) to zero will allow silent recording or
practice.
19. POWER Switch & LED
The power switch turns your amplifier on and
off. The LED will be lit when your amplifier is on
and will not be lit when the amplifier is switched
off.
Note: Before connecting to the mains
electricity supply, always ensure that your
amplifier is compatible with your electricity
supply, as detailed on the rear panel.
Please ensure the amplifier is switched off and
unplugged from the mains electricity supply
before being moved.
ENGLISH
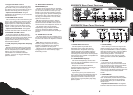
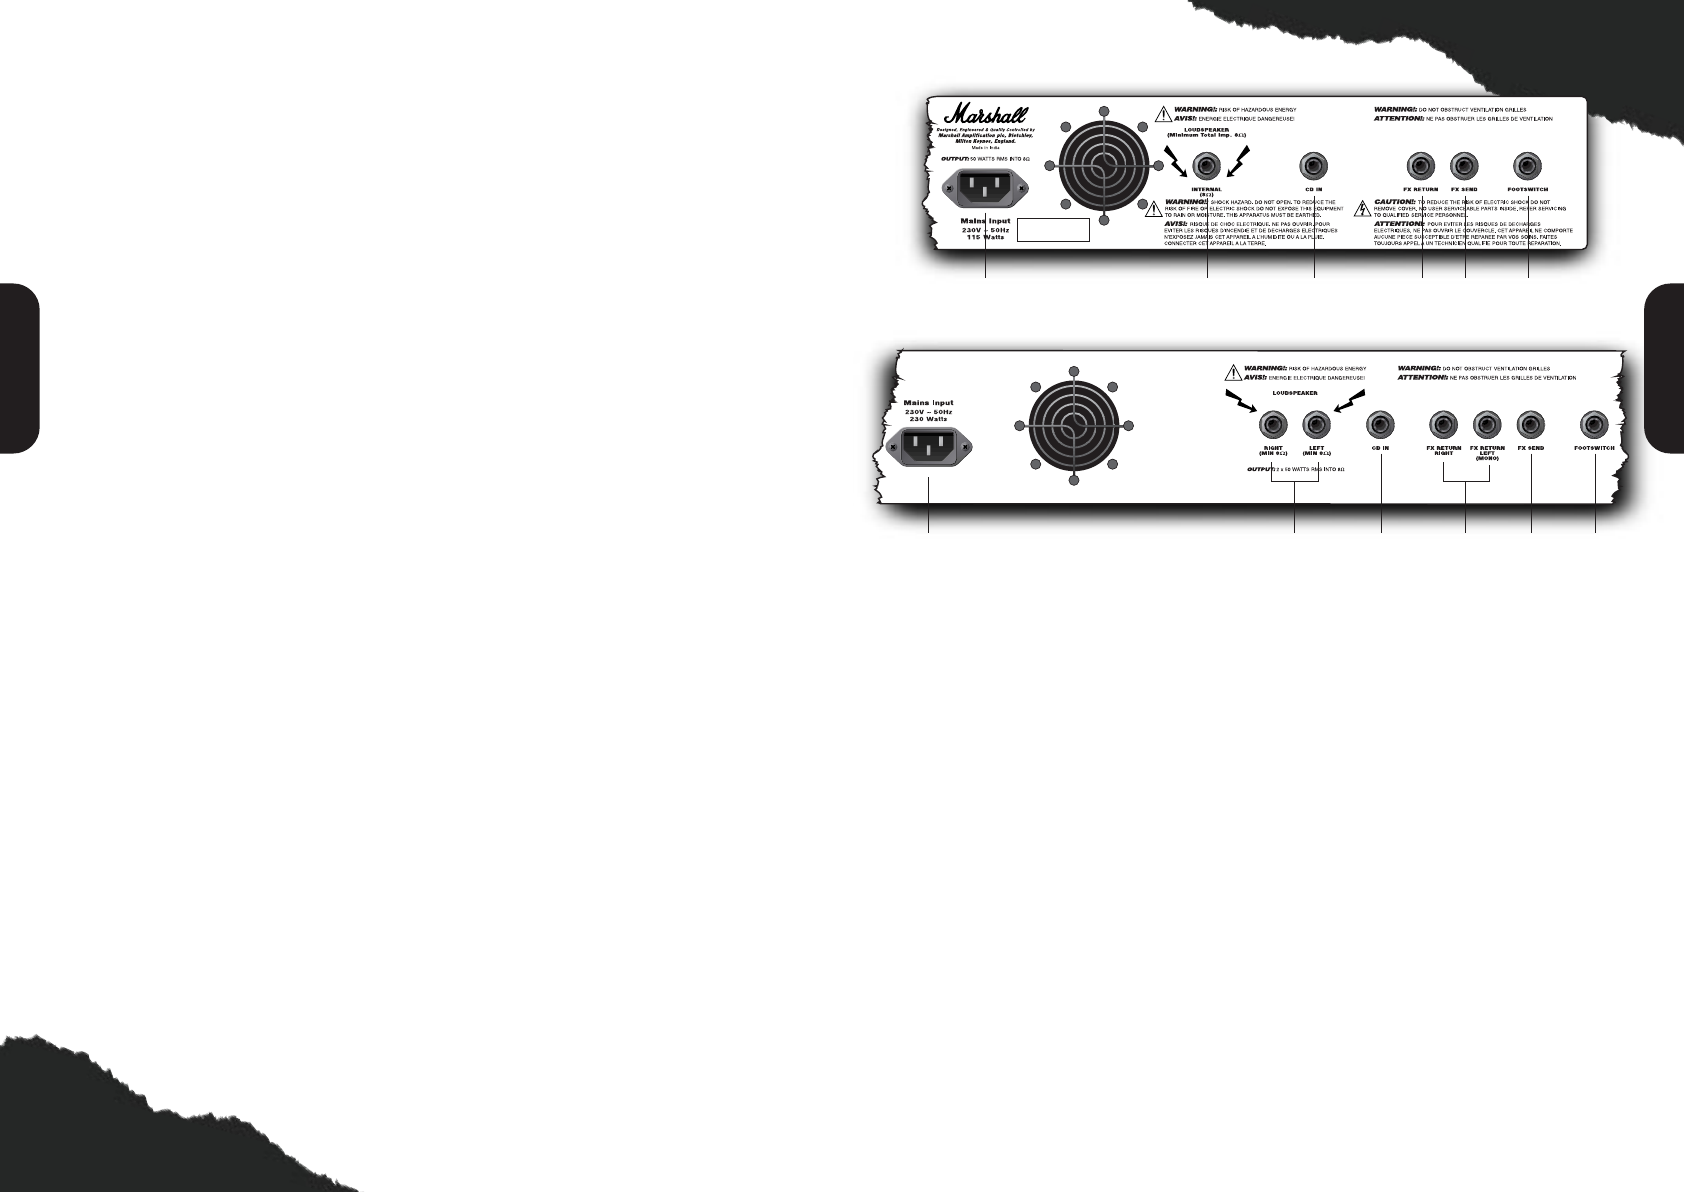
1. MAINS INPUT Connector
The MG amplifier is provided with a
detachable mains (power) lead which is
connected here. The specific mains input
voltage rating that your amplifier requires is
clearly indicated on the back panel. Before
connecting to the mains for the first time please
make sure that your amplifier is compatible with
your electricity supply.
2. LOUDSPEAKER Output(s)
The internal loudspeaker(s) connect here –
one in the case of the MG50DFX and two in the
case of the MG250DFX.
Always use a non-screened Marshall
approved speaker lead when connecting an
extension cabinet to these units.
3. CD IN jack
If you want to jam to your favourite CD or
tape, merely connect the headphone output of
your CD or tape player here, adjust the CD
/tape player’s volume to match that of your
guitar and you’ve got the perfect ‘play-along’
practice system.
4. FX RETURN(s)
This is where you connect the output of the
effects processor you are using in the effects
loop. As the MG250DFX is a stereo amplifier it
offers two FX Return jacks – LEFT and RIGHT.
This allows you to take full advantage of a
stereo effects processor. If, however, the
effects unit you are using only has a single,
mono output then use the LEFT (MONO) FX
Return.
5. FX SEND
If you want to use an external effects
processor in your amp’s built-in Series effects
loop, this is the jack you connect to the INPUT
of the unit you are using. For optimum
performance, the FX loop is best suited for use
with a rack or multi-effects processor which has
a manual adjustment for INPUT SIGNAL
LEVEL.
6. FOOTSWITCH
Connect the supplied two-way footswitch
here. Its left button (marked Channel) enables
you to change channels and its right button
(marked DFX) allows you to switch the DFX
Section on/off.
Important Footswitch Note: The supplied
footswitch does NOT switch the Reverb on/off.
1 2 3 4 5 6
1 2 3 4 5 6
MG50DFX Rear Panel Features
MG250DFX Rear Panel Features