


ENGLISH
4
Models 7200, 72115 & 72410
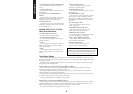
Front Panel Functions.
1. Hi-sensitivity Input
Input for the connection of bass guitars with
lower output levels.
2. Lo-sensitivity Input
Input for the connection of bass guitars with
higher output levels.
3. Gain Control with Peak LED
Controls the level of input gain.
For optimum signal level the peak LED should
light occasionally.
4. Pre-Amp Blend Control
This control fully anti-clockwise routes the signal
through purely solid state input pre-amp circuitry.
Turned fully clockwise the signal is routed through
an ECC83 pre-amp valve circuit. The various
positions in between offer numerous combinations
of the brighter more percussive solid-state tone with
that of warmer more compressed valve tone.
5. Deep Switch
Push switch to add extra bottom to the low end of
the primary EQ.
6. Low Primary EQ Control
Rotary control that gives + or - 15dB cut and
boost of the lower end of the primary EQ.
7. Bright Switch
Push switch to add brightness and attack to the
top end of the primary EQ.
8. High Primary EQ Control
Rotary control that gives + or - 15dB cut or boost
of the primary EQ upper frequencies.
9. Graphic Equaliser
7 Band graphic equaliser offering + or - 15dB cut
or boost (centre flat) of the frequencies that proved
to be the most effective for bass reproduction in our
exhaustive listening tests.
10. Graphic On/Off Switch and
Indicator
Push switch to access or by-pass the graphic with
LED indicating on/off status. (The graphic is also
footswitchable by any standard on/off footswitch).
For the footswitch to function the front panel
switch must be in the ‘Off’ position.
11. Compression Depth Control
Rotary control for selecting the depth of
compression. Note: This control works in
conjunction with input Gain control (3).
The input Gain control should be used to set the
threshold level and the Depth control to select the
amount of compression.
12. Compression Threshold Indicator
LED which indicates when the compression
threshold is reached.
Generally speaking the Low-Sensitivity input (2) suits bass guitars of high output levels e.g. active
basses and the High Sensitivity input (1) suits lower output instruments (passive basses). As there are so
many different output levels from the many types of instrument available to you, you should try both
before making the decision.
Set the Primary EQ to flat and make sure that the Deep (5), Bright (7), Compression (13) and Graphic
EQ switches (10) and the Master Volume control (14) are all off.
By turning the Gain control (3) until the peak LED lights occasionally you will be setting the
optimum level of input gain. Too little means that the amp is working inefficiently, too much can cause
unwanted distortion.
The Gain control (3) may need to be backed off accordingly if you boost the EQ, especially in the
lower frequencies.
Note: (Even with the gain control off you will still get a sound through the speakers on turning up the
Master Volume).
Turn up the Master Volume to the desired level and set-up your basic sound using the Primary EQ
controls (6 & 8) combined with the Deep and Bright switches (5 & 7). The character of the sound can be
changed using the pre-amp Blend control (4) from the brighter more percussive solid state tone to the
warmer more compressed vintage valve tone.
When using the built in Compressor the compression threshold is set using the Gain control (3) and
the amount of compression by the Depth control (11).
The clean power of the D.B.S is so dynamic that you may not need any further EQ although any
amount of fine tuning of tone can take place using the 7 band Graphic Equaliser. Alternatively you can
set-up an entirely different sound on the graphic then use the footswitch to switch between the two. This
incredible clarity also means that you won’t have to compromise your EQ settings as the volume
increases , as is often the case with normal bass amplification.