


4
DANSK
SVENSKA
PORTUGUES
ITALINO
ESPANOL
NEDERLANDS
DEUTSCH
FRANCAIS
ENGLISH
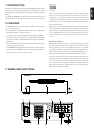
5. SPEAKER CONNECTION
This equipment, being a high audio output power amplifier,
has a hazardous energy at its speaker terminal. Please be sure
to make an appropriate speaker connection according to the
following procedures:
- Confirm that the power switch of the equipment is at "OFF" position.
If it is at "ON", turn it to "OFF" position to connect a speaker cable.
- Use a speaker cable with the flame retardant rating of type
SPT12 or more.
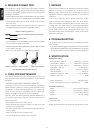
- Don't strip the insulation off more than shown in the figure, at
the speaker terminal connection of speaker cable.
Speaker cable (Type SPT12 )
- Connect speakers in correct polarity, according to the indication
for the polarity of speaker terminals.
- Prevent any stress from being applied to the speaker cable connected
to the speaker terminal.
- Don't touch the speaker terminals during operation.
6. CARE AND MAINTENANCE
This section describes the care and maintenance tasks that
must be performed to optimize the operation of your Marantz
equipment.
CLEANING OF EQUIPMENT EXTERNAL SURFACES
The exterior finish of your unit will last indefinitely with proper
care and cleaning. Never use scouring pads, steel wool, scour-
ing powders or harsh chemical agents (e.g., lye solution), al-
cohol, thinners, benzine, insecticide or other volatile sub-
stances as these will mar the finish of the equipment.
Likewise, never use cloths containing chemical substances. If
the equipment gets dirty, wipe the external surfaces with a
soft, lint-free cloth.
If the equipment becomes heavily soiled:
- Dilute some washing up liquid in water, in a ratio of one part
detergent to six parts water.
- Dip a soft, lint free cloth in the solution and wring the cloth out
until it is damp.
- Wipe the equipment with the damp cloth.
- Dry the equipment by wiping it with a dry cloth.
7. REPAIRS
Only the most competent and qualified technicians should be
allowed to service your unit. Marantz and its factory trained
warranty station personnel have the knowledge and special
equipment needed for repair and calibration of this precision
instrument.
In the event of difficulty, call the toll-free telephone number
listed on the face of the warranty to obtain the name and ad-
dress of the Marantz Authorized Service Center nearest you.
In many cases, the dealer where you purchased your Marantz
unit may be equipped to provide service. Please include the
model, serial number of your unit together with a copy of your
purchase receipt and a full description of what you feel is ab-
normal in its behavior.
8. TROUBLESHOOTING
The amplifier does not operate and the POWER ON indicator
does not light.
- Is the power cable plugged in properly to the AC power outlet?
The POWER ON indicator lights, but the amplifier does not function.
- Are speaker cables and input cables connected properly?
9. SPECIFICATION
Rated power output
Front L/R (20Hz -20KHz) ................. 170W 8-ohm / Channel
Center (20Hz - 20KHz) .................... 170W 8-ohm / Channel
Surround L/R (20Hz - 20KHz).......... 170W 8-ohm / Channel
THD (20Hz - 20KHz) ........................................ 0.03% 8-ohm
Input sensitivity ..................................... 100mV / 1W Output
Input impedance .................................................. 20K ohms
Frequency response (-1dB) ........................ 5 Hz to 100KHz
Signal to noise ratio ......................................................95dB
Power requirement .......................................120 VAC, 60 Hz
Power consumption (L/R cannel 100W driven) .......... 400W
Dimensions (Maximum)
Width ..............................................17-5/16 inches (440mm)
Height............................................... 6-5/16 inches (159mm)
Depth ...............................................17-4/5 inches (452mm)
Weight .......................................................... 44.1 lbs (20Kg)
Accessories
AC power cord.................................................................... 1
Design and specifications are subject to change without notice.
Losen the Terminal Insert the core
Tighten the Terminal
Connection of speaker cable Terminal
Strip the insulation off the tip of the cord.
Twist the cord.