INSTR,INST,MDR
Linear P/N: 210188 B
Material: 20 Lb. Mead Bond
Size: 8.500" x 11.000"
Ink: Black
Scale: 1-1
Side 1 of 2
MegaCode Series
MDR, MDR2, MDRNR,
MDRM, MDRM2
DIGITAL RECEIVERS
Installation Instructions
(800) 421-1587 • www.linearcorp.com
DESCRIPTION
The MegaCode series of digital receivers are wireless radio
controls designed for use with automatic garage door and gate
openers. The MegaCode radio format provides unparalleled
security. The transmitter and receiver can be programmed to more
than a million different codes.
MegaCode receivers and transmitters do not contain a typical
“coding switch”. Each transmitter is pre-set at the factory to a
unique code. The receiver is programmed by sending a signal to
it from the transmitter(s) that are going to be used with it. This
stores the transmitters code into the receiver’s memory. The
receiver will retain its memory even without power. The receiver
will activate only from these “memorized” transmitters. Each
MegaCode receiver can remember a maximum of 10
transmitters.
Receivers are normally powered with 24 volts AC/DC from the garage
door or gate operator. Two-channel receivers provide wire
connections to activate the operator’s light or control other devices.
MDR - Single-channel external receiver with relay output.
MDRM - Single-channel internal receiver (fits operators with
recessed receivers) with solid state output.
MDRNR - Single-channel external receiver with solid state output.
MDR2 - Two-channel external receiver with relay outputs.
MDRM2 - Two-channel internal receiver (fits operators with
recessed receivers) with solid state output on channel one and
relay output on channel two.
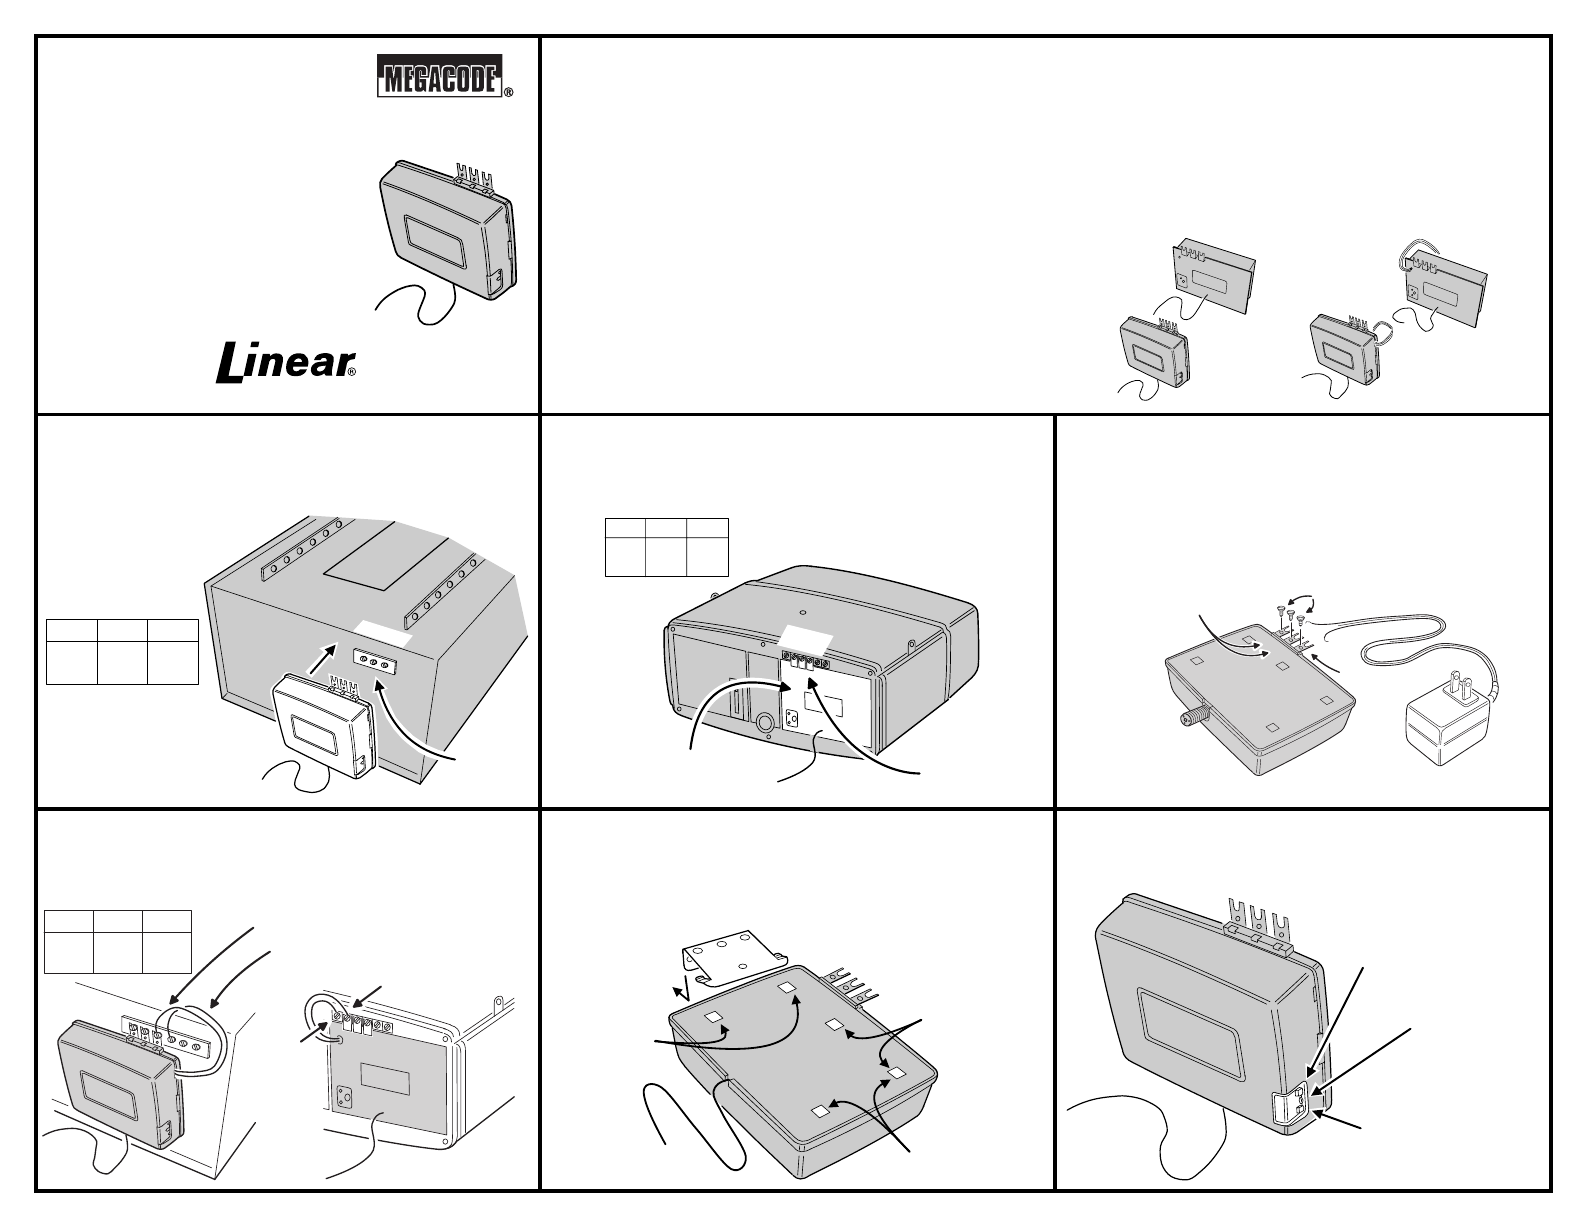
STEP 1A
MDR/MDRNR/MDR2 Three-terminal Operator
Installation. Hold receiver up to back of operator. Connect
Terminals 1, 2 & 3 on the receiver to Terminals 1, 2 & 3 on the
operator.
STEP 1B
MDRM/MDRM2 Recessed Receiver Operator
Installation. Loosen operator terminal screws. Install receiver
into operator “pocket”. Connect Terminals 1, 2 & 3 on the receiver
to Terminals 1, 2 & 3 on the operator.
STEP 1C
MDR/MDR2 Two-terminal Operator Installation.
The Model TF524 step-down transformer must be used to power
the receiver when connecting to a two-terminal operator or one
that supplies other than 24V. Install the screws supplied into the
brass terminals on the receiver. Connect the transformer wires to
Terminals 1 & 3 (polarity not important). Connect receiver
Terminals 1 & 2 to the two operator terminals (polarity not
important).
STEP 2
MDR2/MDRM2 Two-channel Receiver Installation.
Connect the receiver to the operator as described in the previous
step. The channel-two pigtail wires can be connected to the
operator’s light toggle terminals or to an external device.
STEP 3
Optional Receiver Mounting Bracket. If the receiver
isn’t going to be mounted directly to the operator terminals, an
optional mounting bracket is supplied. It can be installed three
ways onto the MDR or MDR2 case. Screw the bracket to a wall
or stud and snap the receiver onto it.
STEP 4A
MDR/MDRNR/MDR2 Program button and LED
Location. Locate the program button and LED on the side of the
receiver case.
1
2
3
1
2
3
CONNECT
RECEIVER
DIRECTLY
TO OPERATOR
MATCH UP
TERMINAL
NUMBERS
123
COMMON
GROUND
RELAY
24-VOLTS
RADIO
POWER
RECEIVER FITS INTO
BACK OF OPERATOR
BRASS
TERMINALS
FIT TO
TERMINALS
1, 2 AND 3
ANTENNA
1
2
3
1
2
3
COMMON
GROUND
RELAY
24-VOLTS
RADIO
POWER
1
2
3
INSTALL 3 SCREWS
WIRE TRANSFORMER TO TERMINALS 1 & 3
USE MODEL
#TF524 24VAC, .5VA
TRANSFORMER
WIRE TERMINALS 1 & 2 TO OPERATOR
PUSHBUTON TERMINALS
CONNECT ORANGE TO LIGHT TERMINAL
GROUND (#1)
BROWN ORANGE RED
RELAY
COMMON
RELAY
NORMALLY
OPEN
RELAY
NORMALLY
CLOSED
3-TERMINAL
OPERATOR
RECESSED RECEIVER
OPERATOR
CONNECT BROWN TO COMMON GROUND
LIGHT
TERMINAL
(#0)
BRACKET CAN
MOUNT IN THREE
PLACES
LOCATION 1
LOCATION 2
LOCATION 3
CORNER HOLE IS
SHARED FOR
LOCATIONS 2 & 3
MDR2
MDR
MDRNR
MDRM
MDRM2
TWO
CHANNEL
SINGLE
CHANNEL
CHANNEL TWO
PROGRAMMING
BUTTON (ONLY
ON MDR2)
CHANNEL ONE
PROGRAMMING
BUTTON
PROGRAMMING
LED


