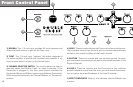
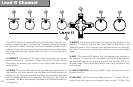
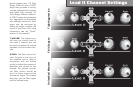
21
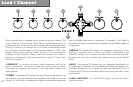
12) MIDI IN This jack is used to receive MIDI data from other MIDI enabled
products, such as MIDI Preset Footswitches or Effects Processors. MIDI
is a great way to allow different products to communicate together. Many
guitarists have found that the ability to hit one switch and have multiple
devices instantly respond can help create a more seamless on-stage perfor-
mance. While using this MIDI In system, you can still use the amp’s regular
footswitch to channel select, boost or bypass the effects loop.
13) SAVE This switch is used to program the MIDI preset as follows: First,
send the desired MIDI preset to the Double Cross. Then, footswitch the
Double Cross to whichever channel you want, and set the Boost and Effects
appropriately. Lastly, press and hold the Save button until the LEDs on the
amp and footswitch begin blinking (in about 2-3 seconds). When they stop
blinking, the preset is stored. From now on the amp will “footswitch” to this
setting whenever that MIDI preset number is received.
MIDI “Channel”: Note that the amp responds to MIDI channel 1 by de-
fault. To change the MIDI channel that is globally recognized, simply send
a preset change to the Double Cross on whichever MIDI channel you want
to use, set the amp’s footswitch appropriately, and press and hold the Save
button to set the amp’s MIDI channel to that number (1 through 16).
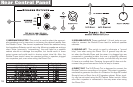
14) POWER CORD RECEPTACLE/FUSE HOLDER Insert the AC cord (provid-
ed) firmly into the AC connector. Replace the AC power cord if protective
jacket is damaged or ground pin is damaged or removed. The fuse is locat-
ed in a housing just below the receptacle. To remove the fuse, remove AC
cord and pull out on the tab above the fuse symbol, located on the fuse
carriage. Place the new fuse in the carriage clip and re-insert. Replace
only with the same type and size. NOTE: To prevent an electrical hazard,
DO NOT replace fuse without using the fuse carriage. Replace the fuse
carriage if lost or damaged before re-inserting the AC power cord.
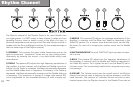
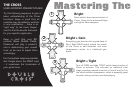
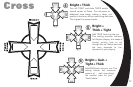
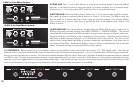
Eects Loop Syncing
This hidden feature allows the user to synchronize the Effects
Loop with any or all channels and/or the Boost function, so that
it will always be activated when a particular channel or the Boost
is selected.(The Effects Loop can always be turned off, even
when synced with a channel, simply by pressing the switch.)
1) To enable this feature, you first must enter into Effects Loop
Sync Program Mode by turning on the amp while first pressing
and holding down the Save button on the back of the amp.
2) When the amp comes on, the Effects Loop LEDs on the amp
and footswitch will begin blinking, indicating that you are in Ef-
fects Loop Sync Program Mode.
3) Press the channel(s) and/or Boost buttons one at a time that
you want effects with.
4) Note that the channels you select will begin blinking along with
the Effects Loop LED. When you select a channel that has the
effects loop Sync’d to it, the Effects Loop LED will blink.
5) When finished selecting your channel(s) and/or boost status,
press and hold the Save button on the amp; after a few seconds
it will blink faster indicating that it’s storing your choices. Effects
syncing can be changed at any later time by going into Effects
Loop Sync Program Mode and turning off the channels that you
DON’T want effects synced with. If you turn all three channels
AND the Boost off, then the Effects Loop will no longer track or
be synced.
When operating in Effects Sync Mode, “Effects” will blink. Solid
illumination indicates manual override. (Manually selected ef-
fects will remain on until deselected.)
Note: MIDI programming is separately handled so it isn’t affected by
programming the Effects Loop Sync. Effects Loop Sync only works with
the amp’s normal footswitch.