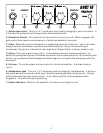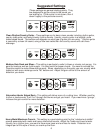
1.) Guitar Input Jack - This is a 1/4” 2-conductor input jack for plugging in your instrument. It
is intended for guitars but will accept other instruments as well.
2.) Overdrive Switch - This switch turns the overdrive circuit on or off. When engaged, the
gain control then determines the amount of distortion added to the sound.
3.) Gain - Adjust this control clockwise to increase the amount of distortion. Use in the lower
ranges (counter clockwise) to produce less distorted tones. As you increase the gain
(clockwise), the amount of distortion can range from “Classic Rock” to heavy, modern rock.
4.) Voice - This is an overall tone control. In the extreme counter-clockwise position, it is
specifically designed to give a full bodied sound with lots of midrange tones. By increasing this
control, you proceed to boost the bass and treble regions, but reduce the midrange content of
the sound.
5.) Volume - This is the output volume control for the entire amplifier. It follows the tone
circuit.
6.) Headphone Jack - This is a 1/4” 3-conductor jack for plugging in headphones. It will sum
the signal and put the sound in both ears, thereby creating a pseudo-stereo sound. Volume
will be determined by the volume control. It will disconnect the internal speaker when
plugged in. This will allow quiet practicing.
7.) Power Indicator - When lit, the amplifier is turned on and ready for use.
5


