


8. Make sure the speakers in each room are connected in phase
with the amplifier + going to the speaker +. Out of phase
speakers give unstable imaging and poor bass response.
9. Connect the AC power into an outlet than can supply at least
six amps (750 watts) dedicated to each GS8 or GS12.
Installing the amplifier should be relatively easy. With a bit of
planning, this amplifier will give trouble free service for years.
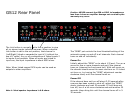
10. After the amp has been turned on adjust the “SENS” pot on
the rear of the amplifier if necessary. The “SENS” adjustment
can be adjusted up (clockwise) to make the amp less
susceptible to be turned on due to nuisance noise and hum. If it
is adjusted too high, the amp may delay turn on or turn off
during a quiet music or speech passage.
Caution: Never listen to sound that is distorted. If distorted
sound is heard, turn the volume down immediately or speaker
and/or amplifier damage could occur that is not covered by the
warranty. If this problem persists, contact your dealer.
User Adjustments and Service: There are no user
adjustments inside the GS8 or GS12. Your installer may make
certain gain and sensitivity level adjustments on the rear panel.
Caution: The GS8 or GS12 contains no user serviceable parts,
so do not attempt to open or repair the GS8 or GS12.
Refer servicing to a qualified technician only or contact the
factory for information.
Troubleshooting
If a problem is encountered with the GS8 or GS12 amplifier, the
most expedient procedure is to locate the problem and if
possible repair it before requesting service. Be sure to carefully
check other system components such as controllers, CD players,
volume controls, wiring, speakers, etc. that may be at fault.
Problem Action
Power led does 1. Check that the GS8 or GS12 is plugged
not light - no sound in.
2. Test the AC outlet with a lamp.
3. Check GS8 or GS12 power button is on
(in).
4. Slowly turn down the “SENS”
adjustment (counterclockwise) on the
amplifier rear, until the amplifier just
turns on.
Installation
1. The most important consideration when installing the
GS8 and/or GS12 is cooling. This amplifier has a lot of power
packed into a small chassis size. When installing it in an
equipment stack, it should be the top component. It needs at
least 3"-5" of space above the amplifier to allow for adequate
convection cooling.
2. When installing the GS8 and/or GS12 in a rack we suggest
adding a 3-1/2" blank above and below the amplifier. In
multiple GS8 and GS12 installations, plan for a 3-1/2" blank
(double) between each amplifier and a 3-1/2" blank on the top
and bottom. Amplifiers should always be the top components in
a rack system.
3. The GS8 and GS12 are available as an optional 19" EIA rack
mount style.
4. Never operate a GS8 or GS12 on its side, as the cooling
potential drops significantly when operated on the side.
5. Connect the GS8 or GS12 RCA inputs to the source
component outputs with good quality, short as possible RCA
jack cables. Connect each channel individually.
6. Connect the GS8 or GS12 speaker outputs to speakers using
good quality speaker wire. Minimum 16 gauge copper wire is
recommended with 14 gauge minimum for runs over 30' (10m).
Fire-rated wire may be required if installing wires inside walls,
ceilings or floors.
Note: Ideally the GS8 and GS12 amplifiers like 6-8 ohm loads.
Connecting to 4-ohm loads won't hurt the amplifier, but the
channels connected to 4-ohm loads may occasionally shutdown
due to overloading. Never connect any GS8 or GS12 amplifier to
less than 4 ohms.
7. Individually adjust the channel gains as required. Ideally, all
gains are fully on (fully clockwise).
(continued)