


CONFIGURATION
Congratulations on your
KICKER purchase
Please record your purchase
information and keep your sales
receipt for validation of warranty.
2
INSTALLATION
COMPSUBWOOFER
EnclosureOwner’sManual
DC12 / DC10 / VC12 / TC10
Models:
COMPSUBWOOFERENCLOSURE
3
Authorized Kicker Dealer:
Purchase Date:
Enclosure Model Number:
Enclosure Serial Number:
_________________________
_________________________
_________________________
_________________________
Please allow two weeks of break-in time for the subwoofer to reach optimum performance. To get the best performance
from your new Kicker subwoofers, we recommend using genuine Kicker Accessories and Wiring.
The Kicker Comp subwoofer enclosures were specially designed for “Livin’ Loud” out in the harsh
automotive environment. They are made of advanced materials and construction techniques to
maintain optimal performance for years to come.
CheckTheLoad
The Comp subwoofer enclosures are internally wired for a 2 or 4 ohm load at the speaker-wire
connection terminal. Please refer to this terminal or the box packaging for your enclosure’s specific
impedance. Check to see if your amplifier is optimized to drive this load.
DC/VCVented
The DC/VC Series vented enclosures combine KICKER’s award winning line of subwoofers with
computer-modeled and human fine-tuned enclosures to offer a level of bass performance never before
thought possible from a commercially available, ready-to-install subwoofer system. The DC Series
enclosures are available with a pair of pre-loaded 10 or 12 inch Comp subwoofers. The VC Series
enclosure is available with a pre-loaded 12 inch Comp.
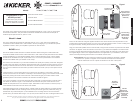
The location and orientation of your enclosure will affect the quality and quantity of the bass. Designed
for use in SUV and sedan type vehicles, these enclosures offer you several mounting options. The vent
opening in these enclosures can not be obstructed. At some frequencies most of the bass will come
out of the vent. Therefore we recommend you leave at least four inches (10cm) of clear space around
the vent.
If the enclosure is to be mounted all the way in the back of the vehicle, it works best to point the
woofer toward the front of the vehicle. Conversely, if the enclosure is going to be mounted closer to the
back seat, pointing the woofer toward the rear of the vehicle will give you the best results. These
guidelines pertain to enclosures mounted in the vehicle as outlined in Figure 1.
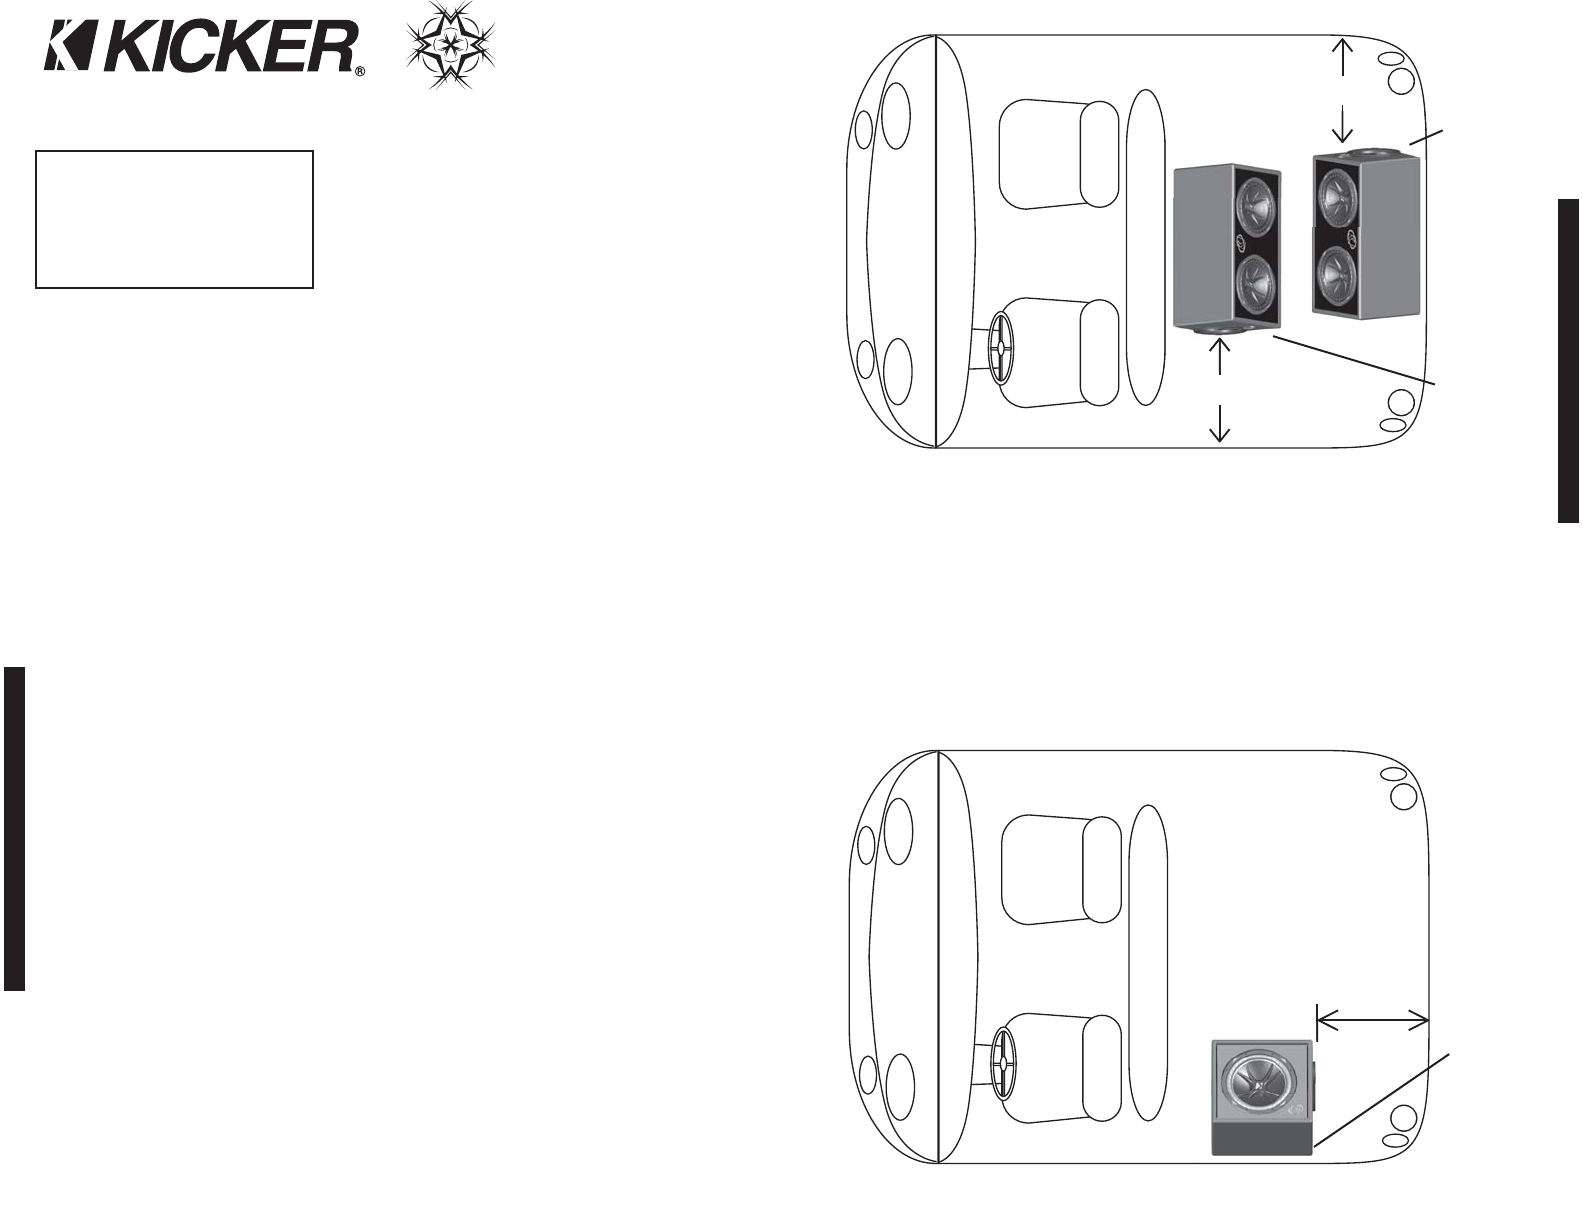
If it is more convenient to mount the enclosure along a side wall, put the enclosure on the left side of
the vehicle as outlined in Figure 2. This orientation will make the vent point toward the rear of the
vehicle and will produce the most low bass output. Remember to leave at least four inches (10cm) of
room between the enclosure and the back of the vehicle.
After determining the best mounting position, carefully check the areas where the mounting brackets
will be placed. Make sure the mounting screws will not puncture the gas tank, brake lines, wiring, or
interfere with any mechanical parts on the underside of the mounting surface. Turn the enclosure
upside-down, pre-drill the holes using a 7/64” (2.5mm) bit and attach the four mounting brackets to the
At least 4”
(10cm) from
the vent
Figure 2
Rear mounting,
speaker faces
front of vehicle
(DC Series is
illustrated)
Front mounting,
speaker faces
rear of vehicle
(DC Series is
illustrated)
Front of
Vehicle
At least 4” (10cm)
from the vent
At least 4” (10cm)
from the vent
Figure 1
bottom of the enclosure using the supplied smaller screws. Each bracket must be positioned so the
rounded end protrudes approximately 3/4" (2cm) from under the cabinet to allow a screw to easily pass
through the bracket, securing the enclosure to the vehicle. See Figure 4.
Plug your subwoofer speaker wire into the terminals, using the red connector as positive and the black
connector as negative. Hook the other end of the wire to your subwoofer amplifier in accordance with
its owner's manual. With the enclosure right side up, securely attach the enclosure to the vehicle with
the supplied larger screws. If the supplied hardware is not applicable to your installation, some other
means of securely attaching the enclosure to the vehicle must be used.
Left side
mounting,
speaker faces
opposite side
of vehicle
(VC Series is
illustrated)
Front of
Vehicle
Sound Check: Poor bass response? Check the system phasing by reversing a speaker
connection from positive to negative on the subwoofer channel; if the bass improves,
then the subwoofer was out of phase in reference to the rest of the system.