


English
|
31
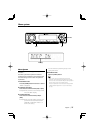
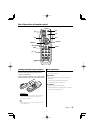
Function of the KDC-X590
When LX AMP unit connecting
AMP Control
You can control the LX AMP connected to the
unit.
1 Select AMP Control mode
Push the Control knob towards [FM] or [AM].
Select the "AMS CTRL" display.
2 Enter AMP Control mode
Press the Control knob for at least 1 second.
3 Select the AMP Control item for adjustment
Push the Control knob towards [FM] or [AM].
• For the details on the AMP Control item, see the
Instruction manual attached to the LX AMP.
4 Adjust the AMP Control item
Push the Control knob towards [4] or
[¢].
5 Exit AMP Control mode
Press the [MENU] button.
• You cannot use the LX AMP operation during standby
mode.
In FM reception
CRSC (Clean Reception System
Circuit)
Temporarily have reception alternate from
stereo to mono to reduce multi-path noise when
listening to the FM station.
Display Setting
"CRSC ON" The CRSC is ON.
"CRSC OFF" The CRSC is OFF.
• Strong electrical fields (such as from power lines) may
cause unstable sound quality when CRSC is turned
ON. In such a situation, turn it OFF.
In HD Radio mode
Receive mode Setting
Sets the receive mode.
1 Select the Receive mode
Push the Control knob towards [FM] or [AM].
Select the "HDR MODE" display.
2 Enter Receive mode
Press the Control knob for at least 1 second.
3 Set the Receive mode
Push the Control knob towards [FM] or [AM].
Each time you push the knob, the Receive mode
alternates between the modes shown in the
table below.
Receive mode Display Operation
Auto mode "AUTO"
Analog broadcasts and digital
broadcasts will be switched
automatically.
When both are being transmitted,
the digital broadcast will have
priority.
Digital "DIGITAL" Digital broadcasts only.
Analog "ANALOG" Analog broadcasts only.
4 Exit Receive mode
Press the [MENU] button.
• Even if the Receive mode is set to "AUTO", when the
Ball game mode program (non-delayed broadcast
program) is received, the Receive mode will
automatically switch to Analog broadcast only.
In SIRIUS tuner source
SIRIUS ID (ESN) display
Displaying the SIRIUS ID (Electronic Serial
Number).
Display
"ESN = ************"
• Serial & SIRIUS ID (ESN)
It is important to retain the unit serial number and
the electronic SIRIUS Identification number for service
activation and potential service changes.