


English
|
25
In Standby mode
Touch Sensor Tone
Setting the operation check sound (beep sound)
ON/OFF.
Display Setting
"BEEP ON" Beep is heard.
"BEEP OFF" Beep canceled.
In Standby mode
Manual Clock Adjustment
⁄
• You can do this adjustment when the <Synchronize Clock>
(page 25) is set as OFF.
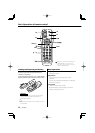
1 Select Clock Adjustment mode
Push the Control knob towards up or down.
Select the "CLK ADJ" display.
2 Enter Clock Adjust mode
Press the Control knob for at least 1 second.
The clock display blinks.
3 Adjust the hours
Push the Control knob towards up or down.
Adjust the minutes
Push the Control knob towards right or left.
4 Exit Clock adjustment mode
Press the [MENU] button.
In Standby mode
Synchronize Clock
Synchronizing the RDS station time data and this
unit’s clock.
Display Setting
"SYNC OFF" Adjust the time manually.
"SYNC ON" Synchronizes the time.
⁄
• It takes 3 to 4 minutes to synchronize the clock.
Display Illumination Control
This function turns off the display when you
perform no operation for 5 seconds. This function is
effective when you are driving at night.
Display Setting
"DISP ON" Keeps the display on.
"DISP OFF"
Turns off the display when you perform no
operation for 5 seconds.
⁄
• Set the Display Illumination Control when the
<Demonstration mode Setting> (page 29) is set to OFF.
• When the display is off, pressing any key will turn on the
display.
• When the display is off, you cannot perform any
operation except for the following:
• Volume
• Attenuator
• Selecting the source
• Ejecting the disc
• Turning off the power
• USB remove mode
• During function control, such as the Menu System, the
display stays on.
In Standby mode
Dimmer
Dimming this unit’s display automatically when the
vehicle light switch is turned ON.
Display Setting
"DIM AUTO" The display dims.
"DIM OFF" The display doesn’t dim.
In Standby mode
Switching preout
Alternating the preout between the rear and
subwoofer. (With the subwoofer the sound outputs
without being effected by fader control.)
Display Setting
"SWPRE R" Rear preout.
"SWPRE SW" Subwoofer preout.