


Skip function
Press during play back or while in Stop mode.
Search function
Keep depressed during play.
ButtonOperation
• During Random Play, the skip but-
tons cannot be used to skip back to
tracks that were played previously
in the random sequence.
Display/Reference
Press
the 3/8 button
again to restart play (Re-
sume Play). The current track will be played
from the beginning (see “Resume Play”).
If stopped for 45 seconds, the power will au-
tomatically shut off.
When all the music is played, the MD player
automatically stops.
or
Display/Reference
Repeat Play and Random Play
You can select either Repeat Play or Random Play. In Repeat Play, you can repeat all the
tracks, or an individual track, as many times as you like. In Random Play, you can play all the
tracks in random order.
Selecting Repeat Play and Random Play in Stop mode
In Stop mode, press the P.MODE button. Each time you press the button, the play mode
changes as follows:
P1 = P = RND = P1 RND = P RND = Original display = (back to the beginning)
P1 : Repeats 1 track.
P : Repeats all the tracks.
RND : Random play
P1 RND : Repeats one track randomly selected.
P RND : Repeats all the tracks in random order.
After selecting one of the above modes, press the 3/8 button.
To exit Repeat Play or Random Play, stop the MD and then press the P.MODE button until
the display returns to its original setting.
Repeat Play during Playback
During Normal Play:
Each time you press the P.MODE button, the play mode changes as follows:
P1 = P = Original display = (back to the beginning)
Select “P1” to repeatedly play the current track. Select “P” to repeat all the tracks.
During Random Play:
Each time you press the P.MODE button, the play mode changes as follows:
P1 RND = P RND = Original display = (back to the beginning)
Select “P1 RND” to repeatedly play a randomly selected track. Select “P RND” to repeat all
the tracks in random order.
To exit Repeat Play or Random Play, stop the MD and then press the P.MODE button until
the display returns to its original setting.
Selecting the Operational Options of Remote Control
Troubleshooting Guide
Before requesting service for this minidisc player, check the chart below for a possible cause of
the problem you are experiencing. Some simple checks, or a minor adjustment on your part,
may eliminate the problem and restore proper operation.
If you are in doubt about some of the check points, or if the remedies indicated in the chart do
not solve the problem, refer to the directory of Authorized Service Centers (enclosed with this
minidisc player), or consult your dealer for instructions.
Problem
Does not operate.
Cannot play the MD.
Tracks on MD do not play in or-
der, starting with the first track.
Cannot hear music—too noisy.
TV picture is distorted.
Radio reception is noisy.
Power is not turned on.
Charging indicator does not light
during charging.
␣
Check this
Is the MD loaded? If unloaded, “No Disc” will appear on
the display.
• Is the HOLD switch released?
• Is the battery low?
• Is there moisture condensation on the lens?
(Wait for about an hour and then try again.)
• Is the Repeat Play or Random Play selected?
• You stopped or turned off the power while playing. It
changed to Resume Play.
• Is the headphone plug inserted all the way?
• Is the plug dirty? (Wipe away dirt on the plug.)
• Is music recorded on the MD? If not, “BLANK” will
appear on the display.
• Is the unit too near a TV or tuner? (If the TV or tuner is
connected to a simple indoor antenna, connect it to an
outdoor antenna.)
• With both HOLD switches activated, the battery was
changed during playback. (Release both HOLD switches
and try to operate again.)
• Is the charger too hot?
(If so, disconnect the AC adaptor and leave the charger
for a while.)
Specifications
Portable MINIDISC player
Type : Minidisc digital audio system
Sampling frequency : 44.1 kHz
Compression/expansion
method : ATRAC method
Number of channels : 2 channels (stereo)
Frequency response : 20 Hz to 20,000 Hz
Wow & flutter : Unmeasurable
Output : Headphone (3.5 mm dia. stereo × 1)
5 mW/ch at 10% THD/16 ohms to 47 kohms
Duration of battery : Approx. 20 hours when using a rechargeable battery
(BN-R1210) charged for 2 hours;
* Above duration may differ depending on the ambient tempera-
ture and conditions.
Power requirements : DC 1.2 V (rechargeable battery)
Dimensions (L × W × H) : 76 mm × 17.5 mm × 80.5 mm
(Excluding buttons and controls)
Mass : Approx. 83 g (without battery)
AC adaptor (AA-R9020)
Input power source : AC 110-AC 230 V, 50 Hz/60 Hz
Output voltage : DC 9 V, 0.5 A
Charger (AC-R126)
Input power source : DC 9 V, 0.5 A
Design and specifications are subject to change without notice.
US and foreign patents licensed from Dolby Laboratories Licensing Corporation.
Muting the pip tone
When you press a button on the remote control except for the A.C.BASS and VOLUME (+, –)
buttons, a pip tone is emitted.
To mute the pip tone, while pressing the A.C.BASS button in Stop mode or during playback,
press the P.MODE button. “BEEP OFF” appears on the remote control display.
To resume the pip tone, do the same operation again. “BEEP ON” will appear on the display.
Using the Minidisc Player with Optional Accessories
Using the minidisc player with an audio system
You can listen to MDs through your audio system.
• After turning off the amplifier, plug a stereo connection cable (not supplied) into the head-
phones jack as shown below.
• Adjust the volume of the minidisc player to an appropriate level.
• Adjust the volume level on the amplifier.
• Use the unit's buttons for operation. (The remote control will issue a Pip tone.)
• Direct connection without passing through the remote control may generate noise.
• Depending on the connected device, the sound may not be as loud as the sound from other
sources. This is because the sound level has been adjusted for the headphones and is not a
malfunction.
Using the minidisc player with a car audio system
You can listen to an MD through your car audio system. The following accessories are avail-
able for your car audio system.
• Car audio cassette adaptor
CAUTION:
• Connect the car audio cassette adaptor to the remote control headphone jack.
The other end connects to the cassette slot of your car.
• Adjust the volume level of the unit to an appropriate level.
EN, CH
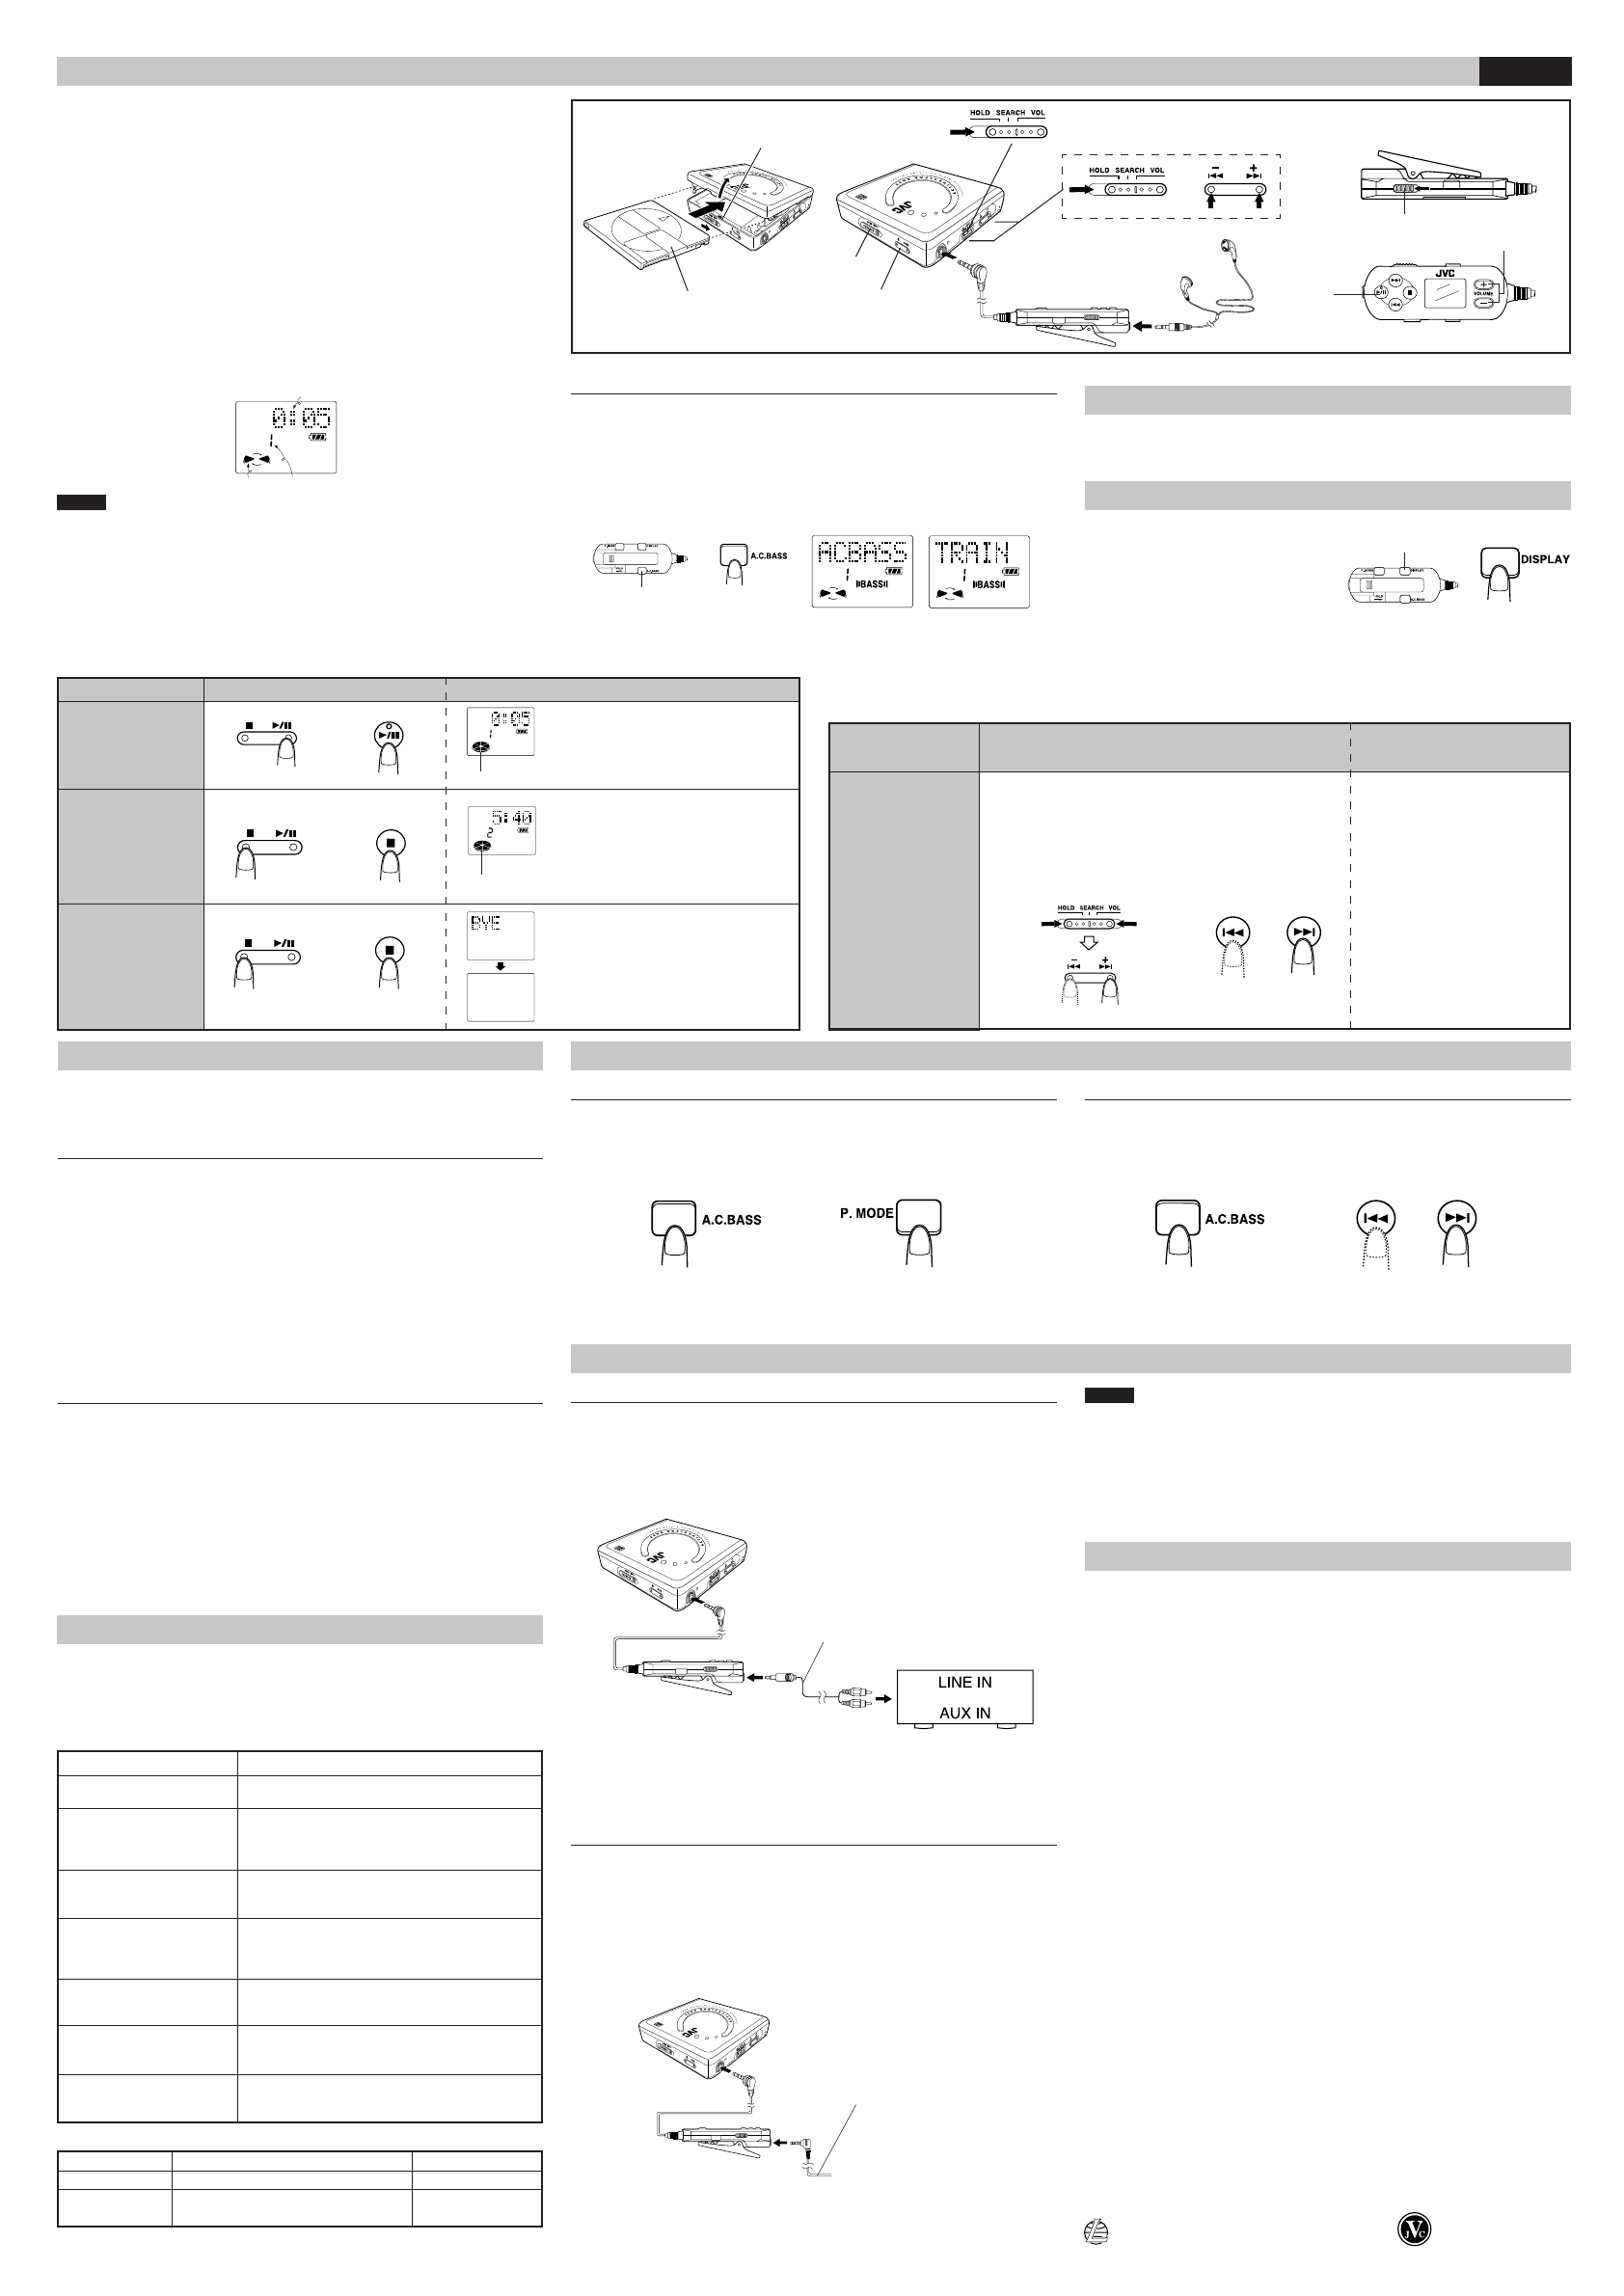
Normal Play
Follow the numbers in the figure to the right.
1
Connect the headphones plug firmly.
2
Connect the remote control plug firmly.
3
Make sure the switches on the unit and remote control are not on
HOLD setting.
4
Load an MD.
• Slide the OPEN switch to open the lid.
• Open the lid by hand.
• Insert the MD into the MD slot beneath the lid, with its label side facing up. Insert the
MD until it stops. Be sure the % or ] mark on the MD aligns as shown in the figure.
• Close the lid.
“HELLO” appears on the remote control display. Then the track number and playback time appear.
5
Adjust the volume level between 0 and 25.
Press the Volume (+, –) button on the unit or the remote control.
6
Press the 3/8 button.
Playback starts from the first track and ends after playing all the tracks on the MD.
Notes:
• Insert the MD in the way that it will not touch the catch. If the catch is bent for some reason,
the lid may not be closed properly.
• When opening the lid, please hold it by the edge when an MD is already loaded.
• If no MD is loaded, “No Disc” appears on the display, and the power will automatically shut
off after approx. 10 seconds.
• If the MD is recorded in Monaural mode, “MONO” will appear on the display.
• To eject the MD, slide the OPEN switch and open the lid by hand. The MD will then come out.
• When the remote control is connected, the power may automatically turn on. However, if
left as it is, it will eventually turn off automatically.
• This MD Player has a 40 second sound-skip-guard memory function to accomodate any
shocks. Consequently, it can be used while walking.
ENGLISH
Resume Play
This function allows you to listen from the beginning of the track on which play was stopped
when the minidisc player was set to Stop mode.
Press the 3/8 button.
Showing the Disc Information
Each time you press the DISPLAY button while in
Stop mode or during playback, the MD's information
is displayed as follows.
In Stop mode:
Disc title* = Total number of tracks and total playback time of the MD = Track title* = Play-
back time = (back to the beginning)
During Playback:
Playing time = Track title* = (back to the beginning)
*The disc title or track title will scroll if it consists of 7 characters or more. If no title is given,
“~” appears on the display. (Up to 80 characters can be displayed.)
The disc indicator rotates Number of tracks being played
Playing time
[Unit]
[Remote control]
6
Amplifier
or
Changing the display character contrast
The character display contrast can be adjusted when the characters become less clear due to
ambient temperature or during scrolling.
While pressing the A.C.BASS button in Stop mode or during playback, press the SEARCH button.
Adjustment can be made between LCD00 and LCD15. While the SEARCH button is pressed,
the contrast will be changed continuously. The initial setting is "LCD10."
Contrast is up
Contrast is down
[Remote control][Unit]
A.C. BASS button
Reinforcing the Bass Sound (A.C.BASS)
Press the A.C.BASS button to activate the active clear bass function.
The "BASS" indicator appears on the remote control display. The bass level is now automati-
cally controlled in conjunction with the sound volume.
Each time you press the A.C.BASS button the playmode changes as follows:
A.C.BASS = TRAIN* = OFF
* TRAIN mode reduces the amount of sound leaking from the headphone.
4
3
1
MD Messages:
Messages Meaning Action
DISC ERROR There is a problem (damage) with the disc. Replace the disc.
READ ERROR Cannot read data.
Remove the MD and
reinsert it.
In play mode, press for 1 second or more.
The power is shut off after “BYE” appears
on the display.
To turn on the unit, press the 3/8 button.
or
[Unit]
[Remote control]
3
5
4
2
0600MNMCREOZK
Stops
6
Catch
Put the labeled side up.
5
DISPLAY button
Press during play.
Press again to restart play.
If paased for 2 minutes, the power will auto-
matically shut off.
or
[Remote control]
[Unit]
Blinks
Fast forward/
Reverse
To stop play
(Stop mode)
To turn off the unit
(Off mode)
To pause play
Operation
Button
Stereo connection
cable (not supplied)
Car audio cassette
adaptor (3.5 mm dia.
stereo plug)
(Blank)
Notes:
• Since the insertion direction of the car audio cassette adaptor is limited, be sure that it can be
inserted into the cassette slot of your car audio system.
•
Depending on the vehicle used, noise may occur. In this case, it is recommended to connect a noise
filter (available on the market) between the remote control and the car audio cassette adaptor.
• If your car audio system is equipped with a LINE IN or AUX IN jack, you can connect the
output of the remote control to the jack using a stereo mini plug signal cord (not supplied).
In this case, you do not need the optional car audio cassette adaptor.
XM-PX3[UB]_Eng.p65 6/21/00, 2:03 PM2