9
Getting Started
English
Installing the Equipment on the Wall
The Center Unit and Speakers can be attached to a wall.
CAUTIONS:
Attachment to a wall
• The Center Unit weighs approximately 4.3 kg. When its buttons are operated, an additional force will be
applied to it in the downward direction. Therefore, sufficient care must be taken when attaching to a wall
to prevent any accidents caused by the Center Unit’s falling off the wall.
• Before attaching the Center Unit to the wall, check the wall and other related aspects, and verify whether
the strength of the wall will be sufficient not only to support the weight of the Center Unit itself but also
to withstand the additional downward force which will be applied to it during operation. (Do not attach
the Center Unit to a plywood or plasterboard wall. The Center Unit may fall and sustain damage as a re-
sult.) If you do not know the strength of the wall and other aspects, consult a qualified service person
(such as a qualified constructor).
• The screws needed for attachment are not supplied. Use screws which are compatible with the strength
and material of the pillar or wall.
• When attaching the Center Unit, the screws must be secured tightly in all three locations. Attaching the
Center Unit to the wall by making only one or two holes for the screws makes for an unstable attachment
and causes a safety hazard as the Center Unit may fall down.
Location of attachment to a wall
• Care is required in selecting a location for attaching the Center Unit to the wall. Injury to personnel, or
damage to the Center Unit, may result if the Center Unit is attached in a location which interferes with
daily activities or a location that the users are liable to knock their bodies or heads against.
• Avoid a location above a bed, sofa, water tank, sink, etc. or in a passage.
Example of attachment (Center Unit)
The procedure below is intended merely to illustrate how the
Center Unit can be attached to a wall and does not make any
guarantees for safety while using the Center Unit on a wall.
Take into account such factors as the material and strength of
the wall, the status of the reinforcing material, and the possible
changes that will take place over time.
• The cords must be connected to the Center Unit before
attaching to a wall. (See page 4.)
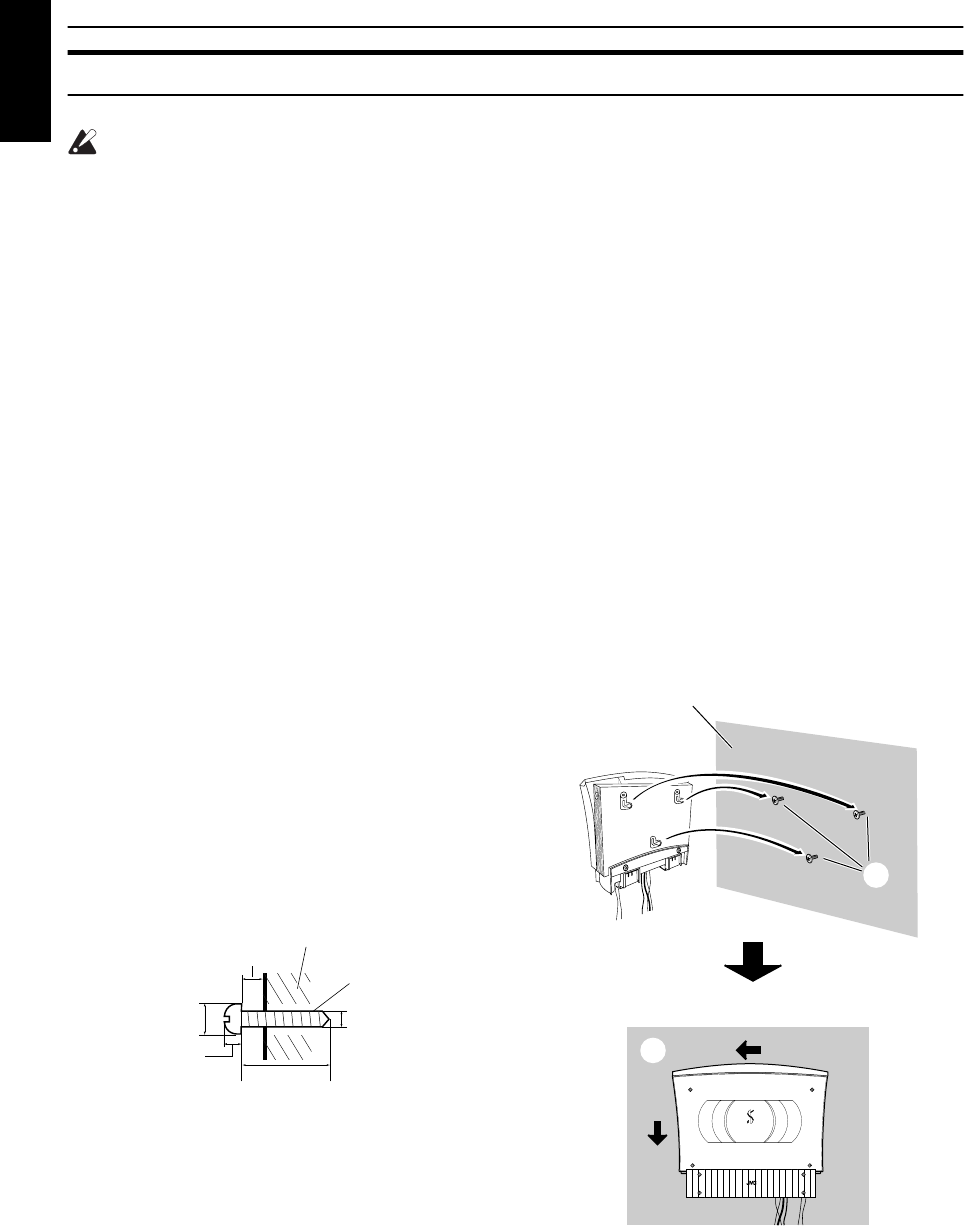
1. Select the place where the Center Unit is to be attached.
2. Mount three screws (not supplied) on the wall. (See the dia-
gram below for the details of the size.)
• The supplied paper pattern will assist in determining the
positions of the screws.
3. Hook the Center Unit onto the attached screws.
4. Slide the Center Unit to the side, and secure it.
• Adjust the screws if the Center Unit is not attached firmly.
COMPACT COMPONENT SYSTEM
4
1
2
3
Slide to left, then down.
6 - 9 mm
6 - 7 mm
3 mm
20 - 30 mm
Within 3 mm
Screw (not supplied)
Wall
VS-DT6-8[UW-UY]_EN_1.fm Page 9 Tuesday, March 12, 2002 5:22 PM


