


Microsoft and Windows Media are either registered trademarks or trademarks of Microsoft Corporation in the
United States and/or other countries.
“Made for iPod,” “Made for iPhone,” and “Made for iPad” mean that an electronic accessory has been designed to
connect specifically to iPod, iPhone, or iPad, respectively, and has been certified by the developer to meet Apple
performance standards. Apple is not responsible for the operation of this device or its compliance with safety
and regulatory standards. Please note that the use of this accessory with iPod, iPhone, or iPad may affect wireless
performance.
iPhone, iPod, iPod classic, iPod nano, and iPod touch are trademarks of Apple Inc., registered in the U.S. and other
countries. iPad is a trademark of Apple Inc.
•
•
•
2
Recording operations (only for UX-VJ5)Playback operations
Playback operations
Searching for stations
Playback operation
Playback operation
Basic playback operations
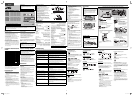
STANDBY/TIMER lamp
Turning on/off the power
The STANDBY/TIMER lamp lights
in red while the System is on
standby.
•
Selecting the source
For UX-VJ5:
For UX-VJ3:
Adjusting the volume
To mute the volume in a
moment, press MUTING.
“MUTING” flashes on the
display.
To restore the volume, press
MUTING again or adjust the
volume level.
•
−
−
DO NOT turn off the System with the volume set
to an extremely high level; otherwise, the sudden
blast of sound may damage your hearing, speakers,
and headphones when you turn on the System or start
playback.
Initial setting:
Set the clock before using the System (see
“Setting the clock” on page 1).
Display
Remote sensor
Using the headphones
Be sure to turn down the volume before
connecting or putting on the headphones.
•
Stereo mini plug cord (not
supplied)
Presetting stations
You can preset up to 30 FM stations and 15 AM
stations.
While listening to a target station...
1 Display the preset channel setting screen.
2 Select a preset number, then store the station.
Tuning in to a preset station
Receiving FM stations with Radio Data
System (Europe only)
Radio Data System allows FM stations to send an
additional signal along with their regular program
signals.
If you want to know more about Radio Data System,
visit <http://www.rds.org.uk>.
To display the Radio Data System information
PS Commonly known station names.
PTY Types of broadcast programs.
RT Text messages the station sends.
“NO PS,” “NO PTY,” or “NO RT” appears on the display
if no relevant signals are sent by a station.
When a Radio Data System signal is not received, the
frequency is displayed.
PTY search (Europe only)
You can search for a program from the preset stations
by specifying PTY code.
While listening to a station...
1
2 Select a PTY code, then start searching.
“SEARCH” flashes on the display. When the System
finds the one you have selected, that station is
tuned in.
To stop searching, press MENU/CANCEL.
If no program is found, “NO FOUND” appears.
•
•
•
•
•
(Hold)
(Monaural mode) (Canceled)
Frequency Clock
Menu operations
To display the menu/to go back to the previous
menu
To select an item on the menu
Notes:
Operate iPod touch, iPhone or iPad itself in the
following cases:
When operating the home button.
When selecting application icons on the home
screen.
When dragging the slider.
Sound distortion may occur when playing back
audio sources with high recording levels. If distortion
occurs, it is recommended to turn off the equalizer
of iPod/iPhone/iPad. For information on operating
iPod/iPhone/iPad, see the instruction manual for
iPod/iPhone/iPad.
•
−
−
−
•
(Hold)
(Hold)
Connecting iPod/iPhone
Connecting iPad
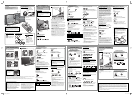
Disc/USB deviceDisc/USB device
Inserting a disc
Before opening the slide door, disconnect the
iPad.
If you try to open the slide door with the iPad
connected, “NO OPE” appears on the display and
the door does not open.
•
On the main unit:
1 Open the slide door.
2 Insert a disc.
3 Close the slide door.
Prohibiting disc ejection
You can lock the slide door.
While the System is on standby...
On the main unit:
Disc playback is available only for UX-VJ5.
USB playback is not available for UX-VJ3 USA
and Canadian models.
•
•
Memorizing the stopped track (Resume
Play)
By activating Resume play, when you restart playback
after playback has been stopped, it starts from the
beginning of the stored track.
When Resume Play is activated, “RESUME” appears on the
display while playback is stopped.
To clear the stored position...
Press 7 twice.
Open the slide door.
Disconnect the USB mass storage class device.
This function cannot be used for Program Play.
Repeat Play*
1
RPT1 Repeats the current track.
RPT GR*
2
Repeats the current group.
RPT ALL Repeats all contents or programmed tracks.
RPT OFF Cancels repeat play.
Random Play*
1
While playback is stopped...
1
2 Press CD 6 or USB 6 to start random play.
•
−
−
−
•
Program Play*
1
While playback is stopped...
1 Display the program entry screen.
2 Select a track number (up to 32 tracks).
To cancel a current program entry, press MENU/
CANCEL.
To cancel all program entries, press and hold MENU/
CANCEL.
If you try to program a 33rd track, “PGM FULL” appears
and the track cannot be stored.
3 Press CD 6 or USB 6 to start program play.
To check the programmed contents, press UP or DOWN
repeatedly while playback is stopped.
To exit Program Play, press PROGRAM while playback is
stopped. “NORMAL” appears on the display.
The stored program is erased.
*
1
These playback modes are canceled in the following
cases:
When the System is turned off.
When the source is changed.
When the slide door is open with “CD” selected as the
source.
When a USB mass storage class device is
disconnected with “USB” selected as the source.
*
2
Appears only for MP3/WMA files.
•
•
•
•
•
−
−
−
−
−
Connecting a USB device
Notes on USB mass storage class device connection
Connect a USB mass storage class device when the
System is turned off to prevent malfunction.
Do not use a USB hub.
When connecting with a USB cable, use a USB 2.0 cable
whose length is less than 1 m.
The USB mass storage class device is charged through
the USB MEMORY ( ) terminal when “CD” or “USB” is
selected as the source.
You cannot connect a computer to the USB MEMORY
( ) terminal of the System.
Electrostatic shock at connecting a USB mass storage
class device may cause abnormal playback of the device.
In this case, disconnect the USB mass storage class
device then reset the System and the USB mass storage
class device.
While playing back or recording a file onto a USB mass
storage class device, do not disconnect the device.
Doing so may cause malfunction on both the System
and the device.
JVC bears no responsibility for any loss of data in USB
mass storage class device while using this System.
•
•
•
•
•
•
•
•
To play back/pause
For discs:
For USB devices:
To open/close the slide door
(On the main unit)
To select a track
To fast-reverse/fast-forward a track
Each time you press the button, the search speed
changes as follows: ×2 = ×4 = ×8 = ×20.
To stop fast-reversing/fast-forwarding, press CD 6
or USB 6.
To select a group
To stop playback
•
•
(Program entry
mode)
(Canceled)
(Activated) (Canceled)
(Activated) (Canceled)
USB mass storage
class device
Before you start recording
It should be noted that it may be unlawful to
re-record pre-recorded tapes, records, or discs
without the consent of the owner of copyright
for the sound or video recording, broadcast or
cable program and for any literary, dramatic,
musical, or artistic work embodied therein.
The use of the files recorded on a USB device
with this System, except for personal use, is
prohibited. Transferring or selling the files you
recorded violates the copyright law and may
subject you to civil and criminal penalties for
copyright infringement.
Volume and sound adjustments do not affect
recordings.
Random Play and Repeat Play are canceled during
recording.
Tracks which are recorded onto a USB mass storage
class device will be converted into MP3 format (at a
bit rate of 192 kbps).
Recording does not start while “READING” is shown
on the display.
You cannot record tracks to the root directory of the
USB mass storage class device.
Recording from a disc
You can record tracks from a CD to a USB mass
storage class device.
Before recording, connect a recordable USB mass
storage class device to the USB MEMORY ( )
terminal.
While the playback of the disc is stopped...
1 Select the first track to record.
2
The REC indicator flashes.
3 Start recording.
Do not move the System while recording. It may
damage the recorded tracks.
The System automatically creates the new group.
When playback ends, recording automatically stops.
To stop recording manually, press 7.
To record a single track, press CD3USB REC during
playback of the track or while it is paused.
If “NO REC” appears on the display when you try to
record a track, the System cannot record that track.
•
•
•
•
•
•
•
•
•
•
•
•
Deleting files from a USB device
You can delete files on the connected USB mass
storage class device.
While playing a file on the USB mass storage class
device...
1 Select the track to delete.
2
“PUSH SET” flashes on the display.
To cancel deleting the file, press 7 or MENU/
CANCEL.
3 Start deleting.
“DELETE” appears on the display and the REC
indicator lights up while deleting the file.
When deleting is complete, “FINISH” appears on
the display.
•
•
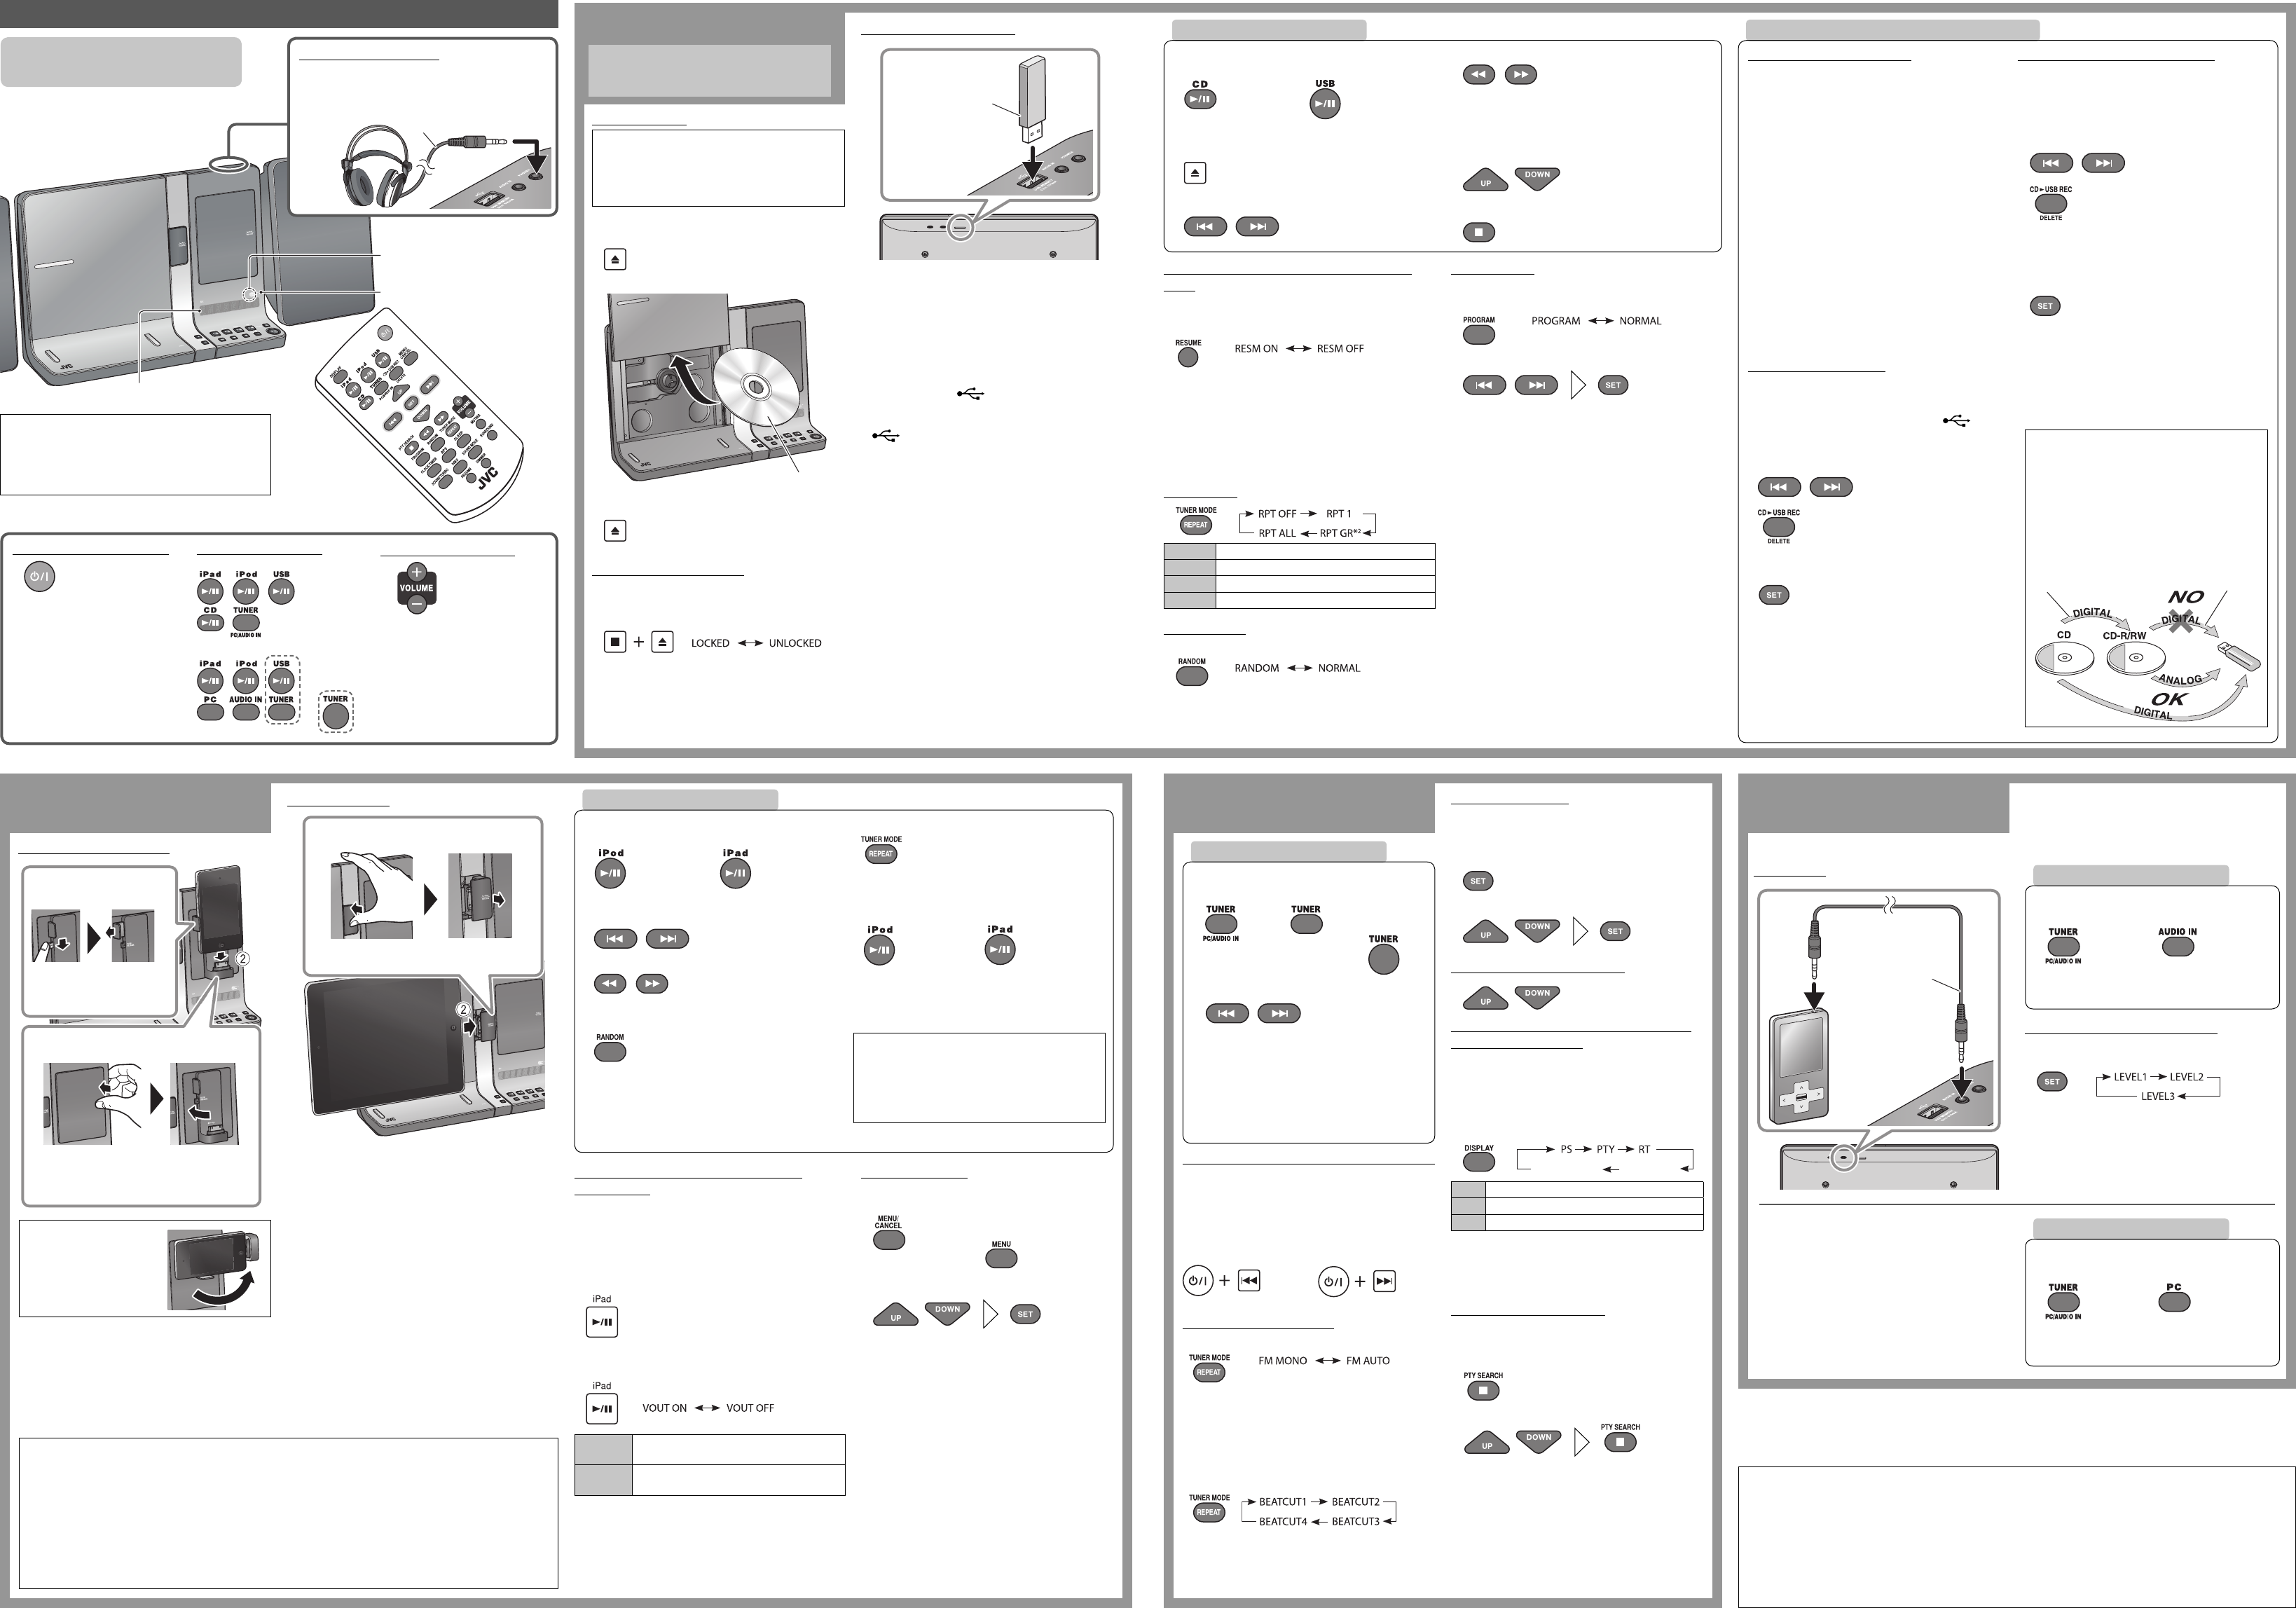
Audio player
Connection
❍
Stereo mini plug cord
(not supplied)
1st generation
2nd generation
About SCMS (Serial Copy Management
System)
The System uses the Serial Copy Management
System which allows only first-generation digital
copies to be made of premastered software such
as regular CDs.
If you try to record from a duplicated CD-R or
CD-RW to a USB
mass storage class device,
“PROTECT” appears on the display.
Label side
(Hold)
(Locked) (Canceled)
iPod/iPhone/iPadiPod/iPhone/iPad
To play back/pause
For iPod/iPhone:
For iPad:
You can also pause playback by pressing 7.
To select a track
To fast-reverse/fast-forward a track
To select random playback
“SHUFFLE” appears on the display.
If you hold RANDOM when both iPod/iPhone
and iPad are connected to the System, “DUAL SFL”
appears on the display and Random Play applies to
both iPod/iPhone and iPad devices.
•
•
To play back repeatedly
“REPEAT” appears on the display.
To put iPod/iPhone/iPad in sleep mode
For iPod/iPhone:
(Hold)
For iPad:
(Hold)
Information shown on the display of iPod/iPhone/
iPad differs depending on the model.
NOTE:
Headphones cannot be used for playing back
iPod/iPhone/iPad. No sound is heard if headphones
are connected.
When the headphones are connected, “HP MUTE”
appears on the display.
•
•
Setting the video output of the iPod/
iPhone/iPad
Before playing a video, select the appropriate video
output to view a video/picture on the monitor or the
iPod/iPhone/iPad.
While the System is on standby...
On the main unit:
1 Display the video output setting screen.
2 Select the video output.
VOUT ON
Displays video/picture on the connected
monitor.
VOUT OFF
Displays video/picture on the iPod/iPhone/
iPad.
FM/AM radioFM/AM radio
When you connect iPod/iPhone/iPad to the dock, “CONNECT” appears on the display first, followed by “READING”
and then “SUCCESS.” You can play iPod/iPhone/iPad when “SUCCESS” appears.
If iPod/iPhone/iPad is not connected properly, “AUTH ERR” appears. Connect the iPod/iPhone/iPad again.
•
−
1 Select the band (“FM” or “AM”).
For UX-VJ5: For UX-VJ3:
(Press repeatedly)
For UX-VJ3 USA and
Canadian models
2 Search for a station.
The station search stops when a station of
sufficient signal strength is found.
To manually stop the search, press 4 or
¢.
When you press 4 or ¢ repeatedly, the
frequency changes step by step.
•
•
Selecting AM interval spacing (Asia only)
Before operating the tuner, select the appropriate AM
tuner interval spacing (9 kHz or 10 kHz) used in your
residential area.
While the System is on standby...
On the main unit:
To select 9 kHz:
To select 10 kHz:
Improving the reception
If the FM reception is poor
When the monaural mode is activated, the reception
is improved. However, the stereo effect is lost.
To restore the stereo effect, press TUNER MODE
again to select “FM AUTO.”
If beat noise is heard while listening to AM station
Select the appropriate AM beat-cut mode.
If you change to another station, this setting is
automatically canceled.
•
•
•
External componentExternal component
1 Select “AUDIO IN” as the source.
For UX-VJ5:
(Press repeatedly)
For UX-VJ3:
2 Start playback of the external device.
Adjusting the audio input level
You can change the audio input level through the
AUDIO IN jack.
The maximum audio input level is “LEVEL3.”•
1 Select “PC” as the source.
For UX-VJ5:
(Press repeatedly)
For UX-VJ3:
2 Start playback on the connected computer.
Digital audio sources from a
computer
For connection, see “To connect a computer” on
page 1.
❍
•
To connect iPod/iPhone
horizontally
Rotate the iPod/iPhone dock
after connection.
1 Reveal the iPod/iPhone dock.
To hide the dock, press and rotate it back.
Make sure that the support arm is fully
pressed in.
•
−
1 Reveal the iPad dock.
To hide the dock, press it until it clicks.•
To pop out the support arm
Press the support arm until
it fits to the iPod/iPhone.
•
Notes on iPod/iPhone/iPad connection
Be sure to connect or disconnect the iPod/iPhone/
iPad only when the System is on standby or turned
off.
Be sure to reduce the volume on the System to the
minimum level before connecting iPod/iPhone/iPad.
Adjust the volume after starting playback.
Do not carry the System with iPod/iPhone/iPad
connected. It might cause damage to the dock or
you might drop the iPod/iPhone/iPad.
•
•
•
Do not touch or hit the iPod/iPhone/iPad terminal
pins or connector pins in the dock for iPod/iPhone/
iPad directly. Doing so might cause damage to the
connector pins.
When the iPod/iPhone/iPad is not in use, it is
recommended to disconnect the iPod/iPhone/iPad,
then close the dock cover to protect the dock.
You may not be able to connect an iPod/iPhone/iPad
with a case depending on the product.
•
•
•
For USA and
Canadian
models
For UX-VJ3 USA and
Canadian models
EN_UX-VJ3_5_Sheet.indd 2EN_UX-VJ3_5_Sheet.indd 2 11.6.10 11:45:23 AM11.6.10 11:45:23 AM