


2
1
2
Start playback of the external device.
Selecting the AM tuner interval
Before operating the tuner, select the appropriate AM
tuner interval used in your residential area.
1
2
Select the AM tuner interval.
(On the main unit)
Each time you press and hold 7, the interval switches
between 9 kHz and 10 kHz alternately.
Presetting stations
You can preset up to 30 FM and 15 AM stations.
While listening to a target station...
1
2
Select a preset number.
To select a number, see “How to select a number
using the remote control” on page 3.
3
•
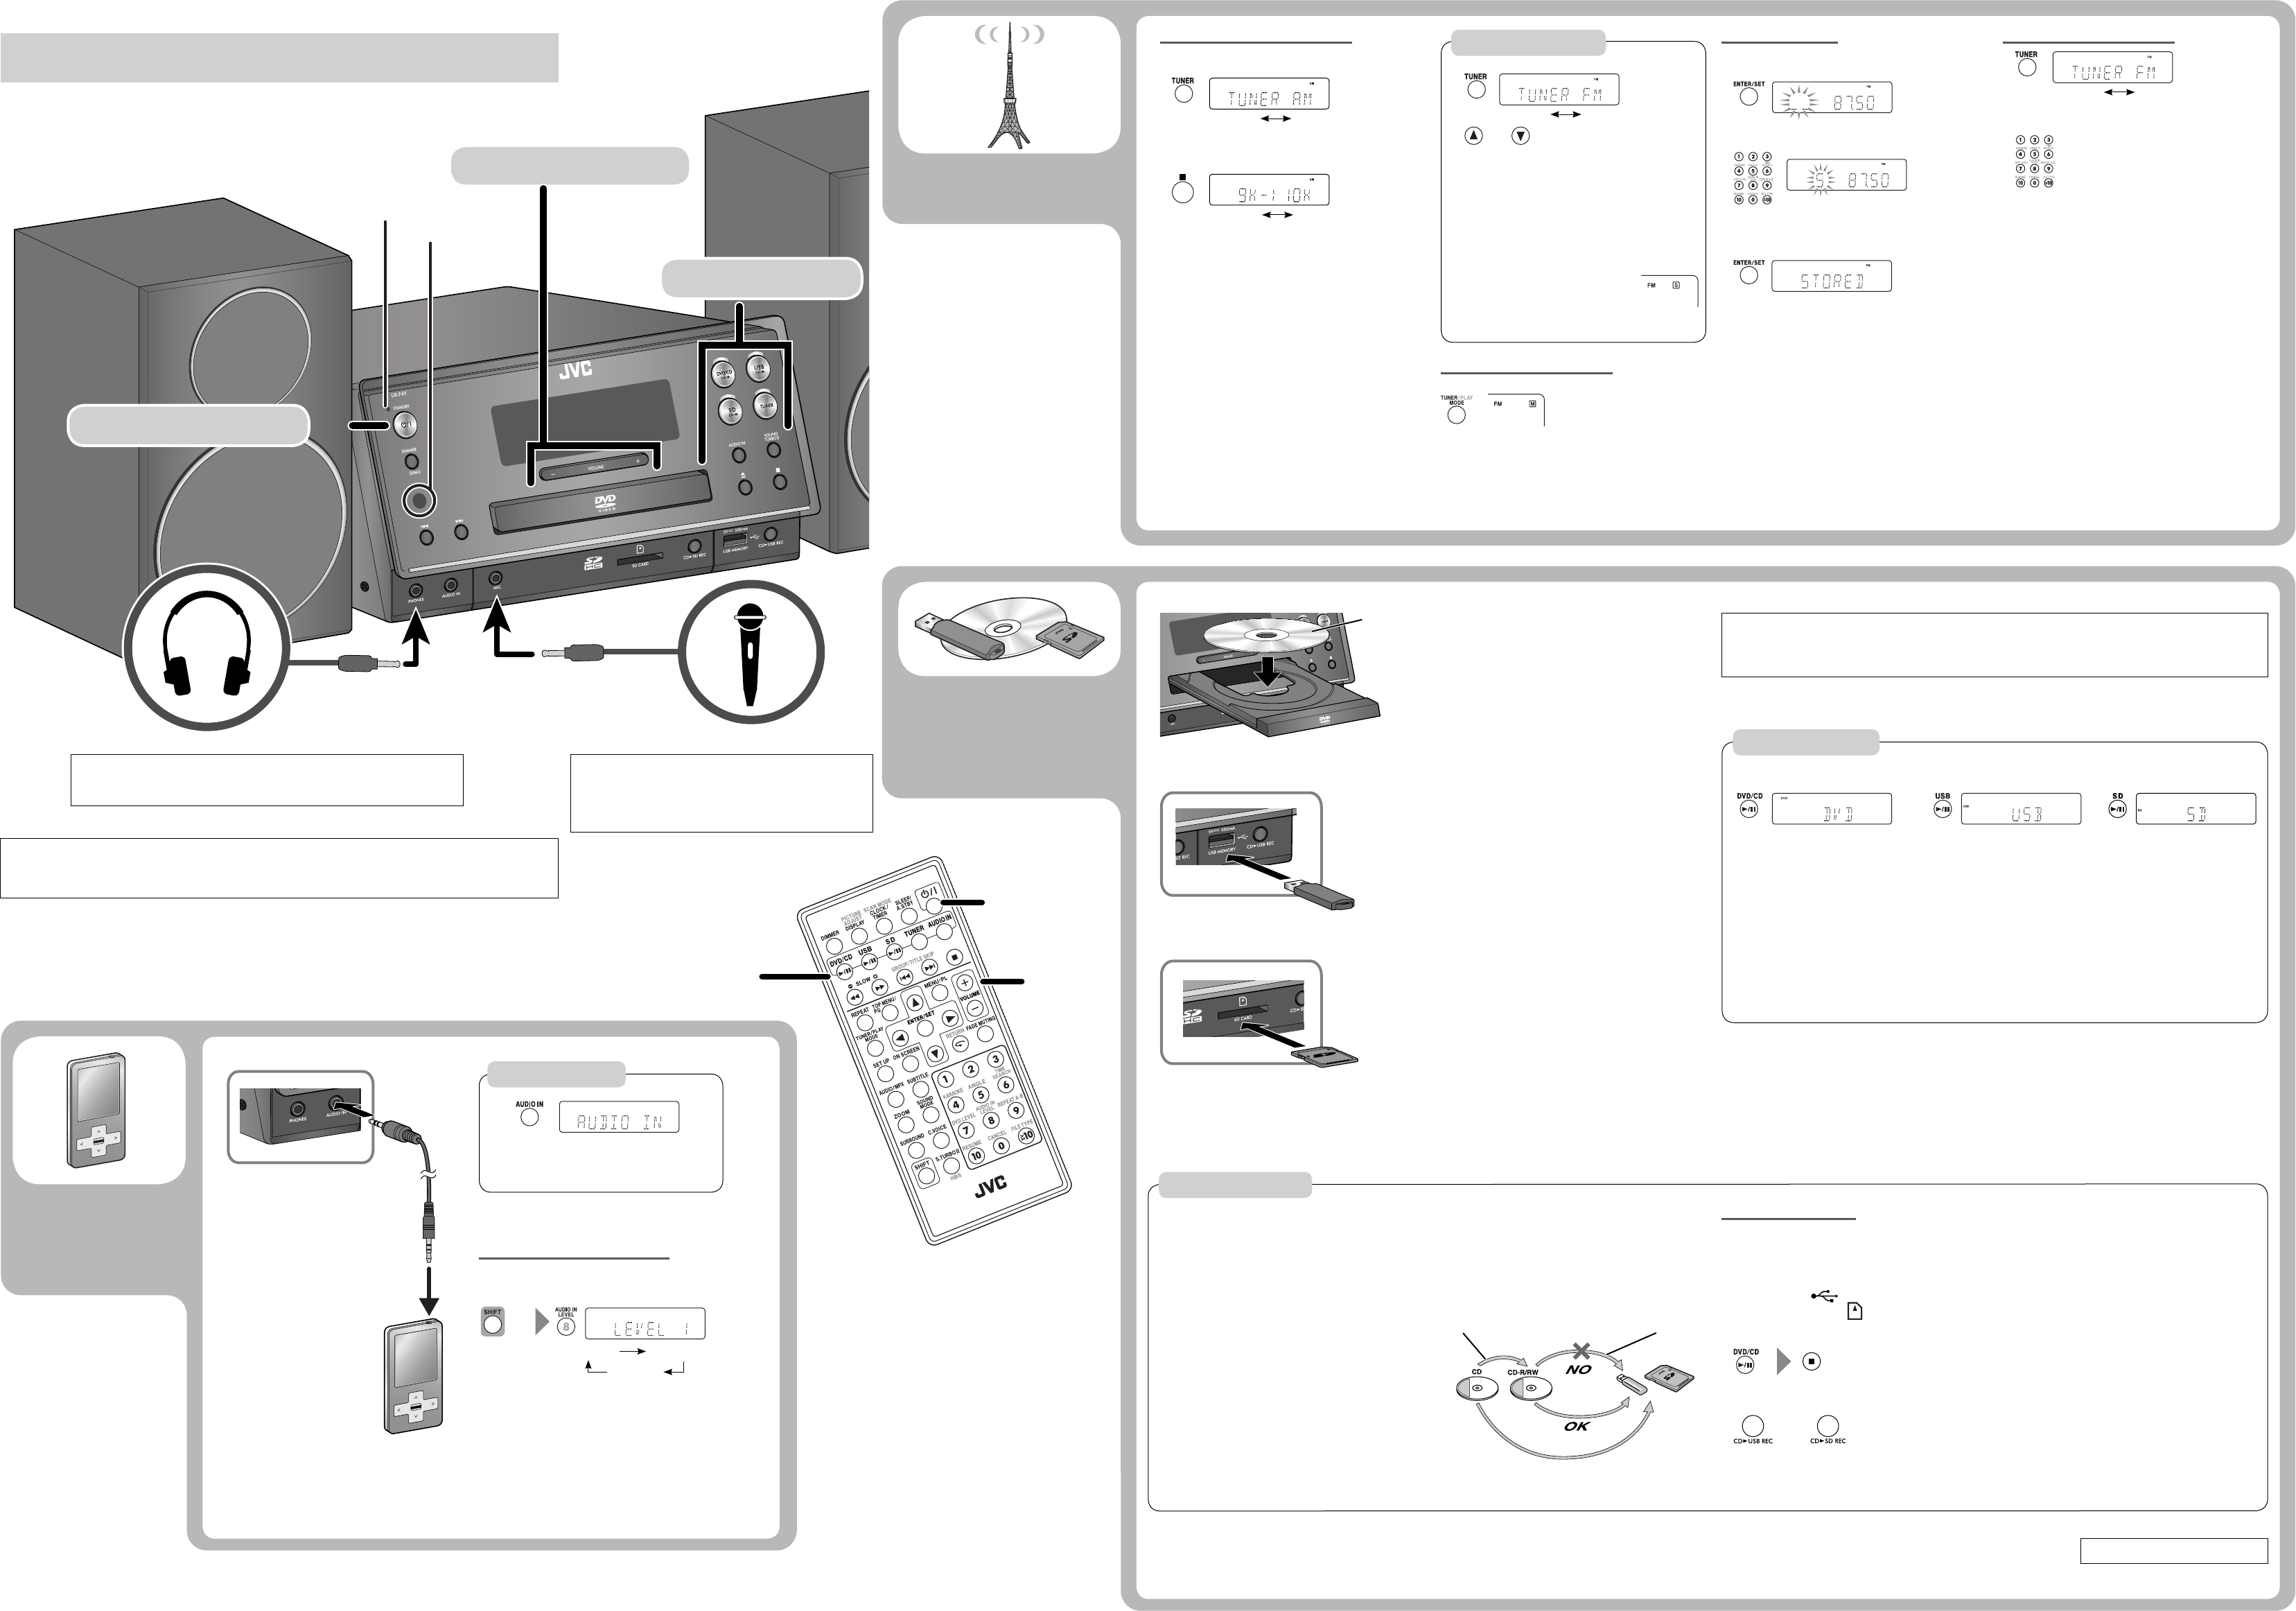
Stereo mini plug cord
(not supplied)
Headphones (not supplied)
USB mass storage
class device
DO NOT turn off the System with the volume set to an extremely high level; otherwise,
the sudden blast of sound may damage your hearing, speakers, and headphones when you
turn on the System or start playback.
22
33
11
11
22
33
Remote sensor
Adjust the volume.
Turn on the power.
Select a source.
Basic operation
Searching for stations
Radio
Disc/USB/
SD
The station search stops when a station of sufficient
signal strength is found.
To manually stop the search, press 5 or ∞.
When you press 5 or ∞ repeatedly, the frequency
changes step by step.
You can use ¢ or 4 on the main unit instead of
5 or ∞ on the remote control.
When an FM program is broadcast in
stereo, the S (stereo) indicator lights
up.
•
•
•
•
External
device
Improving the FM reception
To improve the FM reception
When the monaural mode is activated, the reception is
improved. However, the stereo effect is lost.
To restore the stereo effect, press TUNER MODE again.
•
•
Stereo mini plug cord
(not supplied)
The HP indicator lights up when headphones are connected to the System.
Be sure to turn down the volume before connecting or putting on the
headphones.
•
STANDBY lamp
SD card
Recording operations
Before you start recording
It may be unlawful to record or play back
copyrighted material without the consent of the
copyright owner.
The volume and sound adjustments (see “Basic
operation,” pages 3, and 4) do not affect recordings.
Random Play and Repeat mode are canceled during
recording.
You can record up to 99 tracks per group onto a USB
mass storage class device or SD card.
Tracks which are recorded onto a USB mass storage
class device or SD card will be converted into MP3
format.
Recording does not start while “READING” is shown on
the display.
You cannot record tracks in the root.
•
•
•
•
•
•
•
Do not vibrate the System while recording. It may
damage the recorded tracks.
The System automatically creates the new group.
When playback ends, recording automatically stops.
To stop recording manually, press 7.
To record a single track, press CD3USB REC or
CD3SD REC on the main unit during playback of the
track.
To record tracks in the programmed order, turn
on Resume Play before you start Program Play.
(For details of Program Play and Resume Play, see
“Advanced playback operations” on page 3.)
If “NO REC” appears on the display when you try to
record a track, the System cannot record that track.
•
•
•
•
•
•
•
Recording from a Disc
You can record tracks from a CD to a USB mass storage
class device or SD card.
Before recording....
Connect a recordable USB mass storage class device to
the USB MEMORY ( ) terminal or insert a recordable
SD card into the SD CARD ( )slot.
1 Start and stop playback of the disc.
2 Start recording.
(On the main unit)
The USB REC or SD REC indicator starts flashing.
For advanced operations, see page 3.
Label side
Preset number
Notes on USB mass storage class device connection
Connect a USB mass storage class device when the
System is turned off to prevent malfunction.
Do not use a USB hub.
When connecting with a USB cable, use a USB 2.0 cable
whose length is less than 1 m.
The USB mass storage class device is charged through
the USB MEMORY terminal when the System is turned
on. (Some USB mass storage class devices may be
charged through the USB MEMORY terminal only when
“USB” is selected as the source.)
You cannot connect a computer to the USB MEMORY
terminal of the System.
Electrostatic shock at connecting a USB mass storage
class device may cause abnormal playback of the
device. In this case, disconnect the USB mass storage
class device then reset the System and the USB mass
storage class device.
While playing back or recording a file onto a USB mass
storage class device, do not disconnect the device.
Doing so may cause malfunction on both the System
and the device.
Notes on SD card insertion
DO NOT insert any object other than an SD card into
the insertion slot.
DO NOT use a cracked or deformed SD card.
Make sure that SD card playback has stopped before
removing the SD card. Otherwise, the data may be
damaged.
Never insert an SD card upside down. Otherwise, it will
not be able to be removed.
When you play a miniSD™ card, be sure to attach the
miniSD™ adaptor to the card before insertion.
SD cards initialised by computer may not be
compatible.
You can use an SD card of up to 32 GB.
Do not remove the SD card while recording. It may
cause malfunction.
•
•
•
•
•
•
•
•
•
•
•
•
•
•
•
To open the disc tray
Press 0 on the main unit.
To select a chapter/track
Press ¢ or 4.
To locate a particular section
Press ¡ or 1 repeatedly during playback.
Each time you press ¡ or 1, the search speed
changes as follows.
FORWARD × 2, × 4, × 8, × 20
BACKWARD × 2, × 4, × 8, × 20
To return to normal playback, press DVD/CD 6,
USB 6, or SD 6.
•
–
–
•
Playback operations
Before playing back a disc/file:
Turn on the TV and select an appropriate input mode on the TV to view the picture or on-screen display.
For disc/file playback, you can change the initial setting to your preference. See “Setup menu operations of the
System” on page 4.
•
•
To locate an item directly
Press a number button.
To select a number, see “How to select a number using
the remote control” on page 3.
To select a group/title
Press GROUP/TITLE SKIP ¢ or
GROUP/TITLE SKIP 4 while holding SHIFT.
To stop playback
Press 7.
•
To play back/pause a disc To play back/pause a USB mass
storage class device
To play back/pause an SD card
Playback operation
Adjusting the audio input level
You can change the audio input level through the AUDIO
IN jack.
The playback sound is the maximum when you select
LEVEL3.
•
(While holding...)
LEVEL1 LEVEL2
LEVEL3
1
(Hold)
2
(Hold)
Tuning in to a preset station
1
2
Select a preset number.
To select a number, see “How to select a number
using the remote control” on page 3.
•
Monaural mini plug cord
(not supplied)
The MIC indicator lights up when a microphone is connected
to the System.
Set “MIC VOL” to “0” when connecting or disconnecting the
microphone (see “Singing a song in Karaoke” in “Karaoke
operations” on page 3).
•
Microphone (not supplied)
TUNER FM TUNER AM
TUNER FM TUNER AM
About SCMS (Serial Copy Management System)
The System uses the Serial Copy Management System
which allows only first-generation digital copies to be
made of premastered software such as regular CDs.
If you try to record from a duplicated CD-R or CD-RW to
a USB mass storage class device or SD card, “SCMS VLT”
appears on the display.
or
TUNER FM TUNER AM
(Hold)
10K --> 9K9K --> 10K
1st generation
2nd generation
DIGITAL
DIGITAL
DIGITAL
ANALOG
EN_UXF4VB[USUXUGUW].indd 2EN_UXF4VB[USUXUGUW].indd 2 10.5.10 7:49:08 PM10.5.10 7:49:08 PM