


INPUT 2
TO MAIN
SPEAKERS
(HIGH-LEVEL)
(LOW-LEVEL)
RIGHT
RIGHT LEFT
RIGHT LEFT
LEFT/MONO
MAX
VOLUME
50Hz
200Hz
MIN
CANCEL
ON
ONOFF
REVERSE
NORMAL
FIXED
VARIABLE
INPUT 1
POWER
FREQUENCY
AUTO POWER ON/STANDBY
PHASE
CUT OFF FILTER
Å
Ç
ı
Ç
Î
‰
POWER
PHASE
AUTO POWER
ON/STANDBY
VOLUME
FREQUENCY
CUT OFF
FILTER
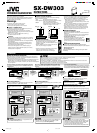
Front view
Rear view
Operations
If your amplifier is not provided with a
crossover frequency setting:
1 Press out the CUT OFF FILTER button to set it
to the — VARIABLE position.
Now the FREQUENCY knob is activated and you
can adjust the crossover frequency on this unit.
2 Turn the FREQUENCY knob to obtain the
best matching crossover frequency with
your main speakers.
Adjust the frequency (50 Hz to 200 Hz) while
listening to playback sound coming out of both
the main speakers and this unit.
• If your main speakers can reproduce the bass sound well,
adjust the frequency at a lower level.
• If you feel bass sounds are not sufficient, adjust the frequency
at a higher level.
Changing the Phase—PHASE Î
You can change the sound phase to match your preference.
Select either “NORMAL” or “REVERSE” to obtain a better bass
sound.
Press in or out the PHASE button to select either
the NORMAL position or the REVERSE position.
• NORMAL : Normally select this.
• REVERSE : Select this when you feel the bass sound is better
with this mode rather than with “NORMAL.”
Operating the Unit Automatically According to the
Incoming Signals—AUTO POWER ON/STANDBY ‰
By using this function, this unit automatically enters standby mode
even though the POWER switch is turned ON [ ❙ ].
Press the AUTO POWER ON/STANDBY
button to the — ON position.
• If no sound comes in for about 10 minutes, the unit automatically
enters standby mode. The power lamp lights in red. Then if the
unit detects incoming signals, this unit starts operating
automatically (the power lamp now lights in green).
If Auto Power On/Standby does not work
correctly (see “MEMO” below), press out the
AUTO POWER ON/STANDBY button to set it to
the _ CANCEL position. Auto Power On/
Standby is canceled.
When the volume level of the amplifier is so low or the
incoming signals are so weak that this unit cannot detect
sounds, Auto Power On/Standby may not work correctly.
• This unit may enter standby mode even though signals are
coming in.
• This unit may not start operating after entering standby
mode, even though signals start coming in.
200Hz
FREQUENCY
50Hz
REVERSE
NORMAL
PHASE
FIX
VARIABLE
CUT OFF FILTER
CANCEL
ON
AUTO POWER ON / STANDBY
Additional Information
Power
lamp
CANCEL
ON
AUTO POWER ON / STANDBY
Possible Cause
Is the unit pugged in?
Signals are too weak or volume
level is too low.
Is the VOLUME knob turned to the
MIN position?
Connections are incorrect, or loose.
Audio signals through the amplifier
are extremely weak.
The built-in protective circuit is
working.
The VOLUME knob on the rear is
set to a very high level.
The volume of the playback source
is too high.
Symptom
Power does not come on.
Auto Power On/Standby does not
function correctly.
No sound is heard.
Sounds fluctuate (suddenly become
loud or soft).
Suddenly no sound comes out.
—the power lamp lights in red.
Suddenly no sound comes out.
—the power lamp still lights in green.
Action
Plug the AC power cord firmly into the AC
outlet.
This is not a malfunction. If this happens, cancel
Auto Power On/Standby.
Turn the VOLUME knob until a suitable volume
is found.
Check the connections. If incorrect, redo the
corrections.
Increase the volume level on the amplifier.
Lower the volume level on the amplifier so that
the symptom will not occur.
Turn down the volume, then turn off and on this
unit.
Turn down the volume of the playback source,
turn off and on the source, then adjust the
volume properly on the source.
Troubleshooting
Use this chart to help you solve daily operational problems. If there is any problem you cannot solve,
contact your dealer.
Specifications
Type : Powered Subwoofer
Bass-reflex type, (magnetically shielded type)
Speaker unit : 16.0 cm cone (× 1)
Frequency range : 30 Hz to 200 Hz
Input impedance : 50 kΩ (LOW-LEVEL), 470 Ω (HIGH-LEVEL)
Input terminals : INPUT 1 (LOW-LEVEL), INPUT 2 (HIGH-LEVEL)
Power requirements : AC 110 V–240 V
, 50 Hz/60 Hz
Output power of built-in amp : 100 W (45 Hz, 4 Ω, 10 % THD)
Power consumption : 27 W
Dimensions : 217 mm (width) × 393 mm (height) × 376 mm (depth)
Mass : 9.2 kg
Accessories : Monaural audio cord (× 1), AC plug adaptor (× 1)
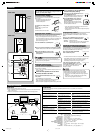
Speaker layout
To obtain the best possible sound from your unit:
—Place a subwoofer wherever you like since bass sound is non-directional. Normally
place it in front of you.
—Place all the main speakers at the same distance from the listening position.
Subwoofer
Left front
speaker
Right front
speaker
Center
speaker
Listening position
Left surround
speaker
Right surround
speaker
Turning On the Power—POWER Å
Press the ON [ ❙ ] portion of the POWER switch.
The main power turns on and the power lamp in the front panel
lights in green.
• The power lamp lights in red when the
Auto Power On/Standby places the
unit into standby mode.
To completely cut off the power to
this unit
Press the OFF [ ‡ ] portion of the
POWER switch.
This will disconnect the mains lead.
Adjusting the Volume—VOLUME ı
Adjust the volume output level through this unit while comparing
with the sounds coming out of the main (front) speakers.
• Once you have adjusted the volume output level of this unit, you
do not need to adjust it each time you use this unit. Adjusting the
volume level on the connected amplifier will also adjust the
volume level through this unit.
1
Turn the VOLUME knob to the MIN position.
2 Turn on the connected amplifier and start playing a source.
Playback sounds come out of the main (front) speakers and this unit.
3 Adjust the VOLUME knob to obtain a well-
balanced sound level with that of the main
(front) speakers.
If the volume is set at a high level before starting play, the
sudden blast of sound energy can permanently damage your
hearing and/or ruin your speakers.
Adjusting the Crossover Frequency
—CUT OFF FILTER and FREQUENCY Ç
You can adjust the crossover frequency to determine the bass
sound level this unit handles.
• Once it is set, only the sounds below the frequency come out of
the built-in speaker.
When the main speakers in use are JVC’s
SP-X103, SP-F303 or SX-XD33
Press in the CUT OFF FILTER button to set it to the
_ FIX position.
• The FREQUENCY knob is deactivated.
• When your amplifier is equipped with crossover frequency
setting, set it within the range of 100 Hz to 150 Hz.
•
When your amplifier is equipped with speaker size setting, select “small.”
MAX
VOLUME
MIN
FIX
VARIABLE
CUT OFF FILTER
MAX
VOLUME
MIN
The unit automatically accommodates AC power between
110V and 240V. You do not need any setting to match the
unit with your local power voltage.
SX-DW303_UJ.p65 03.5.2, 6:33 PM2