


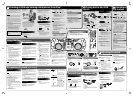
Load a disc or connect a USB device.
Listening to an external device
Before listening to an external device, connect
it properly to the unit.
Refer also to the instruction manual for an
external device.
1. Set the volume level of the unit to
minimum.
2. Connect an external device to the
AUDIO IN jack on the rear of the unit.
1. Press CD 6 or USB 6.
Starts reading the disc or USB device and
playback.
2. Adjust the volume.
To stop playback, Press 7.
To pause, press CD 6 or USB 6.
• To cancel pause, press 6 again.
Playback continues from the point
where it was paused.
To select a track, press 4 or ¢ .
• Press ¢ once to skip to the
beginning of the next track.
• Press 4 to skip to the beginning of
the track being played.
Press 4 twice quickly to skip to the
beginning of the previous track.
To locate a track directly, press number
buttons.
To fast forward/reverse, press and hold
4 or ¢ during playback.
To select a group (for MP3/WMA), press
GROUP UP or GROUP DOWN. (Remote
control only)
• Press GROUP UP to skip to the next
group.
• Press GROUP DOWN to skip to the
previous group.
To detach the dock adaptor
Pull up the dock adaptor with your fingernail
or sharp pointed tool inserted to the slot.
• Be careful not to injure your fingertips or
damage the terminal of the dock.
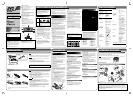
Viewing video/picture
While the unit is turned off, and iPod is not
connected...
Press and hold iPod 6.
A
Listening to iPod and viewing video/picture from iPod
B
Playing back a disc/USB
device
C
Listening to
FM stations
Using the timer
(Remote control only)
D
Adjusting the sound
Convenient playback
(Remote control only)
1. Press FM to select “FM.”
2. Select the station.
• Press and hold 4 or ¢ to change the
frequency automatically until a station of
sufficient signal strength is tuned in.
Presetting stations (Remote control only)
You can preset 30 FM stations manually.
1. Tune in to a station you want to preset.
2. Press SET.
• Finish the following steps while the
indication on the display is flashing.
3. Press the number button to select a
preset number you want to store.
4. Press SET to store the station.
To listen to the preset stations, press number
buttons to select the preset number.
Tuning in to a preset station
Each time you press the button, you can select
the preset station from 1 to 30.
You can select the preset station directly •
pressing number buttons.
You can operate iPod through the unit.
• Before connecting iPod to the unit, check its type
and software version. (See playable iPod devices
on the other side of this sheet.)
• Note that any data cannot be sent to iPod from
the unit.
CAUTIONS
• JVC is not responsible for any loss of or damage
to iPod that might result from the use of this
product.
• When you connect iPod to the unit, make sure
the connection on this unit is fully inserted into
iPod.
• Do not carry the unit with iPod connected. You
might drop it down or it might cause damages to
the connector part.
• Do not touch or hit the iPod terminal pins or the
connector pins directly. It might cause damages
to the connector part.
• Remove iPod from the unit when you do not use.
• While playing back a track from iPod, do not
disconnect the iPod. Doing so may cause
malfunction of both this unit and iPod.
• Always set the volume to the minimum level
when connecting or disconnecting iPod.
• Do not leave the front door open.
• Do not press down on the front door when it is
open, as the unit could fall and possibly cause
an injury.
1. Press iPod 6.
iPod is turned on and starts playing.
• When you have selected another source
press iPod 6 again to start playback.
2. Adjust the volume.
To pause, press iPod 6.
• To cancel pause, press iPod 6 again.
Playback continues from the point
where it has been paused.
To select a track, press 4 or ¢ .
• Press ¢ once to skip to the beginning of
the next track.
• Press 4 to skip to the beginning of the
track being played.
Press 4 twice quickly to skip to the
beginning of the previous track.
To fast forward/reverse, press and hold
4 or ¢ during playback.
NOTE
With iPod selected as the source...
– “CONNECT” appears on the display of the unit
when iPod is connected.
– “NOiPod” appears on the display of the unit
when iPod is not connected.
– Operate iPod touch or iPhone itself in the
following cases:
• When operating the home button.
• When selecting application icons on the
home screen.
• When dragging the slider.
iPod menu operation
(Remote control only)
1 Press MENU to display the menu.
2 Press GROUP UP or GROUP DOWN to
select a menu item, then press SET to
confirm it.
When the power is supplied through the AC outlet
for the first time after the purchase, the CLOCK
indicator and “0:00” (or “AM 12:00”) flash on the
display. Set the clock before using the sleep and
daily timers.
1. Press CLOCK/TIMER.
2. Press 4/1 or ¡/¢ to adjust the hour.
• When you press and hold the button, the
hour digit changes continuously.
3. Press SET.
The minutes digits start flashing on the display.
4. Repeat 2 and 3 to adjust the minute.
• When you press and hold 4/1 or
¡/¢ while adjusting the minutes, the
minutes digits change continuously.
• If you want to change the hour setting while
adjusting the minutes, press CANCEL.
Finish setting the clock.
To display the clock, press DISPLAY.
• Each time you press the button, the clock and
normal indicator changes alternately.
NOTE
• About one hour after you disconnect the AC
power cord, the set time will be reset.
• If the power supplied using batteries, the clock
does not appear on the display when the unit is
turned off.
Press SLEEP.
Each time you press the button, the shut-off time
(in minute) changes as follows:
10 \ 20 \ 30 \ 60 \ 90 \ 120 \ OFF \
(back to the beginning)
The unit is now set to turn off after the minutes you
set have elapsed.
If no operation is performed while the Sleep Timer *
is set to longer than 30 minutes, the unit turns off
automatically 30 minutes later.
To check the remaining time until the unit shuts
off, press SLEEP once.
To cancel the sleep timer, press SLEEP repeatedly to
select “OFF.”
Using the Daily Timer, you can wake up with your
favorite music.
NOTE
Tune into a station, load a disc, or connect a USB
device/iPod to the unit, and make sure that the
source works properly beforehand.
1. Press CLOCK/TIMER.
2. Press 4/1 or ¡/¢ to adjust the
hour.
• When you press and hold the button,
the hour digit changes continuously.
3. Press SET.
The minutes digits start flashing on the
display.
4. Repeat 2 and 3 to adjust the minute
and select the source, and adjust
volume.
• When you press and hold 4/1
or ¡/¢ while adjusting the
minutes, the minutes digits change
continuously.
5. Press
to turn off the unit.
• When the on-time comes, the unit sets
the volume gradually to the preset
level.
• The daily timer works only when the
unit is on standby.
To correct a misentry during the process,
press CANCEL.
You can return to the previous step.
To change the set timer info when
is
lit, press CLOCK/TIMER twice.
You can start setting from step 2.
Adjusting the volume
You can adjust the volume level between MIN 01
and 30 MAX.
You can program up to 30 tracks from a disc or a
USB device in any desired order including the same
tracks.
NOTE
• You can only make a program when playback is
stopped.
• While making a program, you cannot specify a
group number to select a track.
Load a disc or connect a USB device before
making a program.
See ı Playing back a disc/USB device.
1. Press CD 6 or USB 6.
2. Press 7 to stop playback.
3. Press PLAY MODE to select “PROGRAM.”
4. Press the number buttons to select the track
to program.
5. Repeat step 4 to select other tracks for the
program.
• To cancel the last track in the program, press
CANCEL once.
6. Press CD 6 or USB 6.
Playback starts.
While stopped:
To confirm the programmed tracks, press
4/1 or ¡/¢ repeatedly; the tracks in the
program will successively appears on the display in
the programmed order.
• To add a track to the end of the program, press
the number buttons to select the track.
To delete the tracks in the program, press CANCEL
repeatedly.
• Each time you press the button, the last track
in the program is erased.
• Turning off the power also clears the program.
To exit from the program play, press PLAY MODE
repeatedly until the “PRGM” indicator goes off.
You can play all the tracks, on the disc or USB device
in random order.
Load a disc or connect a USB device before
random play.
See ı Playing back a disc/USB device.
1. Press CD 6 or USB 6.
2. Press PLAY MODE to select “RANDOM.”
The tracks are played in random order
once.
• The 4/1 button works only to go back
to the beginning of the current track during
the random playback.
To exit from random mode, press PLAY
MODE. The “RANDOM” indicator goes off.
You can repeat a track or tracks on the disc or
USB device as many times as you like.
Press REPEAT.
Each time you press the button, the play
mode changes as follows:
For CDs:
ALL \ \ canceled \ (back to the beginning)
• ALL:
• :
Repeats all the tracks on the
disc.
In program mode or •
random mode, only
ALL
can be selected.
Repeats the current track.
For MP3/WMA files:
ALL \ GROUP \ \ canceled \ (back to the
beginning)
• ALL:
• GROUP:
• :
Repeats all the tracks on the
disc or USB device.
In program mode or •
random mode, only
ALL
can be selected.
In normal play mode, repeats
all the tracks in a group.
Repeats the current track.
To exit from the repeat mode, press REPEAT
repeatedly until the repeat indicator goes off.
Connect iPod
Disc
USB device
Main unit
Remote control
Start Playback
Main unit
Remote control
Main unit Remote control
Setting the Clock
Start Playback
Program Playback
Random Playback
Repeat Playback
Main unit
Remote control
USB cord
USB
memory
Main unit Remote control
Main unit
Remote control
Main unit
Remote control
Adjusting the super woofer volume
You can adjust the super woofer volume level
between 1 and 6.
B
Front door
Open the front door
Dock adaptor
(supplied with iPod
or sold separately)
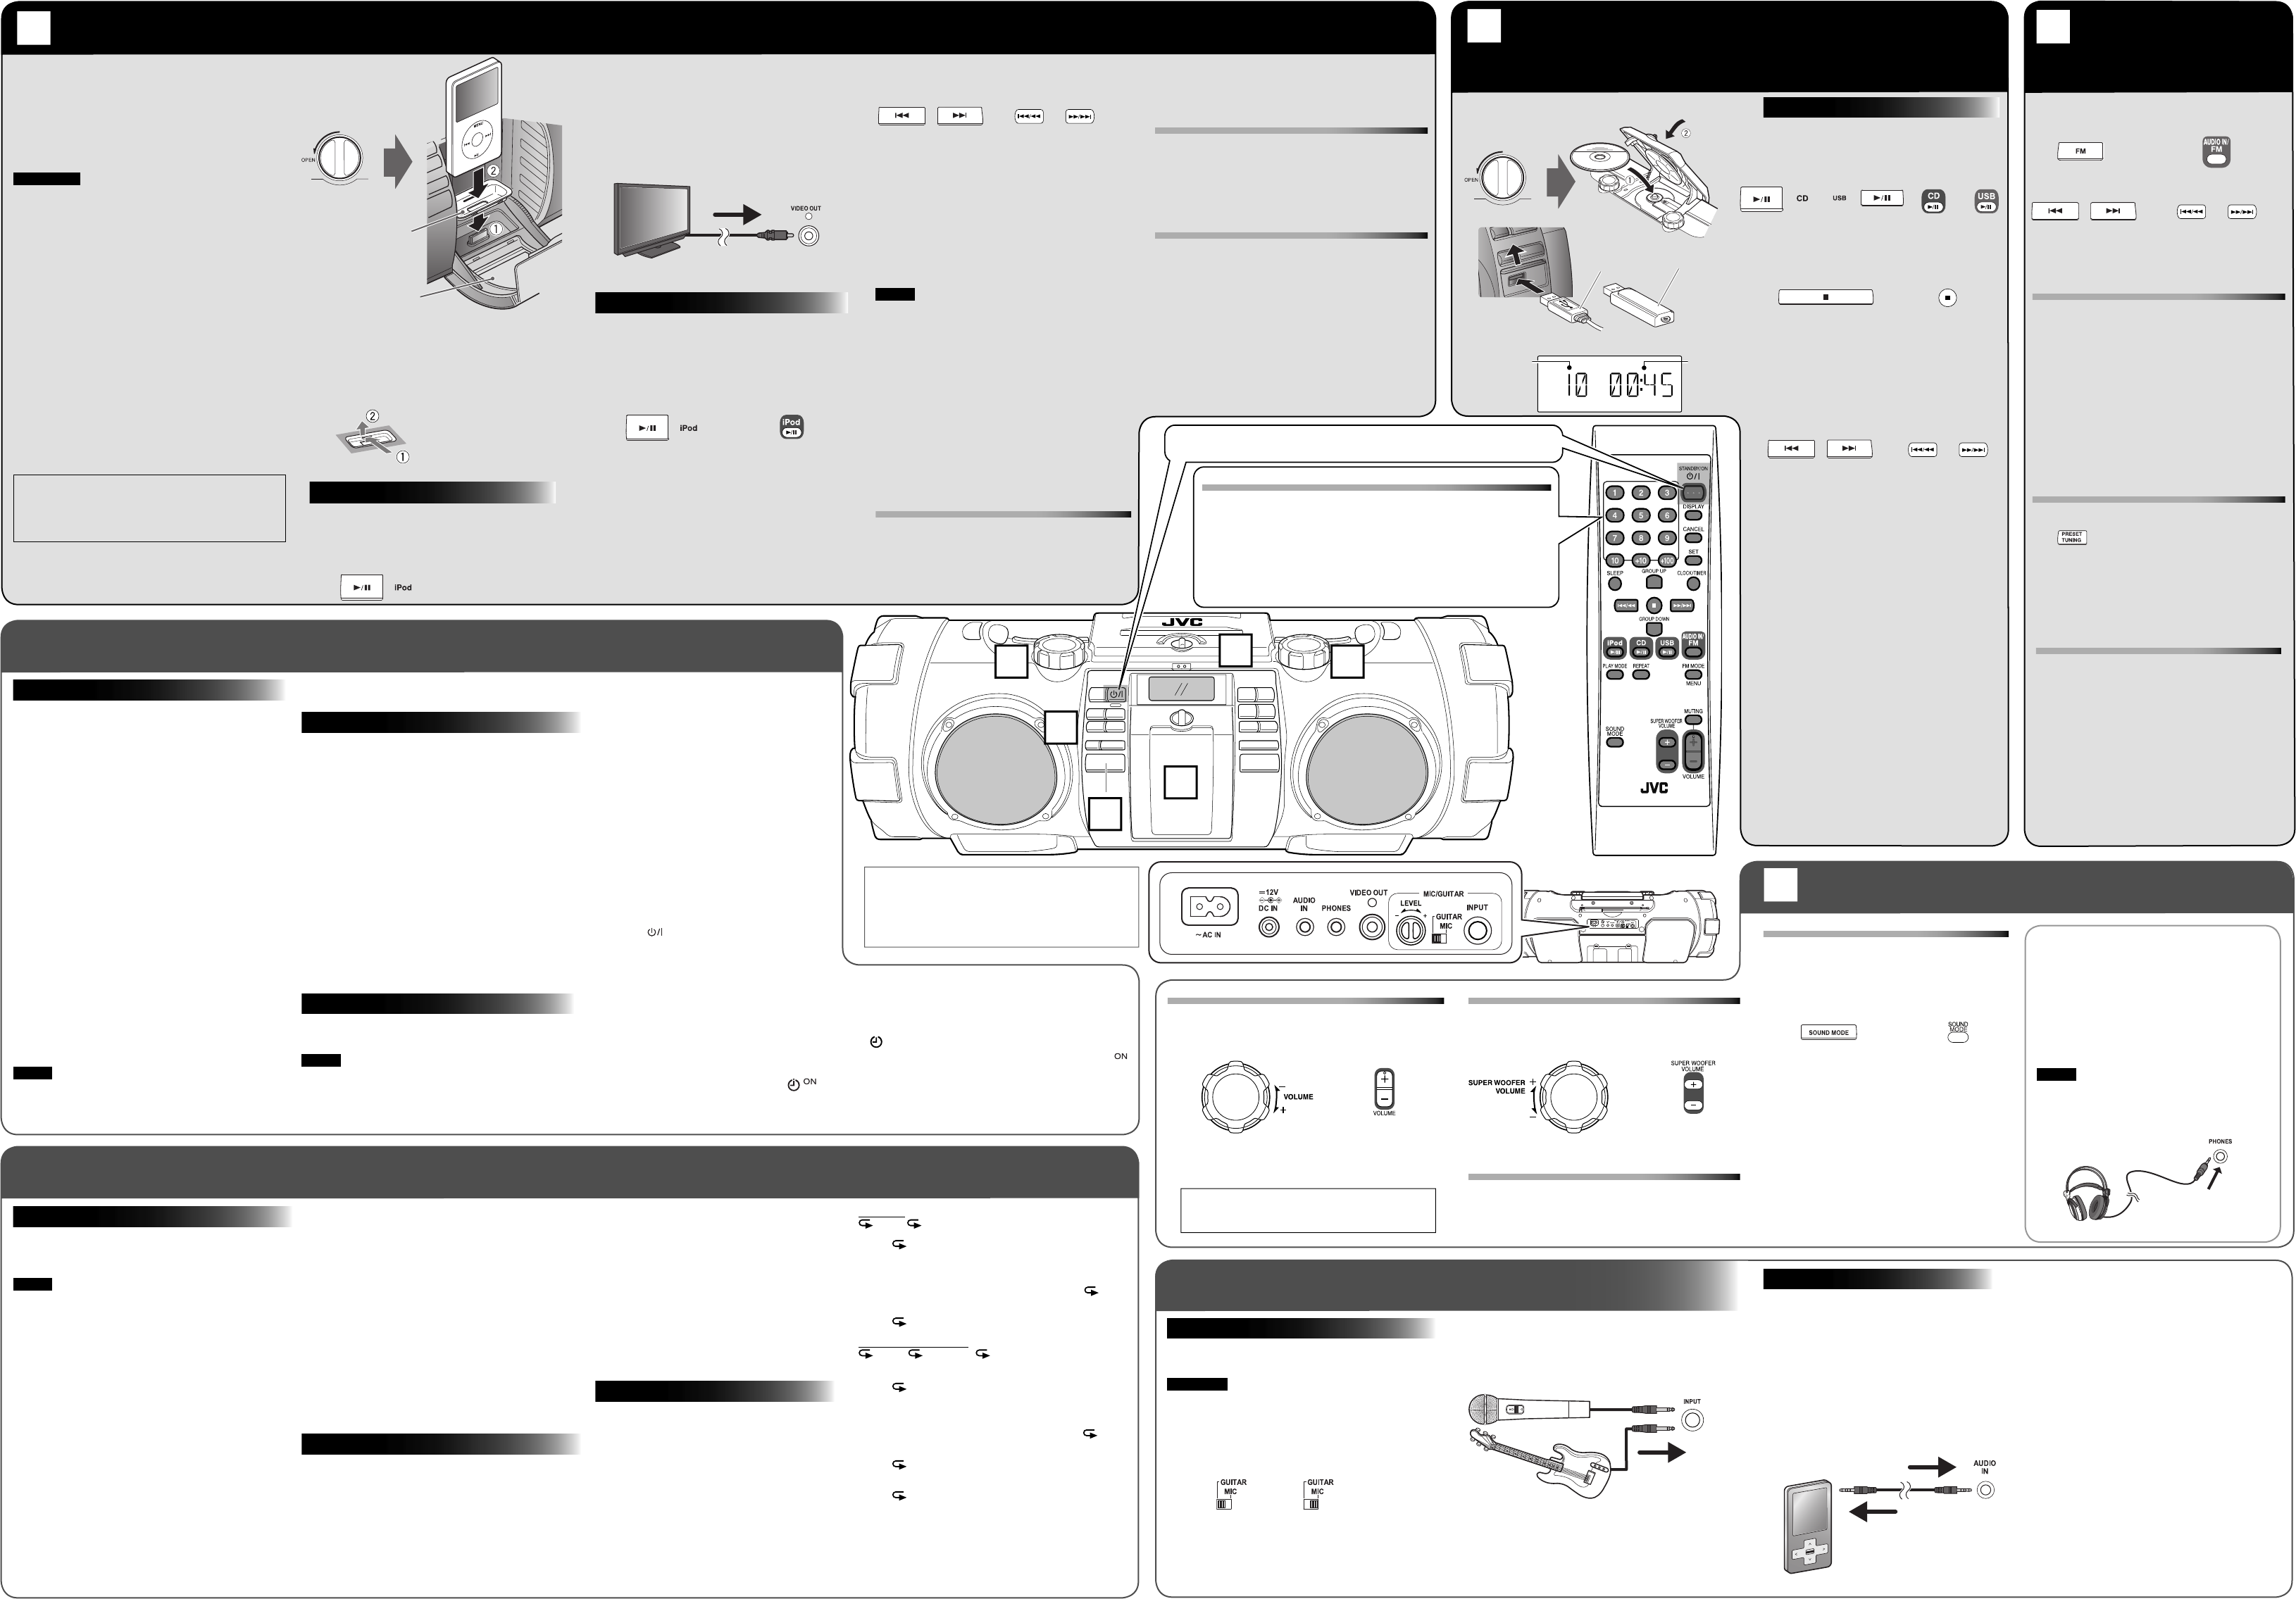
Connecting other equipment
Microphone/guitar mixing
Using a microphone or a guitar, you can mix its
sound with a source sound.
CAUTION
DO NOT connect a bass guitar to the MIC/GUITAR
INPUT jack, as it may damage the unit.
1. Make sure the MIC/GUITAR selector switch on
the rear of the unit is properly set.
2. Set the MIC/GUITAR LEVEL control to – by
turning it counterclockwise.
3. Connect a microphone or a guitar into the
MIC/GUITAR INPUT jack on the rear of the
unit.
4. Start a source.
5. Adjust the volume and microphone/guitar
levels.
Using Headphones
Be sure to turn down the volume before
connecting or putting on the headphones.
• Connecting the headphones deactivates
the speakers.
• Sound adjustments other than the super
woofer volume level also affect the sound
through the headphones.
NOTE
If iPod is selected as a source, no sound is
heard from headphones.
To turn off the daily timer, press CANCEL.
• While the timer is being set, the timer indicator
(
) lights up.
• While the timer is working, the timer indicator (
)
flashes.
• If you do not operate the unit for more than 1
hour, the unit will turn off.
How to select a number using the remote control
Examples:
To select number 5, press 5.•
To select number 15, press +10 then 5.•
To select number 20, press +10 once, then 10.•
To select number 125, press +100, +10, +10 then 5.•
Turn on the power at first.
A
B
C
D
D
Setting the Sleep Timer
Setting the Daily Timer
Sound mode
Sound modes can be selected to enhance the
type of music being played.
Press SOUND MODE to select the sound
mode.
Each time you press the button, the sound
mode changes as follows:
Sound mode selection:
BEAT: Set to this position for music with a
heavy beat, such as rock and disco
music.
POP: Set to this position for light music
including popular and vocal music.
CLEAR: Set to this position for crisp and clear
sounding music.
FLAT: (no effect): Set to this position not to
apply any sound mode.
Turning o the sound temporarily (Remote
control only)
Press MUTING.
To restore the sound, press MUTING again or
adjust the volume.
Current track
number
Playback
time
Display during playback
Improving the FM reception (Remote
control only)
When an FM stereo (FM) broadcast is hard to
receive or noisy, select the monaural reception
(MONO) mode.
Press FM MODE.
• To restore stereo reception, press FM MODE
again.
Adjusting the antenna
Adjust the FM telescopic antenna’s length,
angle and direction until the best reception is
obtained.
Main unit
3. Press AUDIO IN to select “AUDIO.”
4. Press and hold SET to adjust the source
input level. Each time you press the
button, the input level changes as follows:
LEVEL1 \ LEVEL2 \ LEVEL3 \ (back to the
beginning)
• LEVEL1: Ordinary input level.
• LEVEL2: Increases the input level.
• LEVEL3: Increases the input level more
than “LEVEL2.”
5. Start playback of the external device.
6. Adjust the volume of the unit.
Refer also to the instruction manual for iPod for
details.
Turning o iPod
Press and hold iPod 6 for about 2 seconds.
• Selecting another source also turns off iPod.
• Turning off the unit may not turn off iPod
depending on the current source.
About the battery charge of iPod
• When the unit is connected to the AC outlet:
The iPod battery is charged if the unit is
turned on.
• When the unit is operated on batteries:
The iPod battery is not charged even if the
unit is turned on.
Each time you press and hold the button, the
indicator changes alternately as follows:
VOUT ON: View video/picture from iPod on •
the monitor.
VOUT OFF: View video/picture on iPod.•
Main unit
CAUTION:
Excessive sound pressure from earphones or
headphones can cause hearing loss.
or or
(On the right)
Main unit
(On the left)
Remote control
Main unit Remote control
DO NOT turn off the unit with the volume
set to an extremely high level; otherwise, the
sudden blast of sound may damage your hearing,
speakers, and headphones when you turn on the
unit or start playback.
Guitar Microphone
Main unit Remote control
Headphones
(not supplied)
Microphone or guitar
(not supplied)
Monitor
(not supplied)
External device
(not supplied)
Composite video cord
(not supplied)
φ
6.3 monaural cable
(not supplied)
Stereo mini plug cord
(not supplied)
Rear of the unit
or