


3
INSTALLATION
Installation Existing Construction:
1. Use a stud locator to identify the location
of the ceiling joists on each side of the
proposed loudspeaker mounting location.
2. Mark ceiling joists’ edges, using
masking tape
.
3. Repeat this process for the other
loudspeaker locations.
4. You may have to adjust the loudspeaker
mounting locations based on how the
ceiling joists line up with the proposed
speaker mounting locations.
5. Check for clearance using the following
method
:
a. Drill a 1/4” pilot hole in the center of the
intended speaker location.
b. Cut a foot-long piece of coat hanger.
c. Bend the wire, creating a right angle,
leaving 4-1/4” at one end.
d. Poke the “L-shaped” wire into the pilot
hole and turn it in a complete circle,
checking for obstructions.
e. Push it up into the ceiling cavity to
make sure you have approximately
4” of depth.
f. If the coat hanger’s movement is
obstructed by anything, fill the hole(s)
with spackle and try another location.
6. Locate the hole template and remove
the inside portion of it. The inside portion
can be used as a paint mask, if you are
painting the frame of the loudspeaker.
7.
Use a pencil and hole template to trace
the hole outline in the desired location on
the ceiling
.
8. Use a drywall saw to cut along the
penciled line.
9. Strip 1/4” of insulation from the end of
each wire coming from the amplifier.
10. Tightly twist the end of each wire until no
frayed ends remain.
11. Attach the speaker wires to the speaker
terminal connectors. Connect the
negative output from the amplifier to the
black terminal and the positive output to
the red terminal.
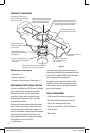
12. There are four clamps “dogs” which
hold each speaker in place. Rotate all
the dogs inward.
13. Insert the loudspeaker into the cutout in
the ceiling.
14. The dogs are tightened via four
front-baffle screws. Tighten the dogs
by turning the screws clockwise,
while pressing the loudspeaker against
the ceiling. NOTE: DO NOT OVER
TIGHTEN THESE SCREWS. Over-
tightening the screws may make the
grille difficult to install.
15. Install the grille into the speaker.
16. Repeat this procedure for the next
speaker.
New Construction Installation:
Install the proper ceiling bracket for this
loudspeaker (NCB-6) using the instructions
supplied with the bracket. After the
hole is cut in the drywall per the bracket
instructions, perform the following steps:
1. Strip 1/4” of insulation from the end of
each wire coming from the amplifier.
2. Tightly twist the end of each wire until
no frayed ends remain.
3.
Attach the speaker wires to the speaker
terminal connectors. Connect the negative
output from the amplifier to the black
terminal and the positive output from the
amplifier to the red terminal.
DS00640A-0_LSC-BG.indd 3 2/7/08 4:26:43 PM