


Power Supply: AC 120V ~ 60Hz
Radio Frequency Coverage: AM: 535 - 1705 KHz
FM: 88 - 108 MHz
Specifications subject to change without notice.
TROUBLE SHOOTING
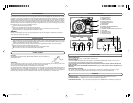
1) Turn on the unit by pressing the POWER BUTTON (3),the Power Indicator lights.
2) Select the desired band (AM/FM/FM St.) with the FUNCTION Control (5).
3) Tune in your desired station using the TUNING Knob (7). If the FM ST. band was chosen, the FM STEREO
indicator (6) will light up whenever a stereo broadcast is received. To receive a weak (noisy) FM station,select FM
band by setting the FUNCTION knob(5) to the FM position .The FM STEREO indicator (6) will go off and the
reception may be improved, but the sound is now monaural (MONO).
4) Adjust the VOLUME Control (1) to the desired sound level.
5) To turn the unit off, press the POWER Knob (3) again, The Power Indicator (4) goes off.
Power buttonon (pushed in), but no power
* Check power to wall plug.
* Check AC cord connection to wall plug.
Power Indicator is on, but no sound from speaker
* Check FUNCTION selector.
* Check VOLUME setting
* Make sure headphones are not plugged in.
Poor FM reception
*Untieand fully extend theFM wire antenna for best reception.
- Do not plug in the power cord until all other connections have been made.
- Do not expose this product to liquid.
Power Button
After using the unit, switch off the power by releasing the POWER Button.
Cleaning the Unit
To clean, simply wipe with soft clean damp (never wet) cloth. Never use solvents or abrasive cleaners.
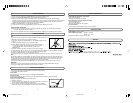
Stylus (needle) Replacement
Replace a worn stylus by following the directions below
1) Raise the “ToneArm”.
2) To remove the old stylus needle, pull out the stylus assembly in the direction
shown, holding the head shell with your other hand.
3) Then install the new stylus needle by pushing it gently into the cartridge
(hold by the edge to prevent damage to the stylus) until it clicks into place.
CARE & MAINTENANCE
TUNER OPERATION
PHONO OPERATION
SPECIFICATIONS
HINTS FOR BEST RECEPTION
FM: The receiver has a built-in FM antenna (8) hanging from the rear cabinet. This wire should be completely
unraveled and extended for best reception.
AM : This unit is equipped with a built-in directional ferrite antenna. Rotate the unit to obtain the best reception.
Note:
Flip-up the clear stylus protector to expose the needle. Be sure that the tone arm
is detached from the tone arm rest (13) before operating.
1) Turn on the unit with the POWER Button (3). The POWER Indicator (4) will
light up.
2) Set the FUNCTION Selector (5) to the PHONO position.
3) Set the SPEED SELECTOR (14) to the proper position depending on
the record to be played. Three speeds (33 rpm, 45 rpm, 78 rpm)
can be selected. When 45 rpm is selected, use the 45 rpm
ADAPTOR (15).
4) Place the record on the platter (if required, use the 45 rpm adaptor)
5) Lift the tone arm (12) from the rest (13) and the platter will begin to rotate as you move it towards the record.
6) Place the needle of the tone arm (12) on the record at the desired position.
7) Adjust the VOLUME control (1) to the desired sound level.
8) At the end of the record, the platter will continue to rotate until the tone arm (12) is returned to the rest (13).
Note:
The turntable platter will not automatically stop when the record finishes playing. This is to allow extended play
records to play all the way through without prematurely stopping before the tone arm reachs the end of the record
(center area). Don't allow the record to continue turning for extended periods of time once the tone arm (12)
reaches the center of the record. This could prematurly wear out the stylus needle.
9) Stop the Turntable by pressing the POWER Button (3). Lift the tone arm (12) and return it to the rest (13).
IMPORTANT:
Do not turn or stop theTurntable platter manually. Moving or jarring the Turntable platter without securing
theToneArm Clamp could result in damage to the Tone Arm or Stylus.
SERVICE
4 5
HXT-1058 IB JENS 001 REV0.P65 5/9/2006, 4:03 PM3