


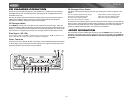

CDX6311
7
NOTE: LCD panels may take longer to respond when subjected to cold temperatures for
an extended period of time. In addition, the visibility of the numbers on the LCD may
decrease slightly. The LCD display will return to normal when the temperature increases
to a normal range.
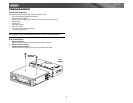
Display Options
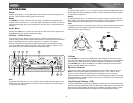
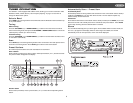
Press DISPLAY/MENU (7) to navigate through the following options:
• Tuner: FREQ > Spectrum > PTM Message
• CDP: Elapsed Time > Spectrum > PTM Message
• XM mode: Category Name > Artist Name > Song Title > Spectrum > PTM Message >
Channel Name
Menu Operation
A second function of the DISPLAY / MENU button (7) is to access a menu of radio options.
Press DISPLAY / MENU for more than three seconds to access the menu. “Menu” will appear
in the display. Navigate the menu by pressing DISPLAY / MENU momentariiy to move forward
to the next option. The menu can also be navigated by using the UP TUNING (10) or DOWN
TUNING (11) button to move to the next or previous option. Once the desired option appears in
the display, adjust that option by rotating the volume control within five seconds.
The following options are adjusted through this menu feature:
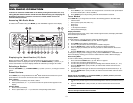
Contrast
The contrast level of the display is set at “CONTRAST 05” by default. Rotate the volume
control to adjust the contrast level from “00” to “10”.
Dimmer
The dimmer feature of the display is set to “DIMMER High” by default. Rotate the volume
control to turn the dimmer to the low setting.
XM Scroll
This option determines whether or not the XM display text scrolls continuously across the
screen. The default setting is “OFF”. Select “ON” to make the display text scroll continuously.
When set to off, you can view the display information by continuously pressing the DISPLAY
button (7).
NOTE: The XM Scroll option only appears when an XM tuner is connected.
Clock Format
This option allows selection of a 12 hour or 24 hour clock format. “CLK FORMAT 12H” is the
default setting. Rotate the volume control to change to the 24 hour clock format.
Time Set
The time on the clock will be set to “12:00” as the default. Program the current time by rotating
the volume control clockwise to adjust the minutes and counter-clockwise to adjust the hours.
Local / Distance Selector
This feature is used to designate the strength of the signals at which the radio will stop during
automatic tuning. “Distant” is the default, allowing the radio to stop at a broader range of
signals. To set the unit to select only strong local stations during automatic tuning, rotate the
volume control to select “Local”. “LOC” appears in the display.
Frequency Spacing
This option allows the selection of the frequency spacing appropriate for your area. “AREA
U.S.A.” is the default setting. Rotate the volume control to select the “Latin”, “Europe” or “Oirt”
options.
Programmable Turn-on Volume
Use the “VOL PGM” option to select the default volume the radio will assume when first turned
on. To program a specific start-up volume level, rotate the volume control to select the desired
level.
Beep Tone
The beep tone feature allows the selection of an audible beep tone to be heard each time a
button is pressed on the face of the radio. “BEEP TONE On” is the default display. Rotate the
volume control to select the “BEEP TONE Off” option.
Illumination Color
The “COLOR” option allows selection between two colors for the backlight illumination of the
unit. “COLOR 1” is the default display and will illuminate the unit in blue backlight. Rotate the
volume control to select “COLOR 2”, which will illuminate the display in red backlight.
Selectable Clock Display
When the selectable clock display (CLK ON LCD) feature is activated, the clock and default
greeting note will appear in the display when the radio is turned off but still connected to the
ignition wire. “CLK ON LCD On” is the default display for this option. To select that the clock
and greeting not be displayed when the unit is powered off, rotate the volume control to select
“CLK ON LCD Off”.
Key Light On/Off
When the key light feature is activated (ON) the preset buttons and the rest of the front panel
function buttons remain lit when the unit is turned off, but the ignition key remains on. Turn the
volume control to select “Key Light Off” if you would prefer the buttons not remain illuminated
when the unit is off.