


INSTALLATION
2
THANK YOU
for choosing the JBL
®
MPS1000. In order that we may better serve
you should you require warranty service for your new subwoofer,
please retain your original purchase receipt and register your new
JBL marine subwoofer online at www.jbl.com.
WARNING
Playing loud music in a boat can hinder your ability to hear other boats,
passengers and nearby swimmers and can permanently damage your
hearing. We recommend listening at low or moderate levels while oper-
ating your boat. JBL accepts no liability for hearing loss, bodily injury or
property damage resulting from the use or misuse of this product.
IMPORTANT
The MPS1000 has been designed to provide the kind of high-performance
low-frequency reproduction that used to require big, clumsy enclosures,
large amplifiers and complex installation. To ensure maximum
performance, we strongly recommend that installation be entrusted
to a qualified professional. Although these instructions explain how to
install the MPS1000 in a general sense, they do not show the specific
installation methods for your particular boat. If you feel you do not
have the necessary tools or experience, do not attempt the installation
yourself; rather, ask your authorized JBL car audio or marine audio
dealer about professional installation options. Remember to keep this
manual and your sales receipt in a safe place for future reference.
NOTE: This marine product is not intended for automotive applications.
INSTALLATION WARNINGS AND TIPS
• Always wear protective eyewear when using tools.
• Turn off the audio system and other electrical devices before you
start. Disconnect the (–) negative lead from your boat’s battery.
• At the installation sites, locate and make a note of all fuel lines,
hydraulic lines, vacuum lines and electrical wiring. Use extreme
caution when cutting or drilling in and around these areas.
• Check clearances on both sides of a planned mounting surface
before drilling any holes or installing any screws. Remember that
the screws can extend behind the surface. Do not use screws long
enough to penetrate the boat’s hull.
• Before drilling or cutting holes, use a utility knife to remove unwanted
fabric or vinyl to keep material from snagging in a drill bit.
• When routing cables, keep input-signal cables away from power
cables and speaker wires.
• When making connections, make certain they are secure and
properly insulated.
• If the amplifier’s fuse must be replaced, use only the same type and
rating as that of the original. Do not substitute another kind.
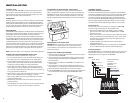
CHOOSING A MOUNTING LOCATION
Choose a mounting location that doesn’t interfere with walkways,
seats or the operation of steering, control or safety mechanisms. The
MPS1000 must not interfere with the safe operation of the boat. The
best location is usually a vertical wall that separates an under-seat
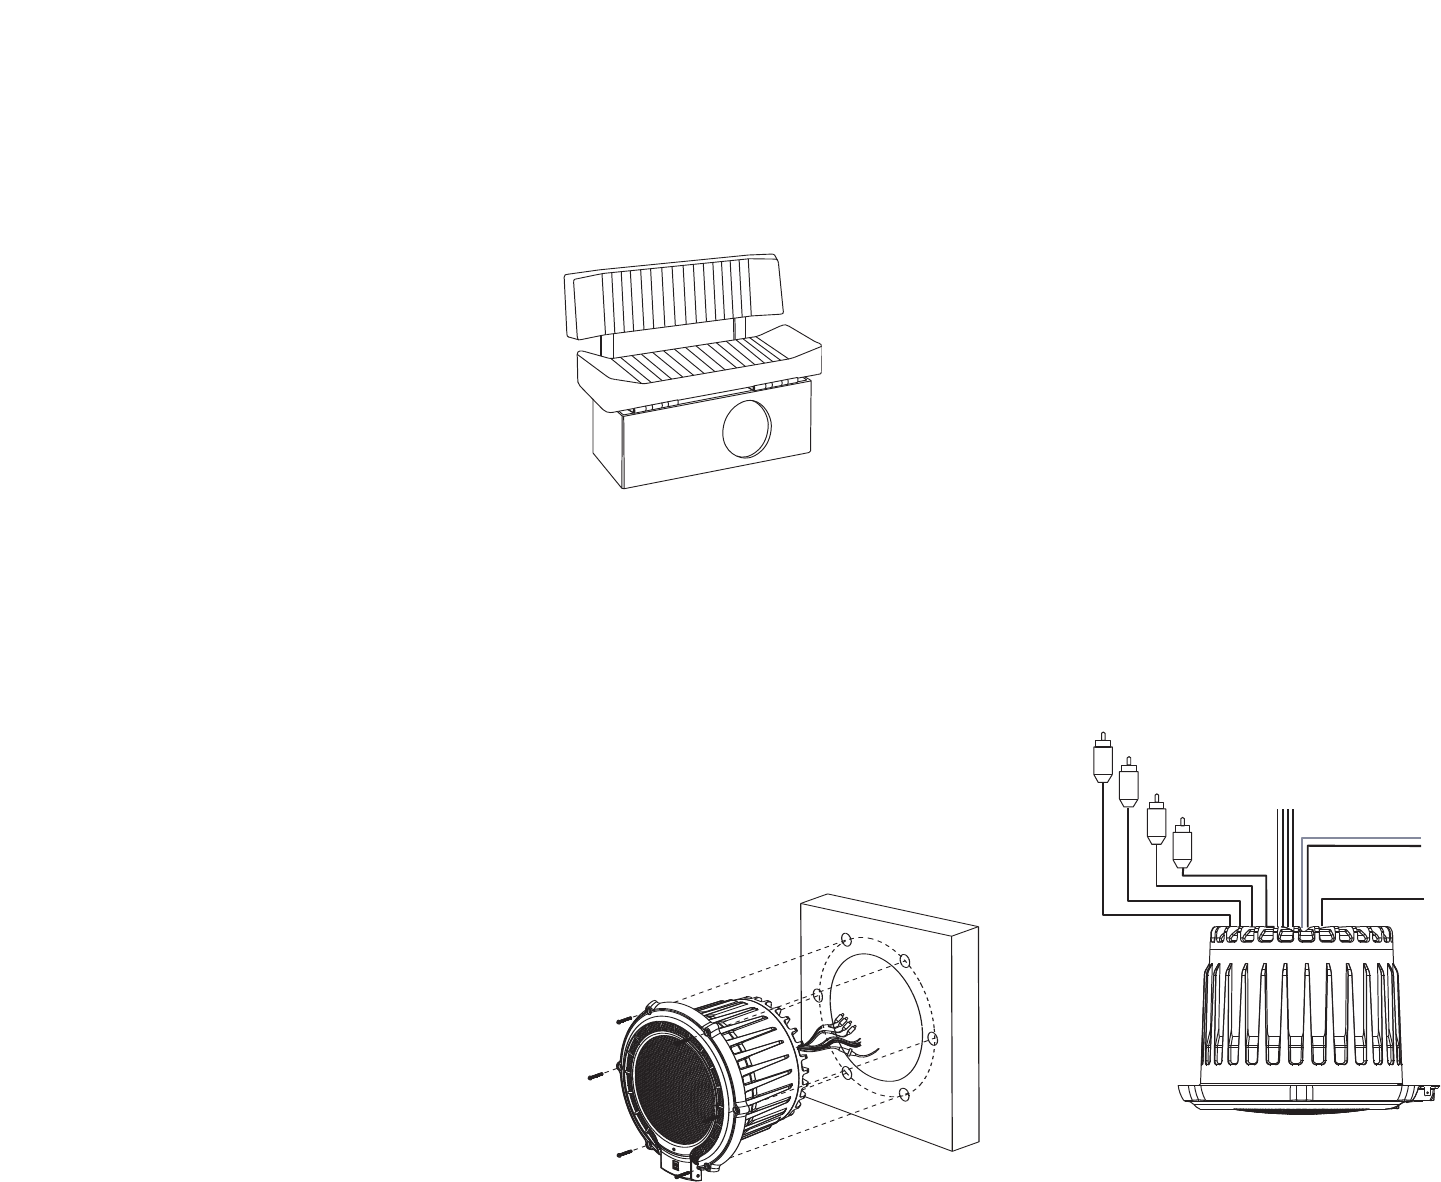
storage compartment from the boat’s interior space, as shown in Figure 1.
Figure 1.
MOUNTING THE MPS1000
CAUTION: Make sure mounting screws will not puncture wiring
harnesses, control cables, hydraulic or fuel lines, the fuel tank
or the hull. Some or all of these may be located behind or under
the mounting surface.
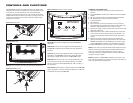
Cutting the Hole and Mounting the MPS1000
1. Check that there is enough clearance behind the mounting surface
to accommodate the MPS1000.
2. Using the included mounting template, check for clearance of the
mounting flange and overall shape of the MPS1000 in front of the
mounting surface.
3. Mark the hole in the baffle for the MPS1000 and the holes for the
mounting bolts.
4. Using a jigsaw or a rotary tool with a blade appropriate for the
material you’ll cut, cut along the line that marks the mounting hole.
5. Using a drill and bit, drill the holes for the mounting screws.
6. Insert the MPS1000 in the mounting hole, align the screw holes, insert
the screws and then tighten them to hold the MPS1000 in place.
Figure 2.
CONNECTIONS
About Power and Ground Connections:
The red B+ wire and the black ground wire should be connected directly
to the battery terminals in your boat. If your boat has a two-battery system,
connect the red and black wires to the battery that provides power for
your boat’s accessories rather than the battery that provides power to
start your boat’s motor. JBL’s MPS1000 is designed to shut off if it senses
that your battery’s voltage has fallen below 10 volts, in order to prevent
your battery from becoming fully discharged while you’re on the water.
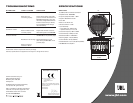
Power Connection
Connect power, ground and remote turn-on signal to the MPS1000,
as shown in Figure 3. Also observe these installation tips:
• Use at least #12 AWG wire for the +BATT (+12 Vdc) and GND
(ground) connections. Use at least a #20 AWG wire for the REM
(remote) connection.
• When routing power, ground, remote and signal cables, ensure that
wires are not able to become entangled with cargo, control cables,
the boat’s motor, passengers’ feet or any other object that could
become a safety hazard.
• Install a fuse holder with a 30A fuse within 18" of the battery +
terminal (see Figure 5).
• The REM connection requires +5 to +12 Vdc signal for the MPS1000
to turn on. Most head units provide this remote voltage signal.
Connecting the Signal
The MPS1000 includes a 2-channel speaker-level input and a 2-channel
line-level input. Either input connection type may be used. Follow the
diagram below to connect signal to your MPS1000.
Figure 3.
Red to battery +
Black to battery –
Blue to remote turn-on
from head unit
Speaker-level inputs:
Gray: right +
Gray/black: right –
White: left +
White/black: left –
Red: right in
White: left in
Gray: right out
Green: left out