SPEAKER PLACEMENT
Proper placement of the
speakers is an important step in
obtaining the most realistic
soundstage possible. These
recommendations are for the
optimal placement of the
loudspeakers. Use these
placement recommendations as
a guide. Slight variations will not
diminish your listening pleasure.
The Studio Series S36
II and
S36AW
II loudspeakers are video-
shielded and can safely be
placed near a television.
The S36AW
II loudspeakers are
weather-resistant and are
specifically designed for outdoor
use, such as in a patio area. As
noted below, we recommend
mounting the speakers under an
overhang, such as roof eaves,
for added protection. The
S36AW
II speakers, because they
are resistant to moisture, are
also appropriate for mounting in
a bathroom, although not inside
a bathtub or shower stall.
Although these loudspeakers are
designed as a mirrored pair, the
decision as to which one is left
or right will depend on the
amount of space left between
them.
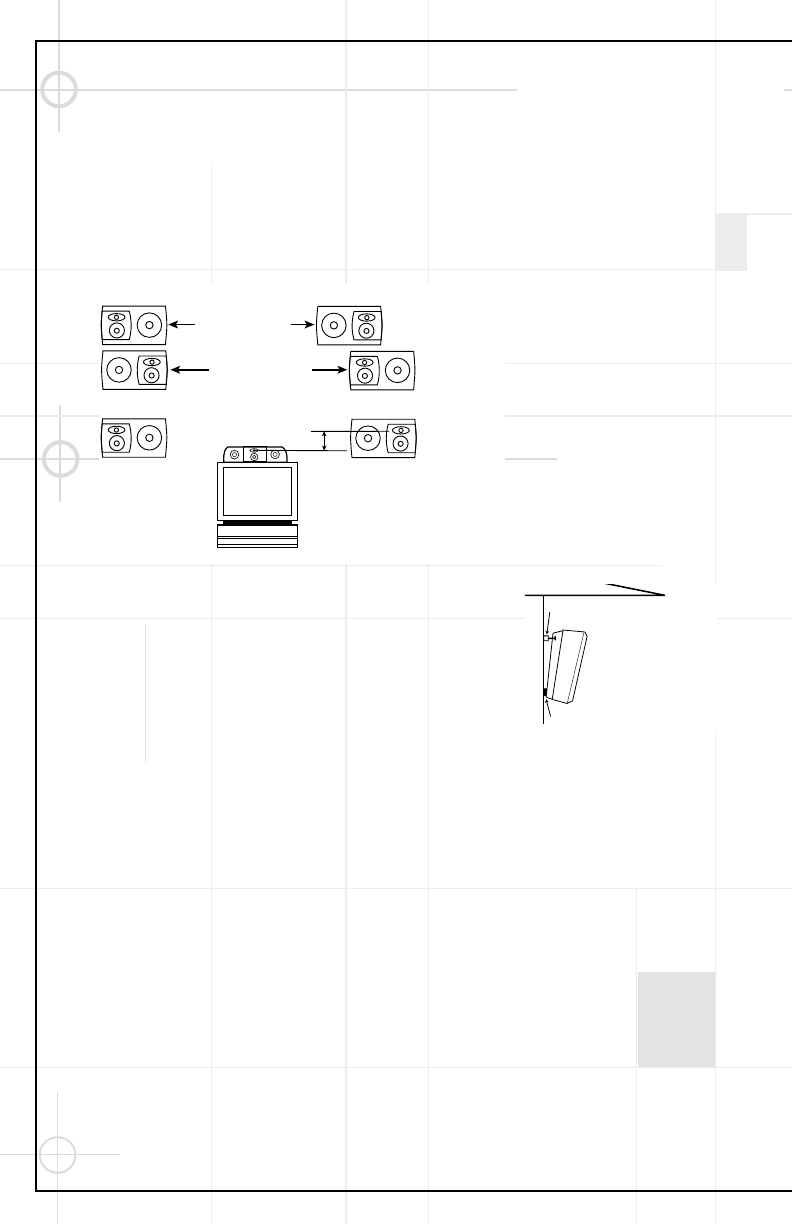
A wider stereo image is
presented with the
tweeter/midrange array
outboard, and a tighter image is
presented with the array
inboard.
Less than 6 – 8 feet
More than 6 – 8 feet
0-2 ft.
For stereo-only applications:
For home theater applications:
This placement provides
a wide spread in sound,
supplemented by the center
channel speaker.
Do not attempt to mount these
speakers on a ceiling, on the
underside of roof eaves or in a
shower stall.
The S36II and S36AWIIloud-
speakers may be positioned on
the wall either horizontally or
vertically. The grille logo on each
speaker may be rotated
depending on how the speaker is
positioned. Gently pull the logo
away from the grille slightly, rotate
it to the desired position, and let
go. The logo will snap back into
place.
When mounted vertically, the
tweeter array may be positioned
either up or down, depending on
the height of the placement. If the
speakers will be above ear level,
the tweeter array should be
positioned down, preferably no
more than two feet above ear
level. If the speakers will be
mounted very low, it may be best
to position the tweeter array
upward so that it will be no more
than two feet below ear level.
The S36
II and S36AWII
enclosures are specially
designed to angle the speakers
toward the listener when
mounted flush against the wall.
When mounting the S36AWII
speakers outdoors, we
recommend that you place them
under an overhang, such as roof
eaves, for added protection, and
that you use two of the supplied
special angle-mount screws
per speaker, which angle the
speakers downward at a greater-
than-usual angle, facilitating
water drainage.
NOTE: When using the enclosed
angle-mount screws, always use
the top two screw locations
appropriate for the specific
mounting orientation of your
S36AW
II. Referring to the
enclosed installation template,
screw locations (1) and (2) are to
be used when mounting the
S36AW
II horizontally so that
these locations are on top. To
mount the loudspeakers
vertically, use locations (2) and
(4)
or locations (1) and (3),
depending on the mounting
orientation. Do not mount the
S36AW
II upside down (with
screw locations (3) and (4) on
top) because it won’t be able to
lock onto the screw heads.
Remember that the JBL logo on
the tweeter/mid faceplate can be
rotated with choice of speaker
position (vertical or horizontal).
At least one screw per speaker
should be installed in a wooden
wall stud. Select an appropriate
wall anchor for the other screw.
If the special angle-mount
screws are not being used, size
10 screws of at least 1-1/2" in
length are recommended. If the
screws are used in drywall or
other surfaces incapable of
holding the screw by itself,
selection of proper anchors is
essential. The customer is solely
responsible for proper selection
and installation of screws,
anchors and other installation
hardware. Further installation
details are included on the
installation template.
WALL-MOUNTING
Supplied Rubber Pad
S36AW
II
Wall
Supplied Angle-Mount Screw
(When using angle-mount
screws, always utilize the
top two screw holes
on the S36AW
II
,
depending on
mounting orientation.)
Horizontal mounting:
Use screwholes (1) and (2).
Vertical mounting: Use
screwholes (1) and (3), or (2)
and (4), whichever are uppermost.
Roof eave


