When we designed the
S120PII powered subwoofer,
our goal was to offer the user
the best possible performance
combined with the most
flexible and complete
installation options. Please
look over the following three
examples to determine which
description best matches
your system and follow the
corresponding hookup
instructions.
To use the binding-post
speaker terminals
•ª with
bare wire, unscrew the collar
until the pass-through hole in
the center post is visible
under the collar. Insert the
bare end of the wire through
the hole in the post, then
screw the collar back down
until the connection is tight.
The holes in the center of the
collars are intended for
banana-type connectors.
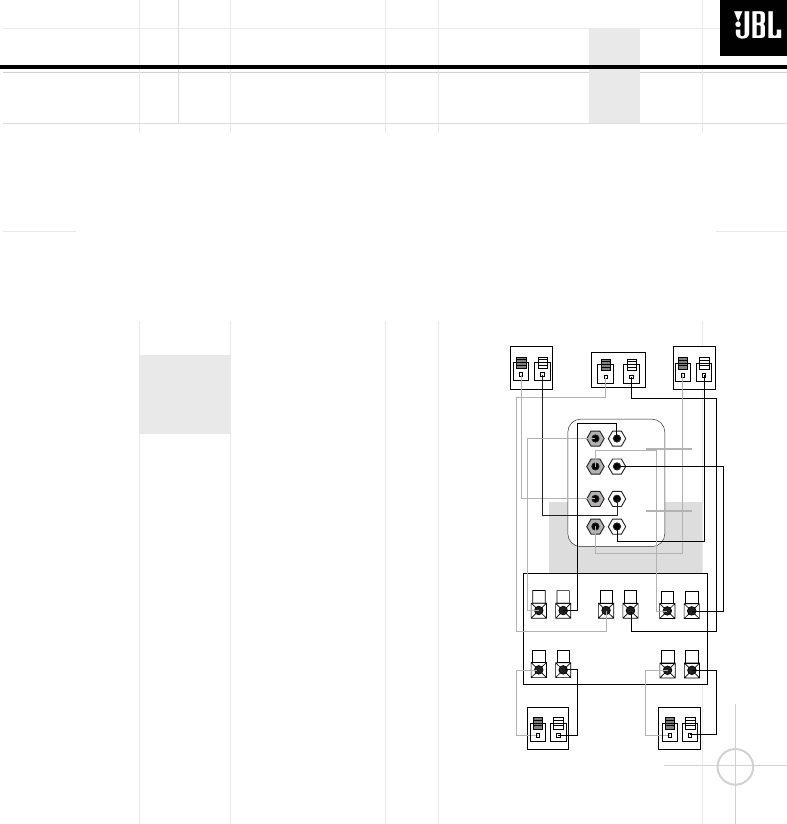
Dolby* Pro Logic* (Non-Digital) – Speaker Level
Use this installation method
for Dolby Pro Logic appli-
cations (not Dolby Digital,
DTS
®
or other digital
processing), where the
receiver/processor does not
have a subwoofer output or
a volume-controlled preamp
(line-) level output:
If your receiver features bass
management capabilities that
require you to configure your
speaker settings, make sure
to set your left- and right-front
speakers to “LARGE”.
Connect your receiver or
amplifier’s front left and right
speaker terminals to the left
and right terminals on the
subwoofer that are marked
“High Level In”
•. Connect
the left and right terminals on
the subwoofer that are
marked “High Level Out” ª
to the corresponding
terminals on the back of your
front left and right speakers.
Connect your receiver or
amplifier’s center, left and
right surround-speaker
terminals to the corre-
sponding terminals on the
back of your center, left and
right surround speakers.
SPEAKER CONNECTION
Right Front
Left Front
Center
+ –
+ –
+ –
Subwoofer
Right SurroundLeft Surround
+ – + –
+ –
+ –
Left Front Center
+ –
Left Surround
Right Front
+ –
Right Surround
+ –
Receiver
L
R
HIGH
LEVEL
IN
L
R
L
R
HIGH
LEVEL
OUT`
+ –
•
ª
S120PII Studio Series
4


