WALL-MOUNTING
Tour
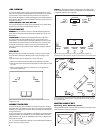
The Venue Series Tour may be wall-mounted. The customer is responsible for
proper selection and use of mounting hardware (available through hardware
stores), to properly and safely wall-mount the speakers. These prod-
ucts are not intended for ceiling mounting.
Adjustable wall-mounting brackets are included.
Balcony
Important Safety Notes
• Proper selection of mounting hardware and installation of the wall brackets
are the responsibility of the customer.
• This product is not intended for ceiling mounting.
Two No. 8 round-head or pan-head screws should be used per loudspeaker.
The screw head should be between 5/16 inch (8mm) and 1/4 inch (6.3mm) in
diameter, and the screw should be at least 2 inches (50mm) in length.
When installing screws in any wall, always use properly selected wall
anchors. Attach two of the four self-adhesive rubber pads that came with the
Balcony loudspeaker to the back of the enclosure in the two bottom corners
so that the cabinet is spaced evenly from the wall. Select a suitable mounting
location on a wall. (The ceiling is not a suitable mounting location.)
Drill two pilot holes, appropriately sized for the specific self-tapping screw or
wall anchor that you will be using. The holes should be 8 inches (203mm)
apart. See Figure 1. The holes should be 3/4" (19mm) below where you want
the top of the enclosure to be positioned. Use a carpenter’s level to ensure
that the holes are even and that the speaker will mount on the level.
Install the two screws into either a wooden wall stud or anchor, and tighten
them until the back of each screw head is about 1/8 inch (3mm) from the wall.
See Figure 2. Install the loudspeaker by slowly moving the cabinet toward the
screws so that the screw heads clear the larger circular portion of the two
keyholes. Once both screw heads have entered the keyholes, the loudspeaker
should gently be lowered onto the screw shafts. Check that the loudspeaker is
firmly locked onto the screws by gently pulling the speaker down and forward.
WIRING THE SYSTEM
IMPORTANT: Make sure all equipment is
turned off before making any connections.
For speaker connections, use a high-quality speaker wire with polarity coding.
The side of the wire with a ridge or other coding is usually considered positive
polarity (i.e., +).
NOTE: If desired, consult your local JBL dealer about speaker wire and
connection options.
The speakers have coded terminals that accept a variety of wire connectors.
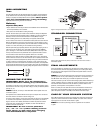
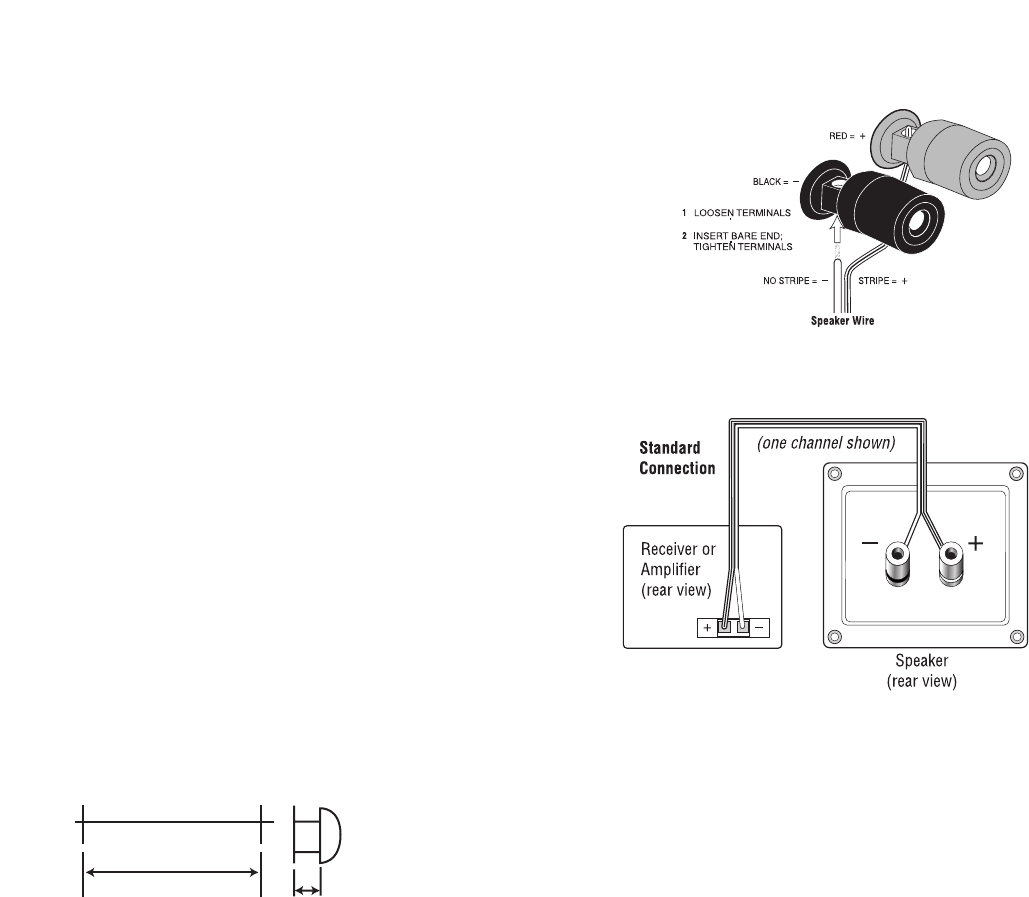
The most common connection is shown in Figure 4.
To ensure proper polarity, connect each + terminal on the back of the amplifier
or receiver to the respective + (red) terminal on each speaker, as shown in
Figure 5. Connect the
–
(black) terminals in a similar way. See the owner’s
guides that were included with your amplifier, receiver and television to
confirm connection procedures.
IMPORTANT: Do not reverse polarities
(i.e., + to
–
or
–
to +) when making connec-
tions. Doing so will cause poor imaging
and diminished bass response.
Figure 4. This figure shows how to connect bare wires to the terminals.
STANDARD CONNECTION
Figure 5. Wiring diagram shows polarity connections for one channel of a stereo or
home theater system.
FINAL ADJUSTMENTS
Check the speakers for playback, first by setting the system volume control
to a minimum level, and then by applying power to your audio system. Play a
favorite music or video segment and increase the system volume control to
a comfortable level.
NOTE: You should hear balanced audio reproduction across the entire fre-
quency spectrum. If not, check all wiring connections or consult the author-
ized JBL dealer from whom you purchased the system for more help.
The amount of bass you hear and the stereo-image quality will be affected by a
number of different factors, including the room’s size and shape, the construc-
tion materials used to build the room, the listener’s position relative to the
speakers, and the position of the speakers in the room.
Listen to a variety of music selections and note the bass level. If there is too
much bass, move the speakers away from nearby walls. Conversely, if you
place the speakers closer to the walls, there will be more bass output.
CARE OF YOUR SPEAKER SYSTEM
Each JBL Venue Series enclosure has a wood-grain-vinyl finish that does not
require any routine maintenance. When needed, use a soft cloth to remove
any fingerprints or dust from the enclosure or grille.
NOTE: Do not use any cleaning products or polishes on the cabinet
or grille.
See Chart
1/8"
(3mm)
3


