


6
INPUT CONNECTIONS
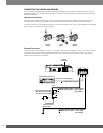
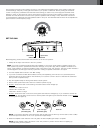
Input Connectors
Use RCA audio cables to connect source units with preamp-level outputs to the amplifier; use the supplied bare wire-
to-RCA adapters to connect to source units that don’t have RCA output connectors.
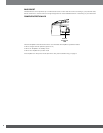
Use a small Phillips screwdriver to loosen the adapter’s set screws and insert the speaker wires into the holes on the
back of the adapter. Tighten the set screws to secure the wires.
Loosen
Screw
Insert
Wire
Tighten
Screw
Always connect the (+) speaker wire to the (+) terminal on the adapter and the (–) speaker wire to the (–) terminal on
the speaker.
IMPORTANT: Make sure the (+) and (–) bare wires do not touch each other. Touching wires can cause a short circuit
that can damage the source unit or the amplifier.
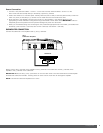
When you’re finished, plug the adapter into the appropriate input connector on the amplifier.
• You can use either input connector to connect a source component with a single mono subwoofer output.
seTuP PrOcedure
GTO subwoofer amplifiers include a setup CD with test signals that makes it easy to precisely set the amplifier’s input
gain to maximize the amplifier’s signal-to-noise and dynamic range performance with your vehicle’s audio system. The
amplifiers feature three Gain Indicator LEDs that provide all the feedback you need to quickly set the gain to the proper
level.
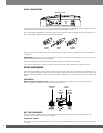
CONTROLS
Before setting the amplifier controls: Confirm that all connections have been correctly made, reconnect the
vehicle’s negative (–) battery terminal and turn the audio system on.
Crossover
Control
Bass
Boost
Control
Gain
Indicator
LEDs
Gain
Control
SET THE CROSSOVER
Before you set the amplifier’s gain, we recommend that you set the Crossover controls for the subwoofer. The
crossover is permanently set for low-pass operation.
Crossover Control
The Crossover control determines the frequency where the low frequencies sent to the subwoofer begin to be reduced
in volume.