Thanks to their high efficiency, JBL
loudspeakers will produce reasonable
volume levels in a room of moderate
size with very little amplifier power.
However, using a small amplifier to
obtain the desired volume listening
levels may lead to overdriving the
unit. This will generate high distortion
levels and may cause damage to your
loudspeaker. For the best perfor-
mance, an amplifier should be
selected with an output rating that is
greater than the maximum power that
will be used. This margin of reserve
power will ensure that the amplifier
will not attempt to deliver more power
than its design allows. However, the
power amplifier’s power rating per
channel must not exceed the
maximum recommended amplifier
power for that specific loudspeaker
model. Please see the specifications
section for details. Following these
two guidelines will provide virtually
distortion-free sound reproduction
and long loudspeaker life.
CONNECTIONS
To connect your JBL loudspeaker sys-
tems to a receiver or an amplifier, use
two-conductor insulated wire. Your
JBL dealer can recommend suitable
cables, or you can buy wire at most
hardware stores. We recommend #16
AWG wire as a minimum size. If your
speakers are more than 30 feet (10 m)
from your receiver or amplifier, use
larger diameter wire. Connections are
made at the terminals located on the
back of the loudspeaker system. The
terminals accept bare wire or dual
banana plugs, either of which will
provide easy, secure connections.
Preparing the hookup wire
1. First determine the distance
between the most distant speaker.
2. Now make the hookup wires for
both speakers this length, even if one
loudspeaker is much closer to your
amplifier than the other. This will help
maintain proper signal balance.
3. Strip off 3/8" of insulation from both
ends of each conductor.
4. Twist each set of thin wires into a
tightly-bunched spiral.
5. At this point you need to identify a
visual difference between the two
conductors of each molded pair of
speaker wire. Differentiating marks
can be a different color wire (copper
or “silver”); a strand of yarn in one
conductor; thin, raised ribs on one
part of the outer insulation; or a
printed “+” marking on one of the
insulators. It does not make a
difference which of the two
conductors of wire go to (+) and (–)
on the speakers and amplifier, as
long as both speakers are connected
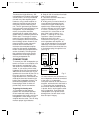
identically. Push down on the button
below the terminal and insert the wire,
or the banana plug, through the hole
(see Fig. 2).
For each channel, the red terminal on
the loudspeaker should be connected
to the red or (+) loudspeaker
connection terminal on the receiver or
amplifier, and the black to the black or
(–). Connecting the loudspeakers in
this manner ensures that they will be
in phase; that is, work together rather
than in opposition. Connecting the
loudspeakers out of phase will not
damage them, but will result in less
bass and poor imaging.
2
Left
Speaker
Red
(+)
Blk.
(–)
Right
Speaker
Red
(+)
Blk.
(–)
Amplifier/
Receiver
+L R+
Fig. 2
G Series Manual.qXp 7/27/98 12:54 PM Page 4


