


2
PAINTING THE CVIW50
FRAME & GRILLE
JBl CVIW50 can be painted
to match any decor. If you wish
to change its color, the satin
finish on the grille and frame
will function as a primer coat.
If CVIW50 is to be painted,
please do it before assembling
a CVSAT50 or CVCEN50
onto this adaptor.
NOTE: Gently remove the
acoustical foam blanket from
the grille before painting.
Reattach the blanket after the
paint has dried.
Before painting, install the
paint shield (in the assembly
kit) securely into the recess
in the baffle. This will protect
the speaker components
and baffle from paint residue.
Use a high-quality spray
paint, and apply a thin coat
of color.
Be certain the grille
perforations remain free
of paint. Filling them
with paint will diminish
the sound quality.
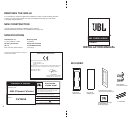
ASSEMBLING A CVSAT50 OR
CVCEN50 ONTO CVIW50
1
5
5
6
2
3
3
4
7
4
Note: If the CVIW50 frame and/or grille are to be painted, please do it before
assembling the loudspeaker onto the CVIW50.
1. Place the frame (1) on a flat surface. Use a non abrasive surface as to
not damage the finish of the frame.
2. Position the CVSAT50 or CVCEN50 loudspeaker (2) on the frame (1).
The four pins on the CVIW50 frame (5) should be inserted into the four
grille-pin holes on the loudspeaker baffle.
3. Position each of the two braces (3) on the back of the loudspeaker (2)
enclosure, and securely attach brace (3) to frame (1) using 4 small bolts
(4) per frame.
4. Remove mounting bracket (7) and store bracket and screws for possible
future use.
5. Do not attach grille (6) until after the assembly is installed in a wall.
3
EXISTING CONSTRUCTION
INSTALLATION
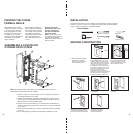
Tools Needed
The JBL Cinema Vision in-wall adaptors were designed to be easily installed.
However, if you are unsure of your ability to properly install these assemblies,
please contact your dealer or a qualified installer.
Pencil
Measuring tape
Phillips #2 screwdriver
Awl
Utility knife
Carpenter’s level
³1/2"
³1/2"
³1/2"
1. Mount CVSAT50 or CVCEN50
loudspeaker to CVIW50
adaptor as instructed earlier
in this installation guide.
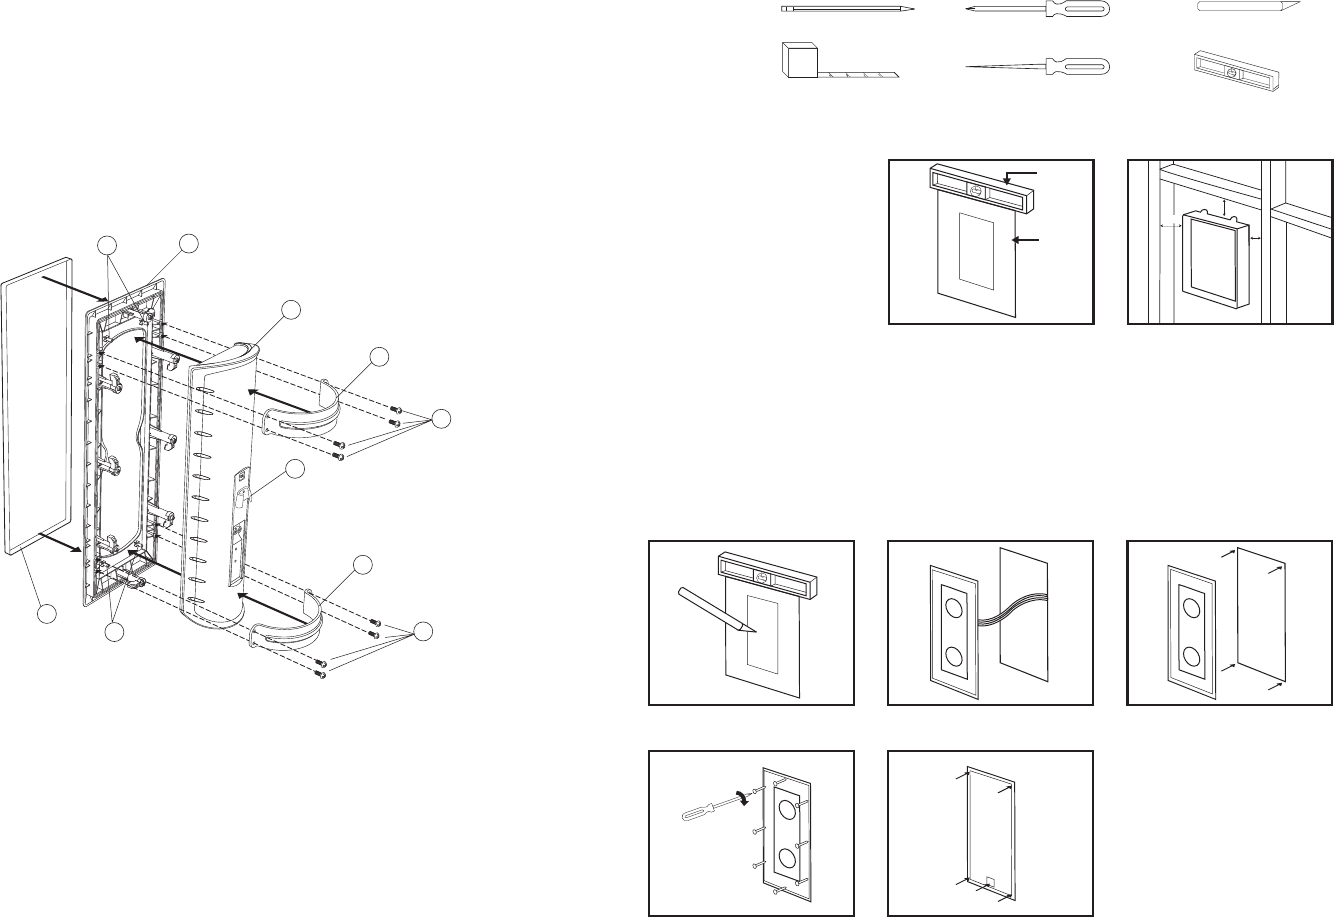
2. Cut the drywall.
Connect the speaker wires
to the speaker.
Place the frame assembly
in the wall.
NOTE: always allow at least
one-half inch between a wall
stud and the speaker cutout
or the locking tabs will not be
able to swivel into place.
Determine the correct speaker
location. Note: Remove the inner
template, which is the paint shield,
at the perforation. Also remove the
other perforation from the cardbord
part until you are left with a card-
board frame. Confirm that this card-
board frame comfortably fits on the
back of the CVIW50 frame. This will
be the opening size of your
installation cutout in the drywall.
Although the adaptor may be oriented
either horizontally or vertically, the
installation procedure is the same.
Level
Template
3. Screw down each of the 8 phillips
head screws. The locking tabs will
swivel into place and will secure the
unit to the rear surface of the drywall.
Replace the metal grille. Attach
the JBL logo to the grille to
correspond to vertical or
horizontal installation.