


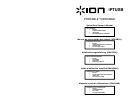
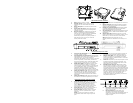

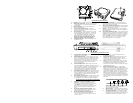
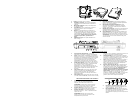

PRODUCT FEATURES
1. Platter: Place your record on the platter.
2. Control Panel: Please see the alternate detailed
section on the control panel features.
3. On Board Speaker: Use this speaker to listen to the
audio.
4. Tone Arm Clip: Use this clip to secure your
tonearm when storing and transporting the unit.
5. Tonearm: This unit comes with a ready to use pre-
balanced tonearm and cartridge. The cartridge is
user replaceable with parts from your distributor
located in the warranty guide. The platter starts
spinning once the tonearm is lifted over the
record.
6. 45 Adapter: Use this adapter with 45 rpm records.
7. Dust Cover: This cover protects the turntable from dust
and abuse while not in use or while in transport.
8. Dust Cover Latch: This latch holds the dustcover
securely in place, and can easily be opened by sliding it to
the left.
9. Carry Handle: Use this handle easily remove the unit
from record crates and bags, as well as carrying it in
transport.
10. Battery Cover: This holds the batteries securely in place
during use and transport. It easily slides open and closed
as indicated on the cover itself. NOTE: This unit uses 6
“D” cell batteries (not included). They should be installed
in the proper direction indicated
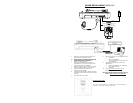
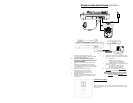
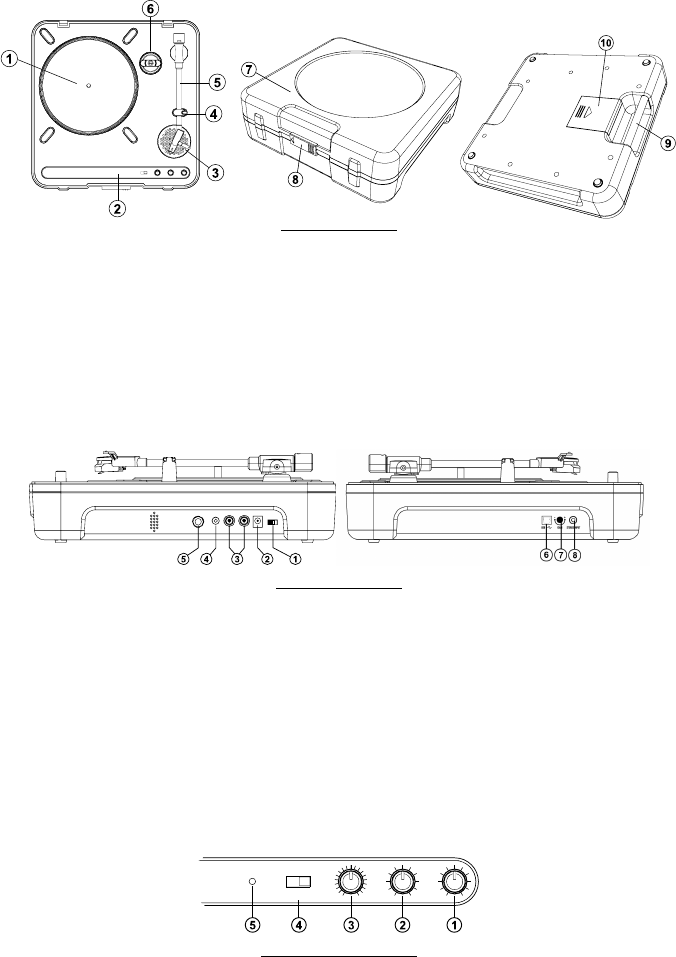
Output Panel Features
1. Power Switch: Use this switch to turn the power on and
off.
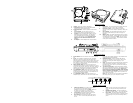
2. AC In: This turntable is designed to work with either
batteries or the power supply cord that comes with it.
While the power is switched off, plug the power supply into
the turntable first, then plug it into the wall power outlet,
then switch on. NOTE: This unit can also be powered by 6
“D” Cell batteries (Not Included).
3. Master Output (RCA): This “line level” output is for
connecting to the input of an external audio device such as
a DJ mixer, tape recorder, CD Burner, PA system, powered
speaker, or a home stereo. The level of the master stereo
output signal is controlled by the audio level control.
4. 1/8” Headphone Jack: Use this jack with the 1/8” mini
headphone plug. NOTE: Be sure the volume control is set
to the OFF position before plugging in any headphones to
avoid permanent hearing damage.
5. 1/4” Headphone Jack: Use this jack with the 1/4”
headphone plug. NOTE: Be sure the volume control is set
to the OFF position before plugging in any headphones to
avoid permanent hearing damage.
6. USB Audio Output: Use the included USB Cable to
connect your turntable to your computer. Refer to the
software instruction guide before plugging in your
turntable.
7. Gain: This knob can be used to adjust the gain level of the
audio signal from the turntable. If the audio from the
turntable is too quiet or too loud, use this knob to adjust
the volume setting.
8. 1/8” Stereo Line Input: Connect Tape Players, Reel to
Reel, or any other audio source here. This signal is sent to
the computer through the USB connection. Make sure
that your phono cartridge is installed while using this
input for maximum sound quality. Also make sure that
your RCA jacks are either plugged into an input device or
not in contact with metal.
Note: The 1/8" audio input is not routed to the turntable's
RCA output jacks, only to your computer via USB.
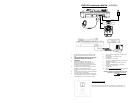
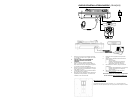
POWER
PITCH
33
RPM
7845
+10%
-10%
TONE
LOW HIGH
AUDIO
OFF
CONTROL PANEL FEATURES
1. Audio Level Control: This rotary control adjusts
the volume level of the onboard speaker,
headphone and line out outputs. NOTE: Make sure
the Audio Level Control is set to OFF when
connecting any alternate audio output devices.
2. Tone Control: This feature allows you to adjust
the low and high frequency audio levels.
3. Pitch Control: This knob adjusts the pitch of the
music +/- 10%. In the center position the pitch is
at 0%.
NOTE: In order for the pitch to be adjusted, the
tempo also changes according to what the pitch
setting.
4. RPM Selection Switch: This switch selects the
RPM of the turntable platter -- 33, 45, and 78 RPM.
5. Power LED: This LED indicates that the power
switch on. Make sure the power is off when storing
or transporting the unit, to avoid wasting battery
power.