


14
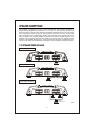
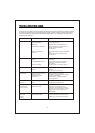
This section provides you with a catalog of amplifier symptoms and their probable causes
and solutions. Before you consult this listing, make sure the vehicle's electrical system is
working properly by verifying that other electrical items (e. g. headlights, windows, etc.)
Still function correctly.
No Audio
Low or N.C Remote
Turn-on connections
Blown Fuse
Power wires not connected
Blown or non speakers
connected
Check remote turn-on voltage at
amp and head unit
Replace with new fast-blow fuse
Check butt splices or solder joints
Check ground and battery
connections
Use VOM or DVM to measure speaker
coil
impedance; check speaker wiring
connections
SOLUTIONPROBABLE CAUSE
SYMPTOM
See adjustment procedure and check
each step;
Inspect each speaker for damage
and repair or replace suspected
component
Refer to head unit owner's manual
Input Sensitivity not set
properly
or damaged speaker cones
Low turn-on voltage
Distorted Audio
Audio Level Low Mute circuit on head
unit is on.
Check electrical system for low
voltage;
Check ground connection
Audio Lacks
Speakers wired with wrong
polarity, causing
cancellation of bass
frequencies
Check polarity of wires from
amplifiers to each speaker as defined
by the system design
Check battery voltage at amplifier
during operation
External Fuse
Blowing
Incorrect wiring or short
circuit
Refer to electrical installation and
check each installation step
Whining noise
on audio with
engine running
Amplifier is picking
up alternator noise
Install an in-line noise filter on the
head unit's power wire; Check
alternator routing diodes or voltage
regulator for proper operation. Check
all grounds , battery voltage, and
RCA cables
Ticking noise on
audio with
engine
running
Amplifier is picking up
radiated spark noise
Check RCA audio cable; Install an
in-line noise filter on the head unit's
power wire. Check spark plug wires.