Actual product may vary from image shown.
Quick Setup Guide
NS-HTIB51A 5.1 Channel Home Theater System
Features
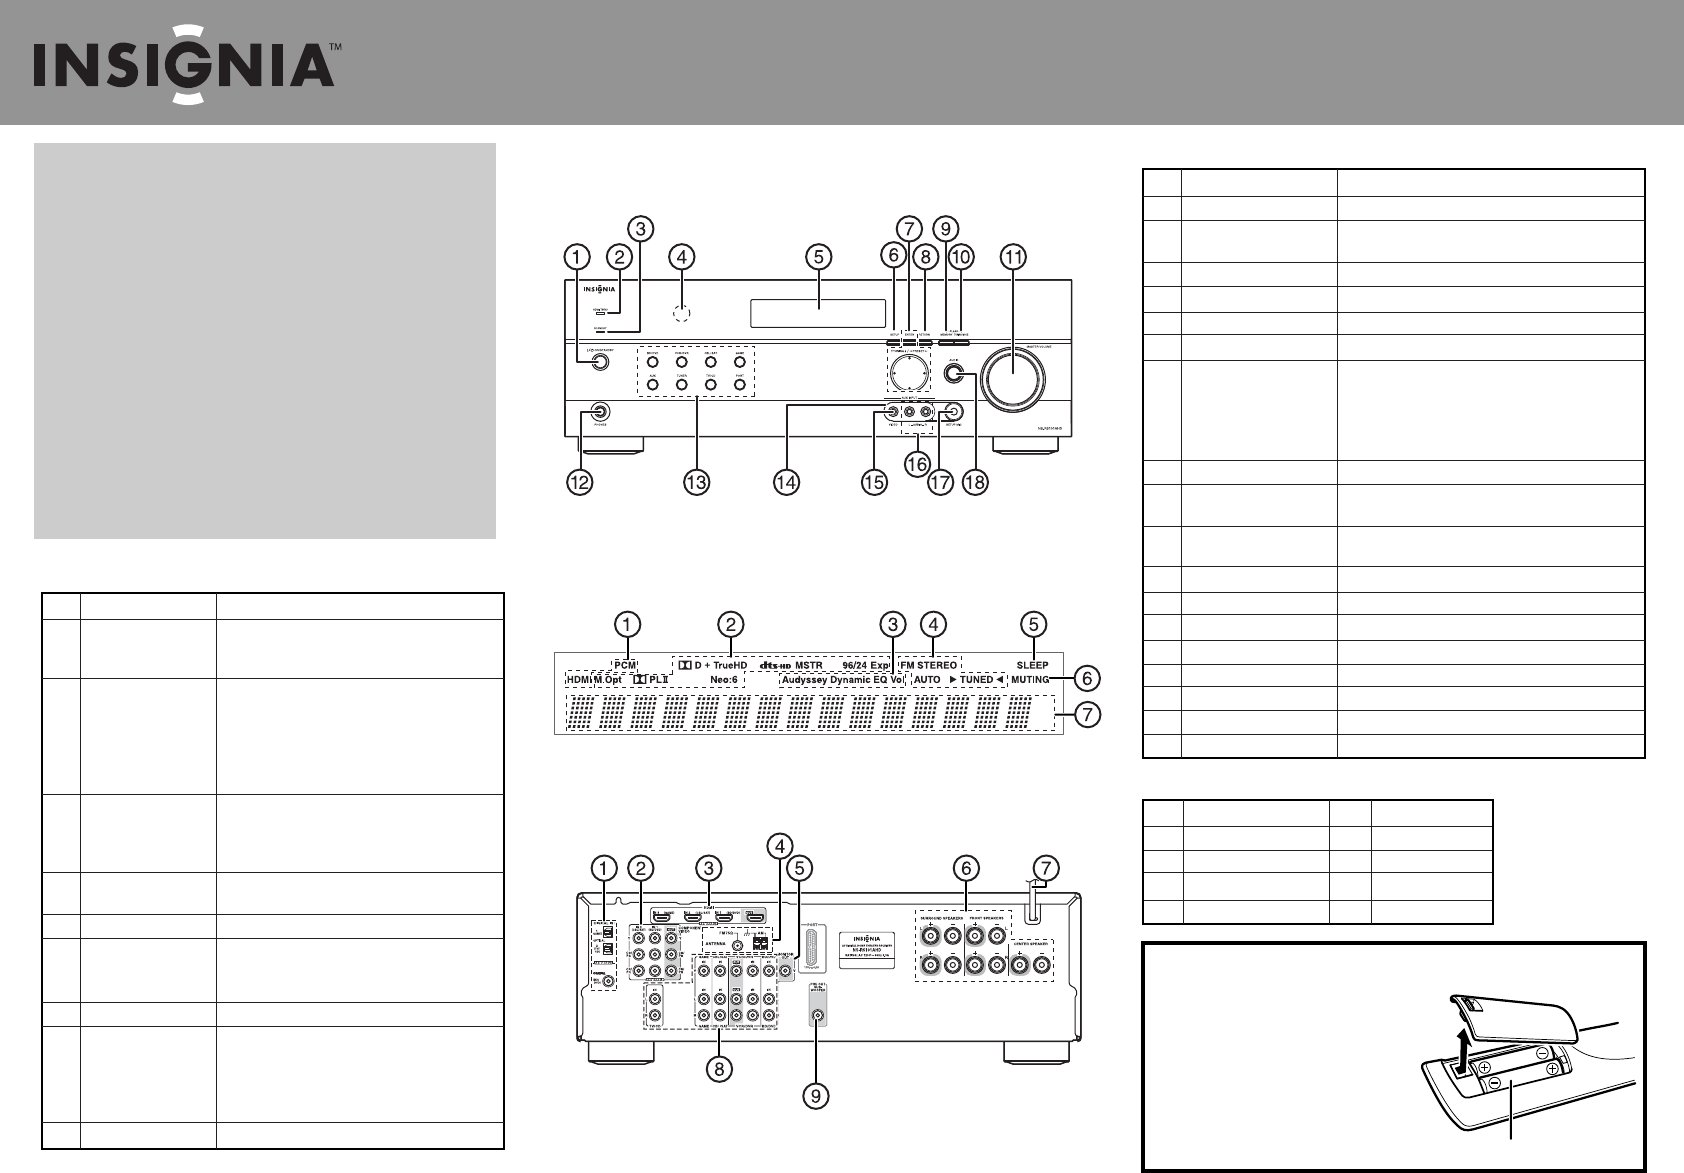
Front controls
Back view
ITEM DESCRIPTION FUNCTION
1 ON/STANDBY button Press to turn on your stereo receiver.
2 HDMI THRU indicator Lights when the HDMI pass-through function is activated
in standby mode.
3 STANDBY indicator Lights red when your stereo receiver is in standby mode.
4 Remote control sensor Receives the signal from the remote control.
5 Display Provides information about receiver functions and settings.
6 SETUP button Press to open the on-screen menus.
7 TUNING / Press TUNING / to tune the radio to the next or
previous station
PRESET / Press PRESET / to tune the radio to the next or
previous station preset.
ENTER Press ENTER to conrm a selection.
8 RETURN button In menu mode, press to return to the main menu.
9 MEMORY button Press to save a radio station preset. Press with the TUNING
MODE button to clear presets.
10 TUNING MODE button Press to turn on the receiver tuning mode and listen to
the radio. Press with the MEMORY button to clear presets.
11 MASTER VOLUME knob Turn to increase or decrease the volume.
12 Headphone jack Plug your headphones into this jack.
13 Input selector buttons Press to select the input signal source you want.
14 Protective cap Remove when using jack.
15 AUX INPUT VIDEO jack Plug an external video source into this jack.
16 AUX INPUT AUDIO L/R jacks Plug an external sound source into this jack.
17 SETUP MIC jack Plug the Audyssey setup microphone into this jack.
18 AUDIO button Press to access audio settings.
Congratulations on your purchase of a high-quality Insignia
product. Your NS-HTIB51A represents the state of the art in
home theater system design and is designed for reliable and
trouble-free performance.
Package contents
• Receiver
• Front speakers (2)
• Center speaker
• Surround speakers (2)
• Subwoofer
• Remote control
• AA batteries (2)
• FM antenna
• AM antenna
• Speaker setup microphone
• Color labels for speaker cables
• Speaker cables:
• 11 ft. (3)
• 26 ft. (2)
• RCA cable 10 ft.
• Rubber spacers for speakers (20)
• User Guide
• Quick Setup Guide
Fluorescent display
Front controls features
ITEM DESCRIPTION FUNCTION
1 DIGITAL IN jacks Plug the optical digital cable from a game (1) or
TV/CD (2) into the upper jacks, or the coaxial digital
cable from a Blu-ray disc/DVD into the lower jack.
2 COMPONENT video Plug the cables from a component video source into
jacks the #1 (BD/DVD) or #2 (CBL/SAT) jacks.
Plug the cables to a component video monitor into
the OUT jacks.
The jacks are color coded (red, green, and blue) to
correspond to the cable connectors.
3 HDMI jacks Plug the HDMI signal input cable from a GAME (IN3),
cable/satellite box (IN2), or a BD/DVD player (IN1).
Plug the HDMI output signal cable to a TV or monitor
into the OUT jack.
4 ANTENNA connectors Connect a 75 ohm FM antenna to the coaxial connector
or an AM loop antenna to the wire connectors.
5 MONITOR OUT V (Video) Connect this jack to a TV monitor.
6 FRONT SPEAKERS Connect the front speakers to these connectors.
SURROUND SPEAKERS Connect the left and right surround speakers and
CENTER SPEAKER the center speaker to these connectors.
7 AC power cord Plug this cord into an AC power outlet.
8 Composite Video and Plug the composite video and audio L/R output cables
Audio L/R jacks from the indicated devices into these jacks.
For video recording, plug the composite video and
audio L/R input cables to a VCR or DVR into the OUT
jacks.
9 SUBWOOFER Connect the subwoofer to this jack.
Back view features
Installing batteries in the remote control
1 Remove the cover.
2 Insert two AA batteries into the compartment
matching the polarity indicated.
3 Replace the cover.
CAUTION: Do not use Ni-Cd rechargeable
batteries in this remote control.
Remove the batteries if they are not to be used
for an extended period of time.
Batteries (AA)
ITEM DESCRIPTION ITEM DESCRIPTION
1 Audio input indicators 5 SLEEP indicator
2 Listening mode indicator 6 MUTING indicator
3 Audyssey indicators 7 DIGITAL display
4 Tuning indicators
Fluorescent display features


