


MUSIC MODE: Music mode is for use with any stereo music recordings, and provides a wide
and deep sound space. The Music mode includes di erent controls that let you tailor sound
to your individual listening preference.
Modifying additional audio settings
>RAFLPBQRM
SLIRJB PBQRM
AVK>JF@O>KDB
JLSFBJLAB
LCC
BUFQPBQRM
MOL I LDF @FF
JRPF@JLAB
Panorama, center width, and dimension are available only when the player is in Music Mode.
These options let you customize the ProLogic II Music Mode Sound E ect.
PA NO RA MA: Extends the front stereo image to include the surround speakers for an exciting
wraparound e ect with side-wall imaging.
CENTER WIDTH: With ProLogic decoding, dominant center signals can come only from
center speaker. If no center speaker is present, the decoder splits the center signals equally
to the left and right speakers to create a phantom center image. The Center Width allows
variable adjustment of the center image so it may be heard only from the center speaker;
only from the left and right speakers as a phantom image; or from all three front speakers
to varying degrees.
DIMENSION: A control that alters the ratio of L+R to L-R for the two-channel input signals.
It let you gradually adjust the sound eld either towards the front or towards the rear. If a
recording is too spacious or strong from the surrounds, it can be adjusted forward to get a
better balance. Likewise, if a stereo recording is somewhat too mono or narrow sounding,
adjusted it toward the rear to get a more enveloping, immersing result.
Specifying the video output
Choose the type of video output that matches the video connection between your home
theater and the television.
480i YPBPR: Select this if you have connected your home theater to your television using the
Y, Pb, Pr video jacks and are not using the progressive scan feature.
P-SCAN YPBPR: Select this if you have connected your home theater to your television using
the Y, Pb,Pr video jacks and are using progressive scan feature.
S-VIDEO: Select this if you have connected your home theater to your television using S-
Video jack.
Specifying the television type
4:3 PS Select this when your home theater is connected to a normal television.
Widescreen images are shown on the screen, but with some parts automatically
cut o .
4:3 LB Select this when your home theater is connected to a normal television.
Widescreen images are shown on screen, with black belts on the top and bottom.
16:9 Select this when your home theater is connected to a wide-screen television.
Notes:
The actual playing e ect depends on the picture recorded on the disc. Some discs may not play depending
on your selection in this option.
A disc recorded in 4:3 mode will only play in 4:3.
The TV TYPE should correspond to the television screen.
Setting up the speakers
If the center speaker is placed close to the front speakers, choose CENTER DIST. to set the Center distance value
to a smaller number to achieve the best listening e ect.
If the surround speakers are placed closer to the listening position than the front speakers, choose REAR DIST. to
set the rear distance value to a larger number to achieve the best listening e ect.
Using your DVD home theater system
Playing discs
You can play the following discs on your home theater:
DVD-Video
Note: For the purpose of distribution of DVD Discs, the world has been separated into six
zones. The zone your unit is intended for is indicated on the Zone Label. This should be the
same as the label on discs available in your region. If you have any di culties in playing a disc,
make sure that the disc is for the same zone as your home theater.
DVD-R, DVD-RW, DVD+R and DVD+RW
DVD-R and DVD-RW discs must be made in Video DVD mode. DVD+RW disc must
be made in accordance with the speci cations for DVD+RW disc with a 4.7 GB
capacity.
Video CD (VCD)
Super Video CD (SVCD)
Audio CDs
CD-R and CD-RW
This player can play most CD-R and CD-RW discs. However depending on the
recording conditions, you may nd that not all discs will play successfully.
MP3 Files on CD-R or CD-RW
MP3 les should be ISO 9660 or JOLIET format. If the sampling frequency is 44.1
or 48.1KHz, and the xed bit rate is 128Kbps or higher, MP3 les can be played.
However, some les may not play depending on their conditions or formats.
WMA Files on CD-R
If the sampling frequency is 32KHz, and the xed bit rate is 128Kbps or higher, WMA
les can be played. However, some les may not be played depending on their
conditions or formats.
•
•
•
•
•
•
•
•
•
•
•
•
•
•
JPEG Files on CD-R or CD-RW
This player can play JPEG les with a resolution for up to ve million pixels. Certain
JPEG les cannot be read by this player.
MPEG 4 Files on CD-R or CD-RW
Your MPEG 4 les should be ISO format without QPEL.
Playing a DVD, VCD, or CD
TITLE - Press to display the Title Menu if present on the disc. This feature works for
DVD playback only.
Stop
Press once to stop the current playback instantly and enter the Resume Play
mode.
Press to resume playback from the point at which you last stopped the disc.
Press twice to stop playback completely. You cannot resume playback.
Press to start playback from the beginning of the disc
3. MENU - Press to display the Disc Menu.
Note: Playback stops to display the menu. The button does not work for CD playback. For VCD, this button is
only available when PBC is set to on.
4. / - Skip to the beginning of a chapter or track
When a disc is playing, you can skip backward or forward a chapter or track.
Press to skip to the beginning of the previous chapter or track.
Press to skip to the beginning of the next chapter or track.
Note: For audio CD discs, use the numeric buttons (0 - 9 ) to directly jump to a track number.
Note: When operating a VCD with the PBC function, the PBC should be set to OFF.
5. ZOOM (To Zoom In the Image) - Press to magnify pictures during playback.
When a disc is playing, press the ZOOM / CLEAR button. Each time ZOOM CLEAR
button is pressed, the ZOOM settings are changed as follows :
• ZOOM x 2 • ZOOM x 3
• ZOOM x 4 • ZOOM x 3/4
• ZOOM x 2/3 • ZOOM x 1/2
• ZOOM : OFF
While an image is magni ed, you can use the , , , and keys to shift image for
viewing.
To return to the original normal view, press the ZOOM key until the ZOOM : OFF
symbol shows. The screen returns to normal.
When you reach the edge of the image, the display will not shift anymore in that
direction.
6. ANGLE - Press to change the viewing angle in DVD. You can select di erent angles of
viewing when playing a DVD video disc that contains scenes recorded from multiple
angles.
Press ANGLE repeatedly to select di erent angles of viewing if available on the disc.
Note: This function is only available when the scenes shot from multiple angles have been recorded on the
DVD. If multi-angle viewing is not available, OFF is displayed.
7. (Open / Close) - Press to open the disc tray.
Note: Load the disc on the disc tray with disc label facing upward.
Press again to close the disc tray. The home theater starts playback automatically.
8.
Pause - You can freeze the image and advance frame-by-frame.
CD: Press
to pause the playback. Press again or press to resume the normal
playback.
DVD / VCD: Press to pause the playback. Press again to go to STEP mode. Each
time you press , the video advances one frame.
Press to resume playback.
9. Play - Press to start playback.
10. / (search backward or forward, slow motion)
Press / to search backward or forward. Press to resume playback.
Each time or or is pressed, the speed of backward or forward search
changes accordingly.
In Pause mode, press / to start forward or backward slow motion play.
Each time or or is pressed, the speed of slow-motion playback changes
accordingly. Press to resume normal playback.
Note: Slow motion step-by-step does not work with CD Playback. Backward slow motion does not work with
VCD playback.
11. SUBTITLE - Press to change a di erent subtitle language available on the disc.
During playback, you can change to a di erent subtitle language or disable subtitles.
When a disc is playing, press SUBTITLE to show the current playback language subtitle.
Press repeatedly to select the desired subtitle language.
Note: This function can only be used for disc on which di erent subtitle languages have been recorded. The
number of languages recorded may be di erent depending on the disc.
12. AUDIO / FM ST - Press to change to a di erent audio language on the disc during
playback. You can change audio language or audio output.
When a disc is playing, press AUDIO / FM ST to show the current playback audio
track number.
Press repeatedly to select the desired audio track.
Note: If there is only one audio track available on the disc, the number does not change.
Advanced DVD, VCD, and CD playback
1. Using the INFO function
While the disc is playing, press INFO to display playback information present on the disc.
To view DVD playback information
Press INFO to display DVD playback information.
•
•
1.
2.
•
•
•
•
•
•
•
•
•
•
•
•
•
•
•
1.
1
2. Press INFO twice to check the remaining time of current chapter.
3. Press INFO thrice to check the playing time of current title.
4. Press INFO four times to check the remaining time of current title.
5. Press INFO ve times to display more playback information.
---
To view CD playback information
Press INFO to display CD playback informaiton.
To view VCD playback information
Press INFO to display VCD playback informaiton.
Press INFO twice to check the remaining time of current track. (CD/VCD)
Press INFO thrice to check the playing time of current disc. (CD/VCD)
Press INFO four times to check the remaining time of current disc. (CD/VCD)
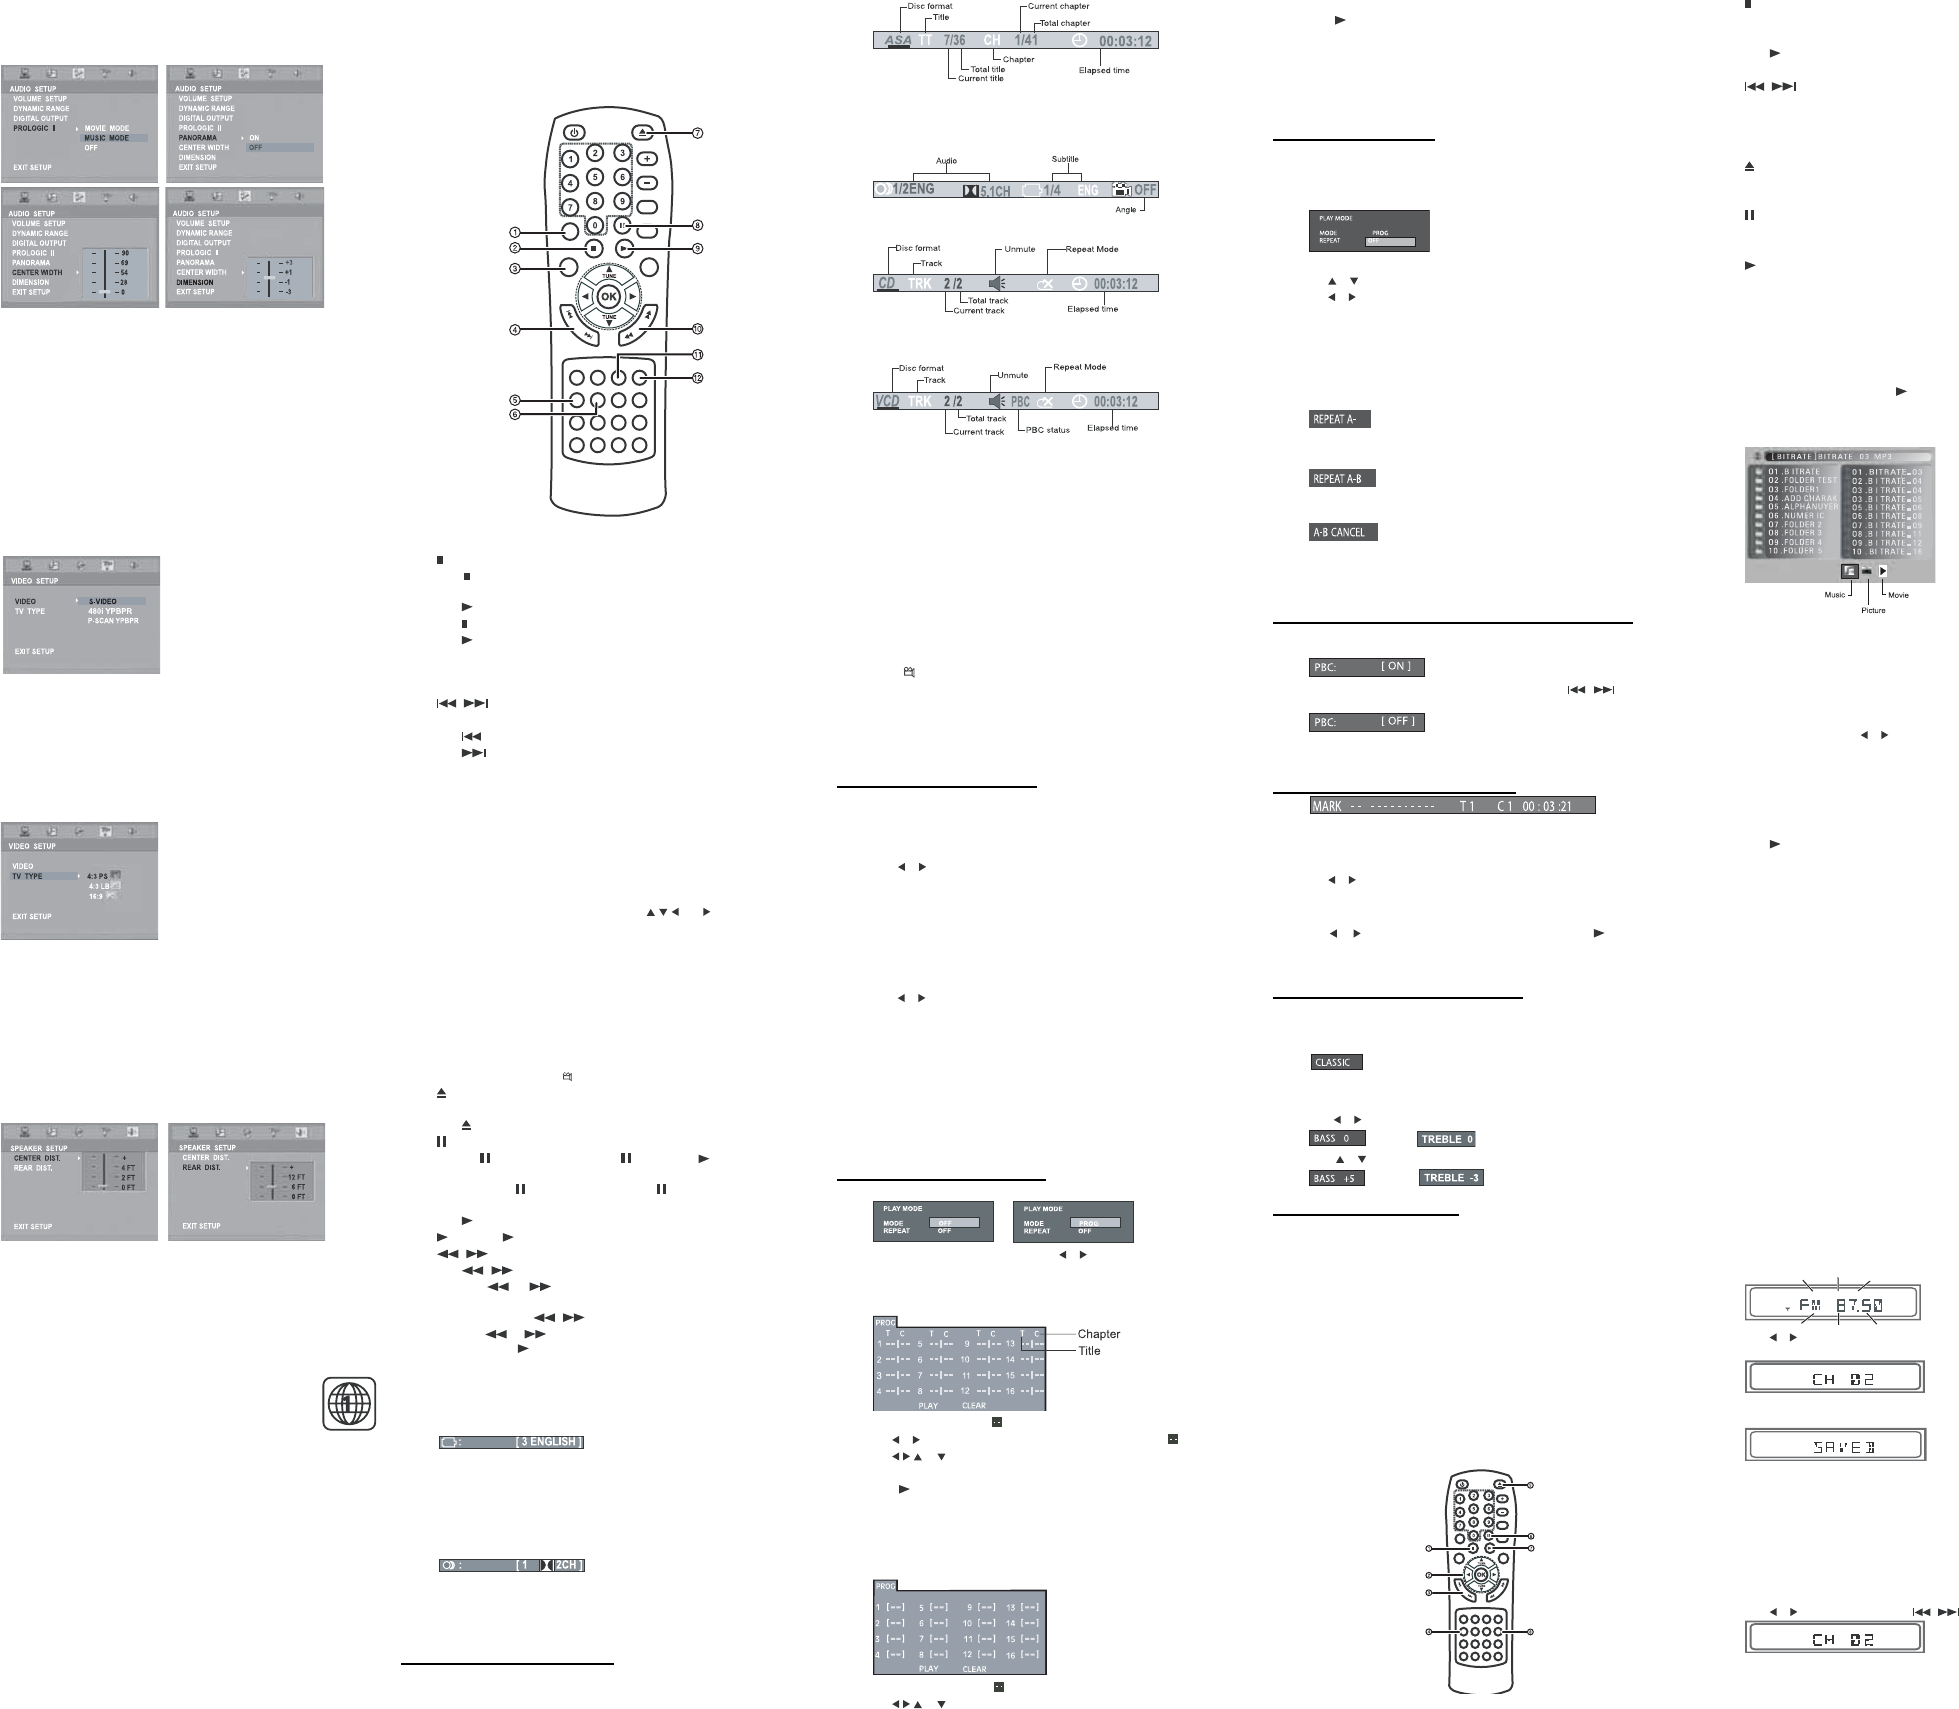
The following describes information you may see when pressing INFO during DVD, CD, or
VCD playback.
1.1 TT (title info) - Displays the currently playing title number and the total number of titles
recorded on the disc.
1.2 CH (chapter info) - Displays the currently playing chapter number and the total number
of chapters recorded on the disc.
1.3 Elapsed Time - Displays the elapsed time from the beginning of the title playback.
1.4 Audio - Displays the audio track currently selected.
1.5 Subtitle - Displays the language (subtitle) number currently selected.
1.6 Angle - Displays the viewing angle currently selected. When a disc without multi-angle
is played back, OFF is displayed.
1.7 TRK (track info) - Displays the currently playing track number and the total number of
tracks recorded on the disc.
1.8 Unmute Icon - Displays when the sound is unmuted.
1.9 Repeat Mode - Displays any repeat mode that is set.
Note: After checking the settings, press INFO again to turn o the display.
2. Using the GOTO function
This function lets you directly select any point of the disc to start playback.
2.1 Select a speci c title, chapter, or track
You can select any speci c title, chapter, or track by number to start playback.
Press GOTO.
Press or to highlight a title, chapter, track and press the corresponding numeric
key 0 - 9.
Press OK to con rm. Your home theater starts playback from the position you select.
Note: Press CLEAR to reset the highlighted title , chapter, or track.
2.2 Locating a speci c time
You can select any speci c location by directly entering the time in hours, minutes, and
seconds.
Press GOTO.
Press or to highlight time.
Directly key in the time to start playback using the numberic keys 0 - 9.
The rst two digits are the hours.
The next two digits are the minutes.
The last two digits are the seconds.
4. Press OK to con rm. Your home theater starts playback from the time you select.
Notes:
Some discs may not let you use this function.
Some scenes may not be located as precisely as you speci ed.
This method for accessing the speci c location is available only within the current title of the DVD disc.
Press CLEAR to reset the time when the time is highlighted.
3. Programming Playback
Press the PLAYMODE button.
MI >V JLAB
JLAB MOLD
OBM B>Q LCC
MI >V JLAB
JLAB MOLD
OBM B>Q LCC
2. When the MODE state is highlighted, use or to select PROG mode.
3. Press OK to con rm.
Note: During VCD and SVCD playback, the function is only available when PBC is 3.1 DVD programming
3.2 DVD programming
Enter the title numbers in .
Use or to highlight chapter and enter the chapter numbers in .
Use
, , , or to move to another entry.
Repeat the above steps for more inputs.
Press
or highlight PLAY on the screen and press OK to start the programmed
playback.
Highlight the current input on the screen and press CLEAR to delete the title chapter
numbers you input.
Note: Highlight CLEAR on the PROG screen, then press OK to delete all inputs.
3.2 CD, VCD, SVCD programming
Enter the track numbers in .
Use
, , , or to move to another entry.
1.
1.
2.
3.
4.
1.
2.
3.
1.
2.
3.
•
•
•
•
•
•
•
1.
•
•
•
•
•
•
•
•
Repeat the above steps for more inputs.
Press
or highlight PLAY on the screen and press OK to start the programmed
playback.
Highlight the current input on the screen, then press CLEAR to delete the track you
input.
Notes:
Highlight CLEAR on the PROG screen and press OK to delete all inputs.
The function is only available when PBC is turned o .
4. Repeating Playback
You can play a speci c title, chapter, or track repeatedly. Press the PLAYMODE button to
access the Playmode menu.
Note : During VCD and SVCD playback, the function is only available when PBC is turned o .
4.1 Repeat a title, chapter, track, or whole disc
Press the PLAYMODE button.
Use or to select the REPEAT option.
Use or to select a di erent repeat mode, then press OK to con rm. The selected
mode is highlighted on the screen.
For DVD Disc : O , REP All, Chapter, or Title
For CD / VCD / SVCD Disc : O , REP 1, or REP All
For MP3 / JPEG / WMA Disc : O , REP DIR, or REP 1
4.2 Repeat a speci c section
While the disc is playing, press A-B to set the beginning of the section you want to
play repeatedly.
2. Press A-B again to set the end of the section you want to play repeatedly. Your home
theater immediately begins replaying your selection repeatedly.
3 Press A-B again to clear the programmed repeat playback and return to the normal
playback.
Notes:
The A-B repeat function can only be used within the same title. If the start and end of the section to be
repeated are in di erent titles, it will not work.
The A-B repeat function does not operate in scenes where di erent camera angles are recorded.
5. Using PBC (VCD and SVCD playback control)
When a VCD or SVCD is playing, press PBC(Playback Control) repeatedly to toggle
between PBC on and PBC o .
If available, the disc menu appears on the television. Use / or the numeric
keys (0-9) to select a play operation.
Your home theater skips the disc menu and starts playback directly from the
beginning. The PLAYMODE button is available when playing a VCD.
6. Using the bookmark feature
The Bookmark feature lets you mark a point in the DVD that you want to watch again.
6.1 Create a bookmark
During DVD playback, press BOOKMARK to access the bookmark menu.
Use or to navigate, then press OK to bookmark your desired point.
6.2 Recalling a bookmark scene
During playback, press BOOKMARK to access the Bookmark menu.
Use or to highlight the bookmark you want, then press to play from the
bookmark point.
Press CLEAR to reset the highlighted bookmark.
7. Selecting di erent EQ modes
7.1 EQ modes
Press TONE repeatedly on the remote for one of ve EQ modes: FLAT, ROCK, POP,
CLASSIC, or JAZZ.
7.2 Treble / Bass control
Press TONE once, then press OK. The Treble Control is enabled.
Press
or to switch to the Bass Control.
Press or to adjust the Treble / Bass Level.
8. Using the sleep feature
This feature lets you select a time for your home theater to switch to the Standby mode
automatically.
8.1 Setting the sleep timer
Press SLEEP on the remote control repeatedly to cycle through the following sleep timer
options:
• SLEEP OFF • SLEEP: 120 MINUTES
• SLEEP: 90 MINUTES • SLEEP: 60 MINUTES
• SLEEP: 30 MINUTES • SLEEP: 15 MINUTES
8.1 Checking the remaining sleep time
When the Sleep timer is switched on, you can check the remaining time before your home
theater switches to Standby mode. Press SLEEP once and the remaining time is displayed.
8.2 Cancelling the sleep timer
To switch o the Sleep Timer, press SLEEP repeatedly until SLEEP OFF is displayed.
Playing MP3, WMA, JPEG, and MPEG 4 les
•
•
•
•
•
1.
2.
3.
•
•
•
1.
•
•
•
•
•
•
•
•
•
•
•
•
•
•
Stop
Press to stop playback.
Press to display the selection menu during playback (for JPEG les only).
Press to resume normal playback.
2. Active Navigation - Press to select a le, then press OK to start playback.
3. / - Press to skip a track or picture backward or forward.
4. ZOOM / CLEAR
ZOOM - Press to zoom into the picture during a JPEG le slideshow or an MPEG 4
playback.
CLEAR - Press to delete the information you input.
5. Open / Close - Press to open the disc tray.
Note: Load the disc on the disc tray with disc label facing upward.
Press again to close the disc tray. Playback starts automatically.
6. Pause
Press to pause playback.
Press again to resume normal playback.
7. Play - Press to start playback.
8. ROTATE (for JPEG le only)
During the playback of a JPEG le, press ROTATE to rotate the picture.
Using the Selection menu
The Selection Menu appears when starting MP3, WMA, JPEG, or MPEG 4 playback.Folders
appear in the left pane. Folders are numbered from the top to the bottom.
When you highlight one of the folders, all the contents of this folder are displayed in the right
pane. All the tracks, pictures, and movies are numbered from top to bottom.Use the active
navigation keys to select les. Press OK or to start playback.
Active navigation keys can also be used to select folders containing MP3, WMA, JPEG, and
MPEG les. When a folder is selected, the rst le plays automatically.
Playing MP3 and WMA les
Your home theater begins playing all of the MP3 and WMA les currently selected. Then it
plays all the les in the subfolders contained within its parent folder. After that, your home
theater plays the remaining folders on the disc.
To create an MP3 playlist:
Press the PLAYMODE button on the remote control. The Play Mode Menu displays
on the screen.
Highligt MODE, then use or to select PROG mode.
Press OK to open MP3 program menu. In this menu, the letter F means folder and
T means track.
Enter the folder number below the F and the track number below the T using a 2-
digital number.
Use the Navigation keys to move to another eld, then repeat step 4 for the next
song.
Press or or highlight PLAY on the screen, then press OK to start playback.
Highlight CLEAR on the PROG screen, then press OK to delete all inputs. You can
progam up to 16 songs total.
Viewing JPEG les
Your home theater starts the slideshow for the currently selected JPEG le. It then displays all
other remaining JPEG les in the same folder. After that, your home theater plays the JPEG
les in the subfolders contained in the same folder.
Viewing MPEG 4 les
Your home theater starts to play the whole le currently selected.
Note: You cannot play WMA and JPEG les simultaneously.
Listening to the radio
Note: Make sure the FM and AM antennas are connected correctly.
You can program up to 20 FM radio channels and 20 AM radio channels.
To search for a radio station
Press STANDBY/ON on the remote control to turn on your home theater.
Press TUNER/AUX on the remote control or SOURCE on the front panel repeatedly
until the Tuner mode is selected.
Press TUNER/AUX on the remote control or SOURCE on the front panel again to
switch between AM and FM bands if necessary.
Tune to the radio station by one of the following methods:
Manual Tuning --- Press or repeatedly on the remote control until the desired frequency appears on the
display.
Automatic Tuning--- Press and hold or on the remote control for more than one second to activate the
AUTO SCAN function. Release the button. The AUTO SCAN function stops on any radio station found.
Repeat this process until it stops on the desired station.
To save a radio station
When a radio station is located, press and hold OK until the frequency ashes on
the VFD display.
MHz
2. Press or use the remote control numeric keys 0 - 9 to select the channel number
that you want your home theater to memorize.
3. Press OK again to store into channel number. The word SAVED is displayed during
the saving operation. The radio station is memorized to that channel number.
4. Repeat the above steps to save up to 20 radio channels.
Note: When you tune at a weak FM station manually, press AUDIO / FM ST on the remote control to switch from
Stereo mode to Mono mode to reduce the background noise.
To recall a memorized radio station:
Press the STANDBY/ON button on the remote control to turn on your home
theater.
Press TUNER /AUX on the remote control or SOURCE on the front panel repeatedly
until the Tuner mode is selected.
Press again to switch between AM and FM bands if necessary.
Press
or on the remote control or / on the front panel to change.
1.
•
•
•
•
•
•
1.
2.
3.
4.
5.
6.
7.
1.
2.
3.
4.
•
•
1.
1.
2.
3.
4.
Troubleshooting
Under no circumstances should you try to repair your home theater yourself, as this will
invalidate the warranty. Only quali ed service personnel can remove the cover or service
this player.
NO POWER
Make sure that the on/o button on the front of your home theater is set to on.
Make sure that the power cord plug is correctly connected.
Make sure that there is power at the AC outlet by plugging in another appliance.
NO PICTURE
Make sure that the TV is turned on.
Select the correct AV input on the TV.
Check the video connection.
Make sure that the channel selector is set to AV on the TV (See your TV manual for instructions).
When Progressive Scan is on, composite video output is disabled. Press the V-SELECT button to select the
correct video output mode, otherwise, you will have no picture or a distorted picture.
DISTORTED PICTURE
Check the disc for ngerprints and clean with a soft cloth, wiping from the center to the edge.
Sometimes a small amount of picture distortion may appear. This is not a malfunction.
The disc format does not match the TV being used (PAL/NTSC).
Make sure that only one video output is connected.
NO COLOR IN PICTURE
The disc format is not the same as that of the TV being used (PAL/NTSC).
Make sure that the DVD player is not connected through a VCR.
PICTURE SWINGS
Move your home theater further away from possible interference or emission sources (for example a radio,
power ampli er, or radiator).
DOES NOT RETURN TO START-UP SCREEN WHEN DISC IS REMOVED
Check to see if the program requires another disc to be loaded.
Reset by unplugging the player, then connect the power again.
THE PLAYER DOES NOT RESPOND TO THE REMOTE CONTROL
Aim the remote control directly at the sensor on the front of the player.
Avoid all obstacles that may interfere with the signal path.
Inspect or replace the batteries.
NO SOUND
Check the audio connections.
If using a Hi-Fi ampli er, try another sound source.
Clean the disc.
Check if the disc is defective by trying another disc.
NO AUDIO AT THE DIGITAL OUTPUT
Check the digital connections.
Check the Digital Out menu to make sure that the digital output is correctly set.
Make sure that the audio format of the selected audio language matches your home theater capabilities.
DISC CANNOT BE PLAYED
Make sure that the disc is placed into the disc tray correctly.
YOU HAVE FORGOTTEN THE PASSWORD
While in NO DISC mode, enter 76418.
FUNCTION DISTURBED
The normal function of your home theater may be disturbed by external interference.
Reset your home theater by disconnecting and reconnecting the power cord.
Warning: This equipment may generate or use radio frequency energy. Changes or modi cations to this
equipment may cause harmful interference unless the modi cations are expressly approved in this manual. The
user could lose the authority to operate this equipment if an unauthorized change or modi cation is made.
Regulatory information FCC Part 15 - This equipment has been tested and found to comply with the limits
for a Class B digital device, pursuant to part 15 of the FCC Rules. These limits are designed to provide reasonable
protection against harmful interference when the home theater is operated in a residential installation.
This home theater generates, uses and can radiate radio frequency energy and, if not installed and used in
accordance with this manual, may cause harmful interference to radio communications. However, there is no
guarantee that interference will not occur in a particular installation. If this home theater does cause harmful
interference to radio or television reception, which can be determined by turning the home theater o and on,
the user is encouraged to try to correct the interference by one or more of the following measures:
Reorient or relocate the receiving antenna.
Increase the separation between the home theater and receiver.
Connect the home theater to a supply outlet di erent from that to which the receiver is connected.
Consult the dealer or an experienced radio/TV technician for help.
Warranty
1-year limited warranty
Insignia Products (“Insignia”) warrants to you, the original purchaser of this new NS-H2002 DVD Home Theater
System (“Product”), that the product shall be free of defects in the original manufacture of the material or
workmanship for a period of one (1) year from the date of your purchase of the Product (“Warranty Period”)
This product must be purchased from an authorized dealer of Insignia brand products and packaged with
this warranty statement. This warranty does not cover refurbished Product. If you notify Insignia during the
Warranty Period of a defect covered by this warranty that requires service, terms of this warranty apply.
How long does the coverage last?
The Warranty Period lasts for 1 year (365 days) from the date you purchased the Product. The purchase date is
printed on the receipt you received with the Product.
What does this warranty cover?
During the Warranty Period, if the original manufacture of the material or workmanship of the Product is
determined to be defective by an authorized Insignia repair center or store personnel, Insignia will (at its sole
option): (1) repair the Product with new or rebuilt parts; or (2) replace the Product at no charge with new or
rebuilt comparable products or parts. Products and parts replaced under this warranty become the property of
Insignia and are not returned to you. If service of Products or parts are required after the Warranty Period expires,
you must pay all labor and parts charges. This warranty lasts as long as you own your Insignia Product during the
Warranty Period. Warranty coverage terminates if you sell or otherwise transfer the Product.
How to obtain warranty service?
If you purchased the Product at a retail store location, take your original receipt and the Product to the store you
purchased it from. Make sure that you place the Product in its original packaging or packaging that provides
the same amount of protection as the original packaging. If you purchased the Product from an online web
site, mail your original receipt and the Product to the address listed on the web site. Make sure that you put
the Product in its original packaging or packaging that provides the same amount of protection as the original
packaging.
Where is the warranty valid?
This warranty is valid only to the original purchaser of the product in the United States and Canada.
What does the warranty not cover?
This warranty does not cover:
Customer instruction • Installation • Set up adjustments • Cosmetic damage
Damage due to acts of God, such as lightning strikes • Accident
Misuse • Abuse • Negligence • Commercial use
Modi cation of any part of the Product, including the antenna
This warranty also does not cover:
Damage due to incorrect operation or maintenance • Connection to an incorrect voltage supply
Attempted repair by anyone other than a facility authorized by Insignia to service the Product
Products sold as is or with all faults • Consumables, such as fuses or batteries
Products where the factory applied serial number has been altered or removed
REPAIR REPLACEMENT AS PROVIDED UNDER THIS WARRANTY IS YOUR EXCLUSIVE REMEDY. INSIGNIA SHALL
NOT BE LIABLE FOR ANY INCIDENTAL OR CONSEQUENTIAL DAMAGES FOR THE BREACH OF ANY EXPRESS OR
IMPLIED WARRANTY ON THIS PRODUCT, INCLUDING, BUT NOT LIMITED TO, LOST DATA, LOSS OF USE OF YOUR
PRODUCT, LOST BUSINESS OR LOST PROFITS. INSIGNIA PRODUCTS MAKES NO OTHER EXPRESS WARRANTIES
WITH RESPECT TO THE PRODUCT, ALL EXPRESS AND IMPLIED WARRANTIES FOR THE PRODUCT, INCLUDING,
BUT NOT LIMITED TO, ANY IMPLIED WARRANTIES OF AND CONDITIONS OF MERCHANTABILITY AND FITNESS
FOR A PARTICULAR PURPOSE, ARE LIMITED IN DURATION TO THE WARRANTY PERIOD SET FORTH ABOVE AND
NO WARRANTIES, WHETHER EXPRESS OR IMPLIED, WILL APPLY AFTER THE WARRANTY PERIOD. SOME STATES,
PROVINCES AND JURISDICTIONS DO NOT ALLOW LIMITATIONS ON HOW LONG AN IMPLIED WARRANTY LASTS,
SO THE ABOVE LIMITATION MAY NOT APPLY TO YOU. THIS WARRANTY GIVES YOU SPECIFIC LEGAL RIGHTS, AND
YOU MAY ALSO HAVE OTHER RIGHTS, WHICH VARY FROM STATE TO STATE OR PROVINCE TO PROVINCE.
•
•
•
•
•
•
•
•
•
•
•
•
•
•
•
•
•
•
•
•
•
•
•
•
•
•
•
•
•
•
•
•
•
•
•
•
•
•
•
•
•
•
•
Copyright © 2007 Insignia. Insignia and the Insignia logo are trademarks of Best Buy Enterprise Services, Inc. Other brands and product names are trademarks or registered trademarks of their respective holders. Speci cations and features are subject to change without notice or obligation