


SKU 66121 For technical questions, please call 1-800-444-3353. Page 2
LISTENING:
RADIO:1.
Extend the Antenna located on the back of the a.
Right Ear Piece. Turn the volume dial “ON”
(clockwise), setting it at a low level.
Press the SCAN Button, located on the upper b.
right hand side of the Right Ear Piece to nd
the next higher FM bands. Re-press to select
another broadcasting channel. It may be nec-
essary to rotate your head slightly for better
reception. Adjust the volume as required.
The RESET button can be pushed to start c.
scanning from the low end of the FM band.
When nished, turn “OFF” (counterclockwise) d.
the volume. Retract the Antenna when not in
use.
TV, DVD, VCR, or STEREO:2.
Observing the color coding (red or white), con-a.
nect one RCA jack on the Standard Use Cable
to the audio output socket on your audio de-
vice, and the other RCA jack into the “Audio-
In” Socket located on back of the Transmitter.
Turn on your audio device at a low volume b.
setting. Slide the ON/OFF Button on back of
the Transmitter to “ON”. Extend the Head-
phone Antenna and turn “ON” the ON/OFF
Switch. Use the Headphone Volume Control
for minor settings.
When nished, turn off the Transmitter, the c.
Headphones, and the audio device you are
listening to.
INTERNET CHAT: 3.
Using the Internet Chat Cable, attach 1/8” a.
Stereo Jacks to the Right Ear Piece. Attach
the two 1/8” Stereo Jacks at the opposite end
of the Cable to your computer’s “sound-out”
socket (use RED Jack), and the other Stereo
Jack (BLACK) to the microphone socket.
Turn on the Headphone Volume Control.b.
NOTE: The Headphone Antenna should not c.
be extended for this use.
You will now be able to both hear, and speak d.
to friends on the internet.
TROUBLESHOOTING:
If sound is too loud, rst turn down the sound 1.
source, then adjust the Headphones for minor
changes.
It is suggested that you place the Transmitter in 2.
a high location for better reception.
If sound is low, distorted or Headphones can 3.
barely receive it, Batteries should be replaced.
Record Serial Number Here:
Note: If product has no serial number, record month
and year of purchase instead.
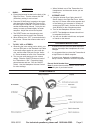
COMPONENTS