


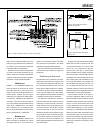
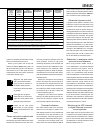

matrix surround decoder (Dolby Surround,
Dolby Pro Logic) should not be connected to
the "LFE IN" input. See section "Subwoofer
in analogue matrix sound systems".
SUM OUT: Use this output connector when
you want to link another subwoofer to your
system. "SUM OUT" carries an unfiltered sum
of signals combined from all input channels.
See section "Using multiple subwoofers".
Middle row
FRONT L, C, R CHANNELS IN/OUT: Use
these connectors for the Front Left, Center
and Right channels of a surround sound
system or the Left and Right channels of a
Stereo system. Connect line level signal
cables from your signal source to their respec-
tive "LEFT IN", "CENTER IN" and "RIGHT IN"
connectors. Then connect the subwoofer to
your main monitors with XLR cables from the
"LEFT OUT", "CENTER OUT" and "RIGHT
OUT" connectors. All "L, C and R OUT" chan-
nels are high pass filtered with the filtering
frquency fixed at 85 Hz (12 dB/octave).
Bottom row
REAR L, C, R CHANNELS IN/OUT: Use
these connectors for the Rear Left, Center
and Right channels of a surround sound
system. The connection is made in the same
way as with the Front channels. Also these
channels are high pass filtered at 85 Hz.
Once all connections have been made, the
subwoofer and main monitors are ready to be
powered up.
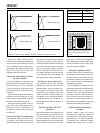
Positioning in the room
The placement of the subwoofer in the room
affects the overall frequency response and
sound level of the system dramatically, as at
low frequencies the effects of the room are
strong. Even a slight change in the subwoof-
er's location can make a marked difference
in the frequency balance and often patient
and methodical experimentation and testing
is needed to find the optimum placement.
The placement will affect the phase dif-
ference between the main monitors and the
subwoofer, and also the bass roll-off rate.
These effects can be compensated by the
use of the controls in the amplifier unit; but
we recommend that at first you leave the
switches untouched and concentrate on find-
ing the position where the subwoofer gives
the smoothest response, and only then use
the controls to fine-tune the balance and
phase alignment between the subwoofer and
the main monitors.
To begin with, place the subwoofer slightly
offset from the center of the front wall. The
recommended distance to the wall is less
than 60 cm / 24" measured from the sub-
woofer's driver (See Fig. 3). This position
gives increased acoustic loading (and SPL)
due to the proximity of the front wall and floor.
Cancellations from the front wall and floor are
also avoided. Front wall cancellation for the
85 Hz high pass filtered main speakers can
be eliminated by placing them at least 110
cm / 43" away from the front wall. In a mul-
tichannel system the main monitors should
ideally be positioned symmetrically and at an
equal distance from the listening position.
If the frequency balance is not right, try
moving the subwoofer slightly to the left or
right so that different room modes are excited
at different levels. Positioning the subwoofer
close to a corner will boost the bass level
at lower frequencies and may cause asym-
metrical spatial imaging. If you are using two
subwoofers, try placing them asymmetrically
relative to the side walls. Sometimes moving
the subwoofers apart into the front corners
helps with problematic rear wall reflections
and the loss of mutual coupling is compen-
sated by the bass boost caused by corner
positioning.
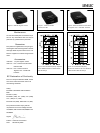
Figure 3. Recommended distances to
the front wall
Figure 1. 7070A's connector panel, connectors and controls.
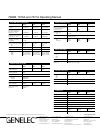
Figure 2. XLR to RCA connector for
unbalanced operation.