


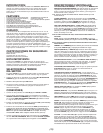


(3)
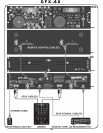
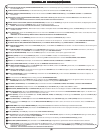
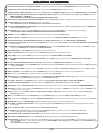
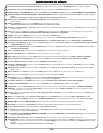
VOLTAGE SELECTOR: To set the proper voltage, adjust the VOLTAGE SELECTOR (1) switch to 115 or 230 volts.
POWER JACK (AC IN): Connect the power plug into the POWER JACK (2) for power.
REMOTE CONTROL: Use the included CABLE & REMOTE CONTROL (3) jacks to connect the REMOTE CONTROL to the MAIN UNIT.
LINE OUTPUT JACKS: LINE OUTPUT JACKS (4) provide stereo sound via included RCA cables to your mixer or receiver.
NOTE: MAKE SURE CABLES ARE PLUGGED IN TIGHT FOR OPTIMAL SOUND.
DIGITAL OUTPUT (COAXIAL): Use the COAXIAL (5) jack to connect to any type of device that accepts digital signals.
POWER: Press the POWER (6) button to turn on the CD player.
NOTE: MAKE SURE VOLTAGE SELECTOR SWITCH (1) IS SET BEFORE USE.
DISC TRAY: Put a CD in the DISC TRAY (7) after pressing STOP (8); trays hold both 12 cm and 8 cm CDs.
STOP: Tap the STOP (8) button once to STOP the CD, twice to open the DISC TRAY (7), and a third time to close the tray.
NOTE: THE STOP (8) BUTTON ONLY FUNCTIONS AS STOP AND EJECT ON THE REMOTE CONTROL.
DIMMER: Turn the DIMMER (9) knob to the right to increase the brightness of the LCD DISPLAY (10).
DISPLAY: The DISPLAY (10) shows the various functions for the CD Player. See FUNCTION DESCRIPTIONS for details.
PLAYBACK DISPLAY BAR: The PLAYBACK DISPLAY BAR (11) shows the TIME ELAPSED and TIME REMAINING.
PLAY/PAUSE: Press PLAY/PAUSE (12) button to activate PLAY or PAUSE mode. See CUE or ROBO START INSTRUCTIONS for details.
CUE/PREVIEW: Tap CUE/PREVIEW (13) to come back to a set CUE or press and hold to PREVIEW from a CUE POINT, refer to CUE
INSTRUCTIONS.
TRACK: Press the TRACK (14) buttons to select which TRACK to play.
SEARCH: Use the SEARCH (15) buttons to scan forward and reverse directions on a TRACK.
TIME: Tap the TIME (16) button to switch the TIME preference in three modes: ELAPSED, REMAIN, TOTAL REMAIN.
SINGLE: Tap SINGLE (17) for SINGLE AUTO CUE, CONTINUOUS, and NORMAL modes.
FLY CUE: FLY CUE (18) sets a SEAMLESS LOOP CUE POINT on the fly.
CUE-B/EXIT: Press CUE-B/EXIT (19) in PLAY mode, after a CUE POINT is memorized to start a LOOP, press again to exit LOOP.
RELOOP STUTTER: To play from a saved CUE POINT or a
LOOP, press RELOOP STUTTER (20) to play the LOOP or the CUE again.
B-EDIT: Press B-EDIT (21) and use the JOG WHEEL (24) to edit an existing LOOP, press again to exit EDIT mode.
BOP: Press the BOP (22) button to start play from the last FLY CUE (18) POINT.
MEMO (CUE 1-5): Press MEMO (23), then select a CUE POINT from CUE1-5 (23) followed by the same number again to set a CUE POINT.
Press CUE1-5 (23) to play from the set CUE POINT.
JOG WHEEL: The JOG WHEEL (24) has various functions such as PITCH BEND, CUEING, VINYL MODE, and EFFECT TIME PARAMETER.
JOG MODE: Press to change the JOG MODE (25) of the JOG WHEEL (24) from CD to VINYL mode.
BRAKE/START: The BRAKE/START (26) knobs control the amount of time it takes for a track to stop and start in VINYL mode. (MAXIMUM 5 SECONDS)
DIRECTION: Flipping the DIRECTION (27) switch down will play the track in REVERSE, to return to NORMAL play flip it back up.
EFFECT: Press an EFFECT button: FILTER, ZOOM, PAN, TRANS, or ECHO (28), to activate an EFFECT. Tap the EFFECT (28) button to release.
RATIO: The RATIO (29) knob controls the RATIO (DEPTH) and the JOG WHEEL (24) adjusts the TIME (LENGTH) parameter of an effect.
BPM: Press the BPM (30) button to view the BPM (BEATS PER MINUTE) of a track, pressing it again will return to PITCH mode.
MASTER TEMPO: Pressing MASTER TEMPO (31) locks the PITCH of a track with no change in vocal or instrument tone.
PITCH BEND: Buttons for PITCH BEND (32), lower or raise the pitch percentage (- or + 4%) when pressed.
PITCH: The PITCH (33) button activates the PITCH CONTROL SLIDE (35).
PITCH SELECT (4%, 12%, 24%, & 100%): Use the PITCH SELECT (34) button to change the PITCH settings from 4%, 12%, & 24%.
Press and hold for 100% PITCH.
PITCH CONTROL SLIDE: Moving the PITCH CONTROL SLIDE (35) up or down will lower or raise the pitch percentage.
ROBO START: Using ROBO START (36) enables you to alternate play between two CDs using both sides.
PGM (PROGRAM): First choose a side by selecting A or B (37). For track programming press PGM (37) then enter a track number followed by
PGM (37) and so-forth. For direct selection press a TRACK NUMBER followed by SET (37) then PLAY/PAUSE (12) to jump to that track.
NOTE: FOR FURTHER EXPLANATION PLEASE SEE PGM SECTION.
QUICK STQUICK ST
QUICK STQUICK ST
QUICK ST
ARAR
ARAR
AR
T GUIDET GUIDE
T GUIDET GUIDE
T GUIDE
1
2
3
4
5
6
7
8
9
10
11
12
13
14
15
16
33
17
18
19
20
21
22
23
24
25
26
27
28
29
30
31
32
34
35
36
37