


-5-
1. Power Connections.
Use only 12 to 18 AWG [2.5 – 1.0 mm2] wire for the power connection.
Strip no more than .25 inch [6 mm] of wire insulation from the ends of the power leads.
If stranded wire is used, be sure that there are no loose strands outside the connector
plug that could touch the adjacent lead and cause a short circuit.
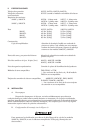
a. 24V AC/DC models.
For 24VDC operation, connect the power source positive (+) lead to
one of the (+) terminals of the connector plug and connect the power source negative (‑)
lead to one of the (‑) terminals of the connector plug as shown in figure 2. For 24VAC
operation connect the line (hot) power source wire to the terminal marked “L”. Con‑
nect the common (neutral) power source wire to the terminal marked “N”. See figure
2. If required by local building codes, connect the earth ground wire to the green screw
threaded into the interior of the housing.
b. 120VAC & 240VAC models.
Connect the line (hot) power source wire to the terminal marked
“L”. Connect the common (neutral) power source wire to the terminal marked “N”. See
figure 2. If required by local building codes, connect the earth ground wire to the green
screw threaded into the interior of the housing.
Plug the connector into the receptacle provided on the printed circuit board.
2. Tone Card Installation.
NOTE
Tone card is purchased separately.
a. Plug the desired tone card into the socket as shown in figure 2.
b. To ensure a proper seal, be sure that the rubber cover gasket is
properly seated in the housing groove and reinstall the housing cover.
3. Speaker Connector Card Installation (Models AM25CK, AM70CK, and
300CK).
NOTE
Connector card is purchased separately.
a. Route the audio signal leads into the enclosure and connect the
signal leads to the connector card audio inputs. The connector cards are NOT polarity
sensitive, however, polarity should be observed when placing units within close proxim‑
ity to each other. Refer to the connector card installation manual provided with the
connector card kit for additional wiring information.
b. Plug the desired connector card into the socket as shown in figure 2.
c. To ensure a proper seal, be sure that the rubber cover gasket is
properly seated in the housing groove and reinstall the housing cover.