


Tips on correctly using the microphone
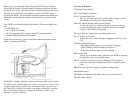
Getting good results with a microphone is largely due to proper micro-
phone technique. Hold the microphone directly in front of your mouth.
Picture yourself eating a lollipop. The lollipop stick is the “body” of
the microphone. This is the proper angle you should be holding the
microphone in relation to your mouth.
The distance the microphone is held away from your mouth is largely
dependent on how loud you speak. It is common for performers or pre-
senters to “eat the mic”. This is term used for someone who keeps the
microphone grill in contact with their lips at all times. You will find
that if you use the microphone this way, you can speak in a normal
voice and be heard clearly. Speaking loudly can cause your voice to
distort.
Experiment with what is most comfortable for you. Keep these few
items in mind.
- The closer the mic is to your mouth, the louder you will be.
- The closer the mic is to your mouth, the “fuller” your voice will be
(this is called “proximity effect” where bass frequencies
increase when you move closer to a microphone).
- The closer your mouth is to the microphone, the lower you can set the
overall output. This lessens the opportunity for feedback to
occur (that awful squealing that occurs when a microphone gets
too close to a speaker).
The power adapter converts AC power to DC power. The output of the
power adapter is 18V DC. (The inner section of the connector is posi-
tive).
Charging the Battery
Plug the barrel end of the cord into the DC power input jack (#10) and
plug the AC end into your AC power source.
Charging will begin immediately and the Battery Charge Indicator (#7)
will show a blinking green light.
Battery Charge Indicator.
- Red light indicates battery is low and needs charging.
- Green, blinking indicates charging in progress.
- Solid green indicates battery is fully charged.
If the indicator does not immediately start to blink green, it may be due to
excessive power drain of the battery. This is normal. The indicator should
begin to blink after 10 to 15 minutes. If the battery charge indicator fails
to light, it may be due to a faulty battery.
Replacing, or using a second Battery
With proper care and charging, it is unlikely that it will be necessary to
replace the battery in the P10W. If you plan on using the P10W for
extended periods of time, you may want to purchase a second battery.
The battery is a standard 12 volt 2.7 amp gel cell and is available from
Fender directly, or from Authorized Fender Audio dealers. (Part number
005-7535-000).
To replace the battery:
- Open the battery compartment by pressing down on the two tabs at the
top of the battery compartment. The door will hinge down.
- The battery is “spring loaded” behind an interior rear panel. Remove
this panel by sliding it upwards.
- Remove the battery by pulling it out of the compartment. Replace the
battery with another. The terminals on the battery should be on
the “top” as you slide it into the compartment.
- Press the battery into the unit and replace the interior rear panel.
- Close the compartment door. Lift up the two tabs until they “click” into
place.