


68-2233-01
Rev. A
08 12
Installation
1. Using a junction box (not included) as a guide, mark and cut out the appropriate material
within the marked area.
2. Insert the junction box and secure it with nails or screws.
3. Run the HDMI and audio cables from the output or input device locations (as applicable)
behind the wall, and to the junction box location, then run the cables through the junction
box.
4. Video — Insert the HDMI connector from the wall into the pigtail connector of the plate.
5. Audio — Strip away 3 inches of the outer jacket from the end of the cable, strip 3/16 inches
(5 mm) of the inner jacket from the end of each wire, and secure the
wires to the 3-pole captive screw connector (see image at right).
Wire as described below.
• For balanced mono audio:
tip (T) = +, ring (R) = –, sleeve (S) = ground
• For unbalanced stereo audio:
tip (T) = left channel, ring (R) = right channel, sleeve (S) = ground
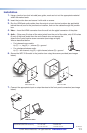
6. Secure the WPC 210 model to the junction box using the screws provided (see images
below).
WPC 210 A EU
HDMI
AUDIO
EU Junction Box
Extron
WPC 210 A EU
UK Junction Box
Extron
WPC 210 A MK
WPC 210 A MK
HDMI
AUDIO
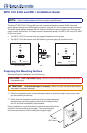
7. Connect the appropriate input or output devices to the front panel connectors (see image
below).
WPC 210 A EU
HDMI
AUDIO
Projector
Laptop
Extron
WPC 210 A EU
T
S
R
Extron USA Headquarters Extron USA - West Extron USA - East
+800.633.9876 (Inside USA/Canada Only) +1.714.491.1500 +1.919.850.1000
+1.714.491.1517 FAX +1.919.850.1001 FAX
© 2012 Extron Electronics All rights reserved. www.extron.com