


VP Receiver VPR-2
NOTICE:
- Do not use this product outside your Country.
- Depending on the specification of the HDMI device, this product may not work properly or there may be some effect on
performance.
- Compatibilities with supporting models have been confirmed in our environment.
- We do not guarantee operation in all environments.
- Depending on the devices to be used with this product, CEC function may not be used.
- Because the wireless connection takes a time in low temperature environments, please use after switching it on and waiting
for a while.
- If you use the wireless system close to more than 5 pairs, it takes a little long time to connect by wireless at interference
when power is on.
- The product design and the specification are subject to change without prior notice.
-
and are trademark of ELMO Co., Ltd.
- All other company/products names described in this manual are trademarks or registered
trademarks of respective companies.
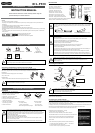
SUPPLIED ITEMS
Contact your dealer if any of the following items are not included in the package.
Caution
・The Supplied AC attachment is for your country.
・When using the product, connect the AC attachment to the AC adapter.
Assembling/ disassembling procedure for the AC adapter
Assemble or disassemble the AC adapter and the AC attachment by taking the following procedure.
Make sure to unplug the cable from the mains power before starting the assembling/ disassembling work..
■ Assembling
Slide the AC attachment along the groove of the AC adapter
until you hear a “click”.
■ Disassembling
Press the centre of the AC attachment and slide it along the groove to remove.
Caution
*1 Use an appropriate AC attachment for your region.
OPERATION PROCEDURES
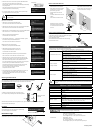
Part Names
1. Micro USB power port : AC adapter terminal.
2. Menu/Select button : To display or select menu.
3. Up button : To scroll up menu items.
4. Down button : To scroll down menu items.
5. HDMI port : HDMI output terminal.
6. Link light : LED to indicate the connection status
with the visual transmitter.
7. Power light : LED to indicate
the power supply condition.
8.
Remote control sensor
.
Caution
・Please remove the protection sheet of the VP receiver before you use.
・The micro USB terminal of the VP receiver is for power supply only and other USB devices cannot be
connected. Use the supplied AC adapter to supply power to the VP receiver. Do not use the bus powered
USB to supply power to the VP receiver. The power consumption of the VP receiver is higher than the
standard of the USB bus power.
・Use the visual transmitter that supports WHDI standard.
・HDMI output of this product complies with HDMI standard.
・Because the wireless connection takes a time in the low temperature environments, please use after
switching it on and waiting for a while.
・When installing this unit please ensure there are no obstacles between the remote control and infrared
receiver.
Remote Control
①Power button : Turn the power ON/OFF(Standby mode)
②OK button : Choose the OSD item
③Up button : Move the cursor up
④Down button : Move the cursor down
⑤Left button : Move the cursor left
⑥Right button : Move the cursor right
⑦Cancel button : Go back in the menu
⑧Menu button : Show the menu on screen
⑨Input button : Select registered video source
⑩Info button : Display the current link information
⑪Part of the infrared signal transmission: infrared transmission
⑫Battery container : install batteries. (TYPE AAA ×2)
Caution
・On the back of the remote control lift and pull the battery lid in the direction shown. Remove the lid and insert
the two AAA batteries.
・If this product is not going to be used for a long time, take the batteries out of the remote control.
・Do not use rechargeable batteries (e.g., Ni-Cd (NiCad batteries)).
・Do not use new and old batteries or batteries of different types together.
・Do not try to recharge or short-circuit the batteries.
・When disposing of used batteries, follow the instructions of your local government.
・Insert from one side and pay particular attention to the polarity (+/-directions).
・Be sure to use AAA batteries.
・If any liquid from a battery leaks onto your skin or clothes flush the area with clean water immediately. If it
gets into your eye, flush immediately with clean water and contact a doctor.
・The receivable range may be reduced when the main unit is placed in direct sunlight, near an inverter
fluorescent light or in any other unfavourable conditions. Depending on the light source conditions, the
sensor may fail to receive any infrared light. In such cases, relocate the main unit or shield the light source.
Caution
Children may ingest small batteries. Always keep batteries safe and out of reach.
If a battery is swallowed, consult a doctor immediately as this could result in asphyxiation or be an
obstacle to digestion, etc.
Connecting the VP Receiver
Connect the equipment equipments as shown in the drawing.
Caution
*1 The AC adapter is different according to the destination.
*2 Change the input mode of the image output device to HDMI.
*3 Use a commercially available HDMI cable (Type A).
Turning the power ON/OFF
Press the power button on the remote control to turn the power on. To turn the power off, press the power button on the
remote control once (standby mode).
Configuring the wireless settings
Configure the wireless settings before using the VP receiver.
Before setting the wireless communication, please connect the VP receiver and standard HDMI display ,then turn on the VP
receiver and the document camera (MO-1w) manufactured by ELMO.
To display the menu screen, push the Menu/Select button on the main unit or the menu button on the remote control, then
select "Setup" and push the Menu/Select button on the main unit or the OK button on the remote control.
You can add/remove or modify the name of the visual transmitter from the menu.
●Add ELMO's document camera (MO-1w) (pairing)
1. Set VP receiver in the add (pairing) mode.
Move the cursor to "Setup" with the Up or Down buttons and push
the Menu/Select button on the main unit or the OK button on the remote control.
Move the cursor to "Add new Video Source" and push the Menu/Select
button on the main unit or the OK button on the remote control to enter
receive mode.
2. Press and hold the pairing button (Located on the side of the MO-1w)
on the document camera until appearing "Adding ○ ○ ○(the name of
the video transmitter)" appears on the screen.
※ About 5 seconds. It may vary depending on the situation.
Caution
・When inserting the batteries, please slide the edge of the negative pole of the battery on the bottom of the
battery box to contact the head of the spring terminal and the negative pole of the battery. If you put the battery
on top of the spring, there is a danger that short circuiting may occur or the crushed spring could break the
battery casing.
Please read this instruction manual carefully before using this
product and keep it for future reference.
INSTRUCTION MANUAL
Instruction Manual
VP Receiver
HDMI cable (*3)
Projector (*2)
HDMI Connector
Monitor (*2) WHDI
Visual transmitter
AC adapter (*1)
VP Receiver
HDMI out USB power
To an electric socket
1 2
3 4 5
6
7
■Link light (Blue)
・Lit : Already matching
with the visual transmitter.
・Blink : Searching for WHDI input signal
■Power light (White)
・Lit : Power is ON.
・Off : Power is OFF.
・Blink : Standby mode
AC adapter with attachments
Remote control
AAA batteries
(for Remote control)
Im
p
ortant Safe
g
uards
⑪
③
④
⑥
①
②
⑤
⑦
⑧
⑨
⑩
⑫
Remove the lid, and
insert two AAA
batteries in the
directions shown in
the figure.
○Always slide the battery towards the spring
×
Do not put the battery on top of the spring
8