


7
DC265 / DC365 INSTALLATION
When ceiling mounting your speakers, attempt to make the locations as symmetrical as
possible.
When wall mounting, carefully measure the distance from the floor to the speaker center
so both speakers are the same distance from the floor. You may use the template that is
included with your Dual speakers to determine the correct cut-out dimensions.
Cut the hole or opening using a sheet rock saw, keyhole saw or other suitable tool. Place
the speaker in the opening to verify a correct flush fit.
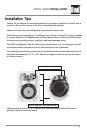
Remove the speaker grille at this point of the installation to gain access to the screws
which turn the mounting tabs that will secure the speaker to the mounting surface. The
screw heads that lock the tabs can be identified by turning the speaker over and pushing
on the tab. The corresponding screw head will protrude identifying which screws you will
need to turn once the speaker is connected, and in the proper position within the wall or
ceiling.
Run speaker wires from the amplifier to the speakers. Allow an extra 2' of wire at the
speaker cutout location to make installation easier. Strip and twist about 1/2” of insulation
off the speaker wires. The speaker wire runs should be hidden as well as possible
within the wall or ceiling and should not come in contact the speaker basket, be wrapped
around the crossover network or hang loosely near a stud as vibration may cause poor
sound quality.
Insert the speaker into the opening cut in the wall or ceiling, slide the whole speaker
into the wall cavity and center the speaker in the opening. Once the speaker wires are
attached and all wire management is complete and the speaker is in the flush position,
turn the screw heads associated with the tabs clock-wise to tighten the tabs against the
wall or ceilings interior surface.
Installation Guide