


preparing the wall or ceiling cutout
Confirm there is at least 1" between the final cutout and nearby studs or joints for positioning mounting
hardware. Temporarily fasten the stiff paper template (supplied) to the wall with thumbtacks. Carefully
trace around the perimeter with a pencil. Before making the final cutout of the entire hole, first make a
small 4-inch"test" cutout in the center of your penciled outline. Reach your hand inside to verify that
studs are outside the outline. This is an important step, since stud finders are not infallible.
To cut the actual hole, first score wallboard with a sharp knife; then use a keyhole saw to complete the
cut. Remove remaining debris from the edges. Hold the speaker up to the cutout to make sure it inserts
easily without forcing.
At this point, it is a good idea to secure the speaker wire to a stud near the cutout so its own weight will
not tug on the terminals of the speaker after it is connected. This will also prevent you from losing the
wire in the wall. Before attaching the wire, make sure the speaker wire runs through, not around, the
metal mounting bracket.
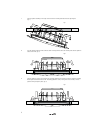
final installation
1. Use the supplied cut-out templates to outline the mounting holes to be cut in the wall. Be sure the
intended hole is square and plumb.
Remove the perforated section out of the center of the template. Save this section, it will serve as
a painting mask if you wish to paint the speaker in the wall. Use the inside edge of the remaining
section of the template to mark the hole size
2. Cut the hole.
3. Route the speaker wire from the amplifier to the speaker installation location. Secure the wires to
prevent them from falling into the wall before the speaker is mounted.
4. Adhesive-backed foam strip-gaskets are supplied with the packing materials. These will be used to
line the back of the mounting collar flange. Remove the speaker from the corrugated shipping
sleeve. Peel the backing from the foam strip-gaskets and place them along the back of the
mounting collar flange. Cut them to size if necessary. Be sure to butt the strips up against each
other to prevent possible air leakage. Once the strips are positioned properly, press them firmly into
place. NOTE: this step is not necessary if you are installing the speaker into sheet-rock. Sheet-rock
is soft enough to compress and naturally seal the gap.
5. Separate the two wire conductors from each other. Strip away approximately 1/4” of insulation
from each of the wire conductors. Twist the strands together into neat bundles.
6. Push the positive (+/red) terminal to open the wire hole. Insert the positive conductor and release
the terminal to lock the wire into place. Be sure not to insert the conductor too far causing the
terminal to lock down on the insulation instead of the wire strands. Perform this same task for the
negative (-/black) terminal as well.
4