


11
© 2002 Directed Electronics, Inc
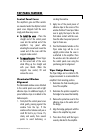
Control Panel Cover
The amplifier’s gain and filter controls
are mounted under the elliptical control
panel cover. Magnets hold the cover
snugly and allow easy access.
TToo iinnssttaallll tthhee ccoovveerr
- Place the
straight end of the control panel
cover into the notched end of the
amplifier’s top panel while
elevating the curved end. Lower the
curved end of the cover until the
magnets make contact.
TToo rreemmoovvee tthhee ccoovveerr
- Place a finger
on the curved end of the cover
while lifting up the straight end
with your thumb. When the
magnets lose contact, lift and
remove the cover.
Illuminated Window
Alignment
The illuminated window comes attached
to the control panel cover with a light
adhesive tape. An additional supply of
precut adhesive tape is included in the
hardware pack.
1. Firmly hold the control panel cover
while gently pressing against the
window from the top. If the
window will not release easily use a
small flat tool to pry it loose. Pry
slowly and evenly from several
points to avoid deforming or
cracking the window.
2. Apply two of the precut pieces of
adhesive tape to the corners of the
window that don't have tape. Make
sure to apply the tape to the side
that makes contact with the cover.
Save the other two precut pieces of
tape for future use.
3. Turn the illuminated window so the
Viper snake logo will be in an
upright position when the cover is
re-attached to the amplifier. Press
the window onto the underside of
the control panel cover using the
positioning pins for alignment.
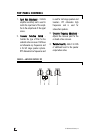
Viper Badge Mounting
The Viper Badge can be rotated in 90-
degree increments to accommodate the
amplifier’s final mounting position.
1. Determine the final mounting posi-
tion of the amplifier.
2. Determine the position required for
the badge to be viewed horizontally.
3. Remove the protective cover for the
adhesive tape on the under side of
the badge.
4. Align the badge guideposts with the
holes in the amplifier top panel.
5. Press down firmly until the logo is
securely attached to the amplifier.
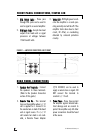
TOP PANEL FEATURES