


88
© 2004 Directed Electronics, Inc
1.
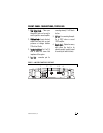
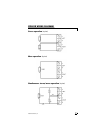
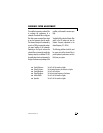
SSppeeaakkeerr OOuutt TTeerrmmiinnaallss
- Connect
the speakers to these terminals.
(Refer to the
Speaker Connection
section of this guide.)
2.
PPoowweerr LLEEDD --
This LED will illuminate
Green to indicate the amplifier is on
and operating normally. The LED
will extinguish if the amplifier is off
or if the amplifier shuts-down due
to short circuit, DC offset, or over-
heating.
3.
OOnnee OOhhmm
LED
--
This LED will illumi-
nate when the 1-ohm mode is
selected.
4.
FFuussee 3300AA xx 33 --
These fuses protect
the amplifier against internal elec-
trical damage and are meant to
protect the amplifier only. All other
power connections should be fused
at the source.
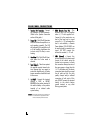
5.
((++)) BBAATTTT
- Connect this terminal
through a FUSE or CIRCUIT
BREAKER to the positive terminal of
the vehicle battery or the positive
terminal of an isolated audio
system battery.
WWAARRNNIINNGG::
Always protect this power wire by installing a fuse
or circuit breaker of the appropriate size within
12 inches of the battery terminal connection.
6.
RREEMM ((RReemmoottee TTuurrnn OOnn))
- This
terminal turns on the amplifier
when (+) 12 volt is applied to it.
Connect it to the remote turn on
lead of the head unit or signal
source. If a (+) 12 volt remote turn
lead is not available, a Remote
Power Adapter (P/N #55000) can
be used to supply a remote turn on
signal. DO NOT connect this
terminal to constant (+) 12 volt.
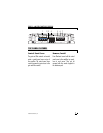
7.
GGNNDD ((GGrroouunndd)) --
Connect this
terminal directly to the sheet metal
chassis of the vehicle using the
shortest wire necessary to make
this connection. Always use wire of
the same gauge or larger than the
(+) 12 volt power wire. The chassis
connection point should be scraped
free of paint and dirt. Use only
quality crimped and/or soldered
connectors at both ends of this
wire. DO NOT connect this terminal
directly to the vehicle battery
ground terminal or any other
factory ground points.
REAR PANEL CONNECTIONS