


5
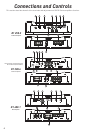
RCA Input and Pass-Thru Output - These RCA jacks allow for a normal Left and Right channel signal input. Simply connect to the
source unit using RCA type audio cables, keeping them away from power wiring wherever possible. On the 4 channel amplifiers
(D1 300.4) “Front” and “Rear” input jacks are present. The “Pass-Thru” output allows the signal to pass on to other amplifiers.
The Pass-Thru output is unaffected by the onboard crossover.
Input Gain Adjustment - This control matches the preamp stage of the DAT amplifier to your source unit. This is NOT a volume
control. The range is between 150mV and 4V.
Crossover Adjustment- Use this adjustment to select the crossover point. Remember that your choice will be directed to High
Pass or Low Pass depending upon the position of the adjacent switch. The range of adjustment is limited between 40-400 Hz (D1
250.2/D1 300.4) or 40-250Hz (D1 400.1)
Crossover Selection Switch - This switch allows you to select the crossover. Use High Pass for midrange or high frequency
speakers. Use Low Pass for subwoofers. In the OFF position, the crossover adjustment knob has no effect. The D1 400.1 is only
available as Low Pass.
Bass Boost - This control adds 0 to +6dB of boost at 50Hz. Be cautious when adding boost to some subwoofer systems as they
may not be able to handle the additional low frequency boost. In the OFF position, no bass boost is added.
High Level Input - This plug (included) is for use when the source unit does not have an RCA output. Although this is a popular
method of connecting a factory car stereo, some systems may require additional adapters. The far left side of the plug is the LEFT
channel; the far right side is for the RIGHT channel. The wire in the middle is for chassis ground ONLY if the system is experiencing
excessive noise problems.
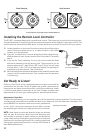
Remote Level Adjustment (D1 400.1 Only) - This port is for the remote level control (included). The control is intended to allow
the user to control the level of gain up to the maximum adjustment level set on the amplifier. The control does not add additional
boost, it only attenuates the setting that is fixed at the amplifier’s control panel.
Status LED’s - These lights indicate when the amplifier is powered up normally and when there is a protection fault. See the
“Troubleshooting” section for details on what these useful indicators can tell you if there’s a problem.
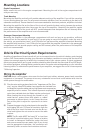
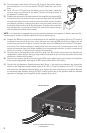
Power Input Connections - These connections are for input power, chassis ground, and remote turn-on. Use a minimum of 4 gauge
wiring for power and ground connections. The terminals will handle up to 4 gauge wiring with no problem whatsoever. Be sure
any wiring that passes through metal has a grommet!
Power Fuses - Standard automotive type ATC/ATO fuses are used on DAT D1 Series Amplifiers. Always replace with the correct
fuse size. Never insert fuses of higher values. Doing so will void the warranty of your DAT amplifier. Also include a main fuse at
the connection to the vehicle battery within 18 inches (45.7 mm) of the positive battery post. It is also important to upgrade the
connection between the negative battery post and the chassis of the vehicle. This greatly reduces possibilities of weak electrical
“links” in the circuit.
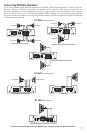
Speaker Output Terminals - Connect your speakers to these terminals. Stereo connections are connected as labeled. Bridged
connections use the LEFT + and RIGHT - as the two connections. The 2 and 4 channel amplifiers will perform into 2 Ohm stereo
loads or 4 Ohm bridged loads. DO NOT run 2 Ohm bridged loads on these amplifiers!
1
2
3
4
5
6
7
8
9
10
11