


6
ENGLISH
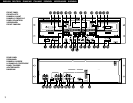
!5 Input Select Switch of Deck B
(INPUT SELECT)
Select the audio input to the Deck B (DECK A,
LINE A, LINE B).
!6 Cassette Compartment Cover
If the cover is not closed completely, the tape
transport buttons will remain inoperative.
!7 Counter Memory Button
(COUNTER MEMO)
When this button is pressed during forward tape
travel ( 1 ), fast rewinding ( 6 ) will stop
automatically at the tape counter position
“‚‚‚‚”.
When this button is pressed during reverse tape
travel ( 0 ), fast forwarding ( 7 ) will stop
automatically at the tape counter position
“‚‚‚‚”. See page 11.
!8 Counter Reset Button
(COUNTER RESET)
Press this button to reset the tape counter to
zero.
@9 Cascade Control Jacks (CASCADE)
Connect these for continuous operation on
multiple units.
When the REV. MODE button @0 is set to
“CASCADE”, the start signal is output from this
output jack once operation of Deck B is finished.
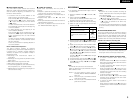
#0 Serial Control Port (RS232C)
This is serial remote connector.
Applicable connector : 9-pin D-sub (male)
Baud rate : 9600 bps
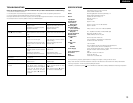
Pin layout
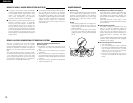
!4 Tape Transport Buttons
0 , 1
2
6
7
4
3
Play Button
Stop Button
Fast Rewind Button
Fast Forward Button
Rec/Rec Mute Button
Rec Pause Button
Press to playback tape.
Press to stop the tape in any mode.
Press for fast rewind.
Press for fast forwarding.
Press the Rec/Rec Mute button ( 4 ) and Play button ( 0 , 1 )
simultaneously to start recording. If only the Rec/Rec Mute
button ( 4 ) is pressed, the deck enters the recording pause
mode. Pressing this button in the recording pause mode will
start Auto Rec Mute, and a 5-second silent space is recorded
onto the tape. See page 9.
Press this button to enter the recording pause mode from the
recording or recording mute mode. This button can only be used
during recording. See page 9.
@3 Remote Control Sensor
(REMOTE SENSOR)
This sensor receives the infrared light transmitted
from the wireless remote control unit.
This product dose not come with remote control
unit.
@4 Deck A, B Line Input Jacks (LINE IN)
These are unbalanced inputs using RCA type
jacks.
Use them to input signals to be recorded on a
tape.
@5 Deck A, B Line Output Jacks
(LINE OUT)
These are unbalanced outputs using RCA type
jacks.
@6 Deck A Line Output Select Switch
(DECK A OUTPUT SEL.)
Selects the signal to be output from the Deck A
output jacks.
A : The Deck A signal is output.
A+B : Both the Deck A and Deck B signals are
output.
@7 Deck A Line Input Through Jacks
(THRU)
The signal input to the DECK A LINE IN jacks is
output unchanged.
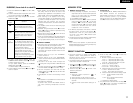
@8 External Synchronized Control Jacks
(EXT. SYNC.)
Connect these for synchronized recording.
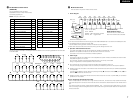
Pin No.
Signal Name
1
6NC
GND
I / O
_
_
2
7NC
TxD O
_
3
8NC
RxD I
_
4
9NC
NC
_
_
5 S. GROUND
_
!9 Eject Button ( 5 )
Press this button to open the cassette
compartment cover. When the tape is running,
press the Stop ( 2 ) button first to stop tape
transport, then press the Eject ( 5 ) button.
@0 Reverse Mode Button (REV. MODE)
Select the type of tape transport. The reverse
mode can be set to (one side),
(continuous playback), RELAY (relay playback),
CASCADE (continuous recording/playback on
multiple units is possible).
@1 Twin Recording Button (TWIN REC)
Pressing this button will set both deck A and B
to the recording pause mode. See page 10.
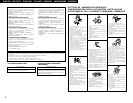
@2 Display
Reverse Mode Indicator
Deck B Peak Level Meter
Deck B Dolby NR
Indicator
Deck A Dolby NR
Indicator
Deck A Peak Level Meter
Deck B Tape CounterDeck A Tape Counter
Twin Rec
Indicator
Lights when deck A is selected with the RC IN control jack.
Deck A
Tape Transport
Indicator
Deck B
Tape Transport
Indicator
Deck A Memory
Indicator
Deck B Memory
Indicator
Lights when deck B is
selected with the RC IN
control jack.
• Synchronized Indicator
• Infrared Remote
Control Indicator
Dubbing Speed Indicator