


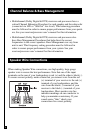


7
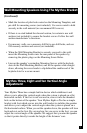
• Mark the location of pilot holes noted on the Mounting Template, and
pre-drill for mounting screws (not included). Use screws rated to hold
securely in the wall material (we recommend #10 screws).
• If there is no stud behind the chosen location, be certain to use wall
anchors (not included) to secure the bracket screws. Follow the wall
anchor manufacturer’s directions.
• For masonry walls, use a masonry drill bit to pre-drill holes, and use
#10 masonry anchors and screws (not included).
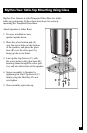
• When the Wall Mounting Bracket is securely screwed to the wall,
insert the Mounting Screws into the rear panel of the speaker by
removing the plastic plugs on the Mounting Screw Holes.
• Line up the speaker’s protruding Mounting Screws with the keyhole
slots on the Wall Mounting Bracket, and let the speaker slide straight
down, allowing the screw heads to slip behind the smaller end of the
keyhole slots for a secure mount.
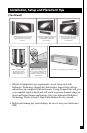
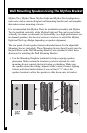
Your Mythos Three has a simple built-in device which stabilizes it and
allows you to adjust the vertical angle when the system is placed on a flat
horizontal surface. If the foot is not screwed in, screw it into the threaded
hole on the bottom of the speaker. Your Mythos Eight or Ten has a simple
bracket with foot which screws into the wall bracket to stabilize the speaker
and allows you to adjust the vertical angle when the system is placed on a
flat horizontal surface. When you set the speaker down, the speaker will lean
back and rest on the foot. By varying how far you screw in the foot, you can
adjust the vertical angle of the speaker. We suggest that you aim the speaker
so that it points directly towards the height of the listeners’ ears.
Wall Mounting Speakers Using The Mythos Bracket
(Continued)
Mythos Three, Eight and Ten Vertical Angle
Adjustment