


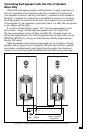


It is important, because of the BP7000sc/BP7001sc’s unique bipolar
(front and rear) radiation pattern, that some simple set-up recommendations be
followed in order to assure optimum performance in your room. Please remember
that although these recommendations are usually valid, all rooms and listening
set-ups are somewhat unique, so do not be afraid to experiment with the speakers.
Remember, whatever sounds best to you is correct.
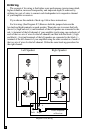
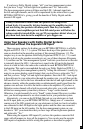
In most rooms the speakers should be placed 5 to 36 inches from the rear wall
in order to allow the rear radiated sound to freely reflect off the back wall. Please
note that they can go closer to, or further from, the wall if desired. Placement
closer to the rear wall will increase the bass output while placement further from
the rear wall will decrease the bass output (which, of course, can be compensated
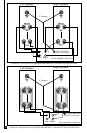
Please Inspect For Shipping Damage
Each loudspeaker leaves our plant in perfect condition. Any visible or
concealed damage most likely occurred in handling after it left our plant and
should be reported at once to your Definitive dealer or the delivery company that
delivered your loudspeaker. Please unpack your system carefully. Save all cartons
and packing materials in case you move or need to ship your system. Record the
serial number found on the back of the BP7000
SC/BP7001SC in the appropriate
place on your warranty card, answer all questions and send it in.
3.Insert two screws provided and tighten them securely, being careful not to strip out material.
4.Repeat steps #2 and #3 for the other stabilizer brackets.
5.Remove the supporting feet closest to the stabilizer brackets and thread them into the brass insert in
the stabilizer brackets.
6.Carefully return the speaker to the upright position and adjust the glides (supporting feet) to level the speaker.
Note: If desired, the four glides (support feet) may be replaced and the four spikes provided may be installed.
The four spikes or glides must be fully threaded into the brass inserts on the stabilizer brackets.
AVERTISSEMENT Mesures de Sécurité Importantes
Pour réduire les risques que le produit se renverse par inadvertance, quatre supports stabiliseurs avec vis de montage
ont été fournis. Ceux-ci doivent être installés sur la base du produit, dans les rainures appropriées.
Procédures d’installation:
Outils requis: Tournevis étoile (non fourni)
Pièces requises: Quatre supports stabiliseurs (fournis), huit vis (fournies)
Instructions:
1.Coucher soigneusement le haut-parleur sur la face avant.
2.Placer un des supports stabiliseurs dans la rainure appropriée arrière. (Note: le support stabiliseur sera égal
au bas de la base)
3.Insérer deux des vis prévues à cet effet et serrer de façon ajustée en prenant garde de ne pas élimer les parois
du matériel.
4.Répéter les étapes #2 et #3 pour l’autre support stabiliseur.
5.Retirer les niveleurs (pieds de support) les plus rapprochés des supports stabiliseurs et visser les niveleurs, dans
l’encolure de cuivre des supports stabiliseurs.
6.Relever soigneusement le haut-parleur dans sa position fonctionnelle et ajuster les niveleurs (pieds de support) pour
égaliser le haut-parleur.
Note: Les quatres niveleurs (pieds de support) peuvent être remplacés, si désiré, par les quatres pointes fournies
à cet effet.
Unpacking Your BP7000SC/BP7001SCs
Positioning the Speakers in Your Room
3