


Operation Manual
I-Tech HD Series Power Amplifi ers
page 24
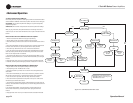
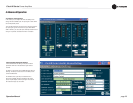
4.4 File Transfer Via the USB Port
On the front panel of the amplifi er is a USB Type A port which can transfer fi les either
direction between a USB fl ash drive and the amplifi er. These fi les can be of two types:
A Preset fi le, which contains amplifi er DSP settings for a specifi c loudspeaker/
amplifi er confi guration.
A Device fi le, which contain all 50 presets and the current amplifi er DSP settings.
When you plug in the drive, the amplfi ier defaults to a fi le-exchange mode and is
muted. Then you can load or save individual fi les. No computer is needed for this fi le
transfer.
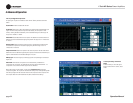
How to transfer a fi le from a USB fl ash drive to the amplifi er:
1. The fi le must reside in the fl ash-drive root (top-level) directory.
2. Plug the fl ash drive into the amplifi er’s USB port on the front panel.
3. The screen asks if you want to load or save a fi le. Press the left Encoder to LOAD a
fi le.
4. The screen asks whether you want to load a device fi le or preset fi le. Press the left
Encoder to load a device fi le, or press the right Encoder to load a preset fi le.
5. The screen says “Select File to Load.” Turn an Encoder to select the fi le.
6. If you are loading a preset, the front panel shows the acceptable fi les in the fl ash
drive root directory. Turn the Encoder to view the fi les; press the Encoder to select.
Note: You can’t explore folders or subfolders.
7. The amplifi er loads the fi le into its memory and displays the Eject Menu. To stop
the transfers, press the left Encoder. To continue with more transfers, press the right
Encoder.
8. Unplug the fl ash drive. The amp is unmuted and returns to the determined state.
9. If desired, recall the preset following the procedures in Sections 4.3.2 and 4.3.3.
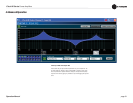
How to transfer a fi le from the amplifi er to a USB fl ash drive:
1. Plug the fl ash drive into the amplifi er’s USB port on the front panel.
2. The amplifi er goes into “File Mode” and is muted.
3. The front panel asks if you want to load or save a fi le. Press the right Encoder to
select SAVE.
4. The screen will ask whether you want to save a device fi le or preset fi le. Press the
left encoder to save a device fi le, or press the right encoder to save a preset fi le.
5. If you chose to save a preset fi le, the screen says “Select Preset to Save.”
6. The screen shows the preset fi les in the amplifi er’s memory. Turn an Encoder to
view the fi les; press the Encoder to select.
7. The amplifi er’s Preset fi le will be saved to a default fi lename in the fl ash-drive root
directory. If the default fi lename already exists, a number will be appended to the end
of the fi lename.
8. You will see the Eject Menu. To stop the transfers, press the left Encoder. To
continue with more transfers, press the right Encoder. Unplug the drive when
fi nished.
9. Unplug the fl ash drive. The amp is unmuted and returns to the determined state.
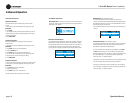
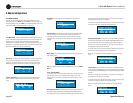
4 Advanced Operation
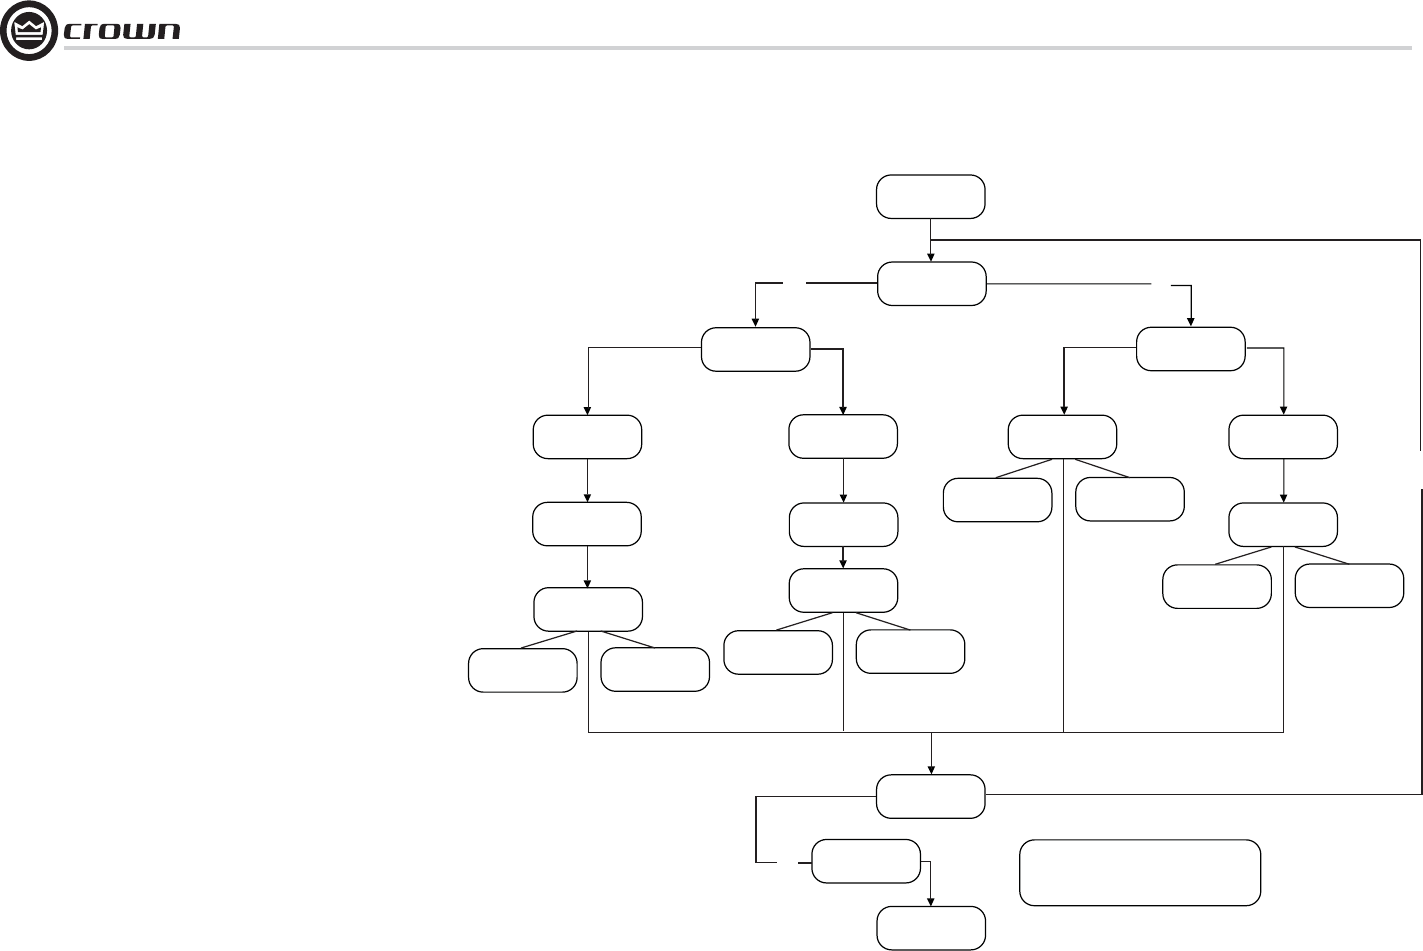
Insert USB Device
USB Main Menu
LOAD or SAVE
Ch1
Enc
Ch2
Enc
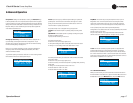
Save a File
DEVICE PRESET
Save Device FileLoad Preset File
Load a File
DEVICE PRESET
Load Device File
Save Preset File
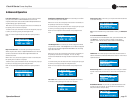
Ch2
Enc
Select Preset to
Save
Select file to load
Select Preset to
Overwrite
Select file to load
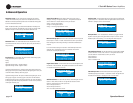
EJECT MENU
DONE
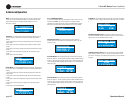
NOTE: Pressing any of the navigation buttons
(MENU, PREV or NEXT) at any time will go to the
“EJECT-MENU” selection screen.
Ch1
Enc
(Pop-up box)
Loading Device File
(Pop-up box)
Loading File
Successful
(Pop-up box)
Safe to Remove
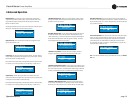
(Pop-up box)
Loading File
Failed!
(Pop-up box)
Overwriting Preset
Successful
(Pop-up box)
Overwriting Preset
Failed!
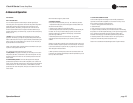
(Pop-up box)
Save to USB
Successful
(Pop-up box)
Save to USB
Failed!
(Pop-up box)
Save to USB
Successful
(Pop-up box)
Save to USB
Failed!
Figure 4.3 USB File Transfer Flow Chart