


Turntable Features
Getting Started
Control Locators........................ 4
Unpacking................................ 5
Set Up...................................... 5
Power Source.......................... 5
Turntable
Turntable Features.................... 6
Operating Instructions............... 6
Tone Arm Adjustment................ 6
Accessory: Adapter for 45 rpm
.................................................... 7
Tone Control............................... 7
General
Troubleshooting Guide.............. 7
Warranty..................................... 8
6
About This Manual
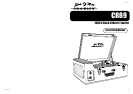
Thank you for purchasing the Crosley 1950S Stack-
O-Matic Traveler (CR89). Before operating this unit,
please read this manual throughly and retain it for
future reference.
Instructions in the manual describe the controls and
functions of the CR89.
Welcome Table of Contents
1 Selectable 33/45/78 rpm speeds.
2 Load up to 6 records at a time.
3 Plays 7, 10, and 12 records.
4 Record changer is fully automatic or can be
operated manually.
5 Adjustable tone control.
1 Turn power on by rotating the ON/OFF VOLUME
KNOB (10) clockwise.
2 Lift TENSION ARM (1) and rotate counter-clockwise
over the TONE ARM (5).
3 Load desired records on the CENTER SPINDLE
(2). Records should be loaded one at a time.
4 Lift TENSION ARM (1) and rotate it clockwise over
the records and release. TENSION ARM (1) will
automatically pull down onto the records.
5 Set the SIZE SELECT SWITCH (6) to the correct
size of your records.
6 Set the SPEED SELECT SWITCH (4) to the correct
speed of your records.
7 Move the TURNTABLE SWITCH (8) to the ON
position. Turntable will begin to turn.
8. Remove white protective needle cover by gently
pulling towards the front of the unit.
Turntable Operation
9 Move the TURNTABLE SWITCH (8) to AUTO.
The switch will automatically return back to the
ON position and the first record will drop. The
TONE ARM (5) will automatically lift and move to
the beginning of the record. Once the first record
is finished, the TONE ARM (5) will move back to
the TONE ARM REST (7) and the next record
will drop. The TONE ARM (5) will move back to
the beginning of the record. This will repeat until
the last record is finished. When the last record
is finished, the TONE ARM (5) will return to its
rest and the turntable will shut off.
10 To manually switch to the next record during
playback, move the TURNTABLE SWITCH (8)
to the AUTO position. The next record will drop
and begin to play.
11 To stop playback manually, move the TURNTABLE
SWITCH (8) to the OFF position. Gently lift
the TONE ARM (5) from the record and return
it to the TONE ARM REST (7).
12 To remove the records from the turntable, lift the
TENSION ARM (1) up and rotate it counter-
clockwise over the TONE ARM (5). Grab the
edges of the bottom record and lift straight up.
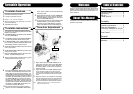
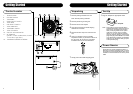
1 Adjust this screw if the TONE ARM(25) is not
raising high enough to clear to the TONE ARM
REST(27). Turn the screw counter-clockwise
to raise the height. Turn the screw clockwise to
lower the height.
2 Adjust this screw if the TONE ARM(25) drops
on the record too early or too late. Turn the
screw counter-clockwise to start at a later point.
Turn the screw clockwise to start at an earlier
point.
3 Adjust the screw if you feel there is not enough
tone arm pressure on the record. Turn the screw
counter-clockwise to increase pressure. Turn
the screw clockwise to descrease the pressure.
Note : Adjust the screws one turn at a time and check the
adjustment after each turn.
Turntable Instructions
1
2
3
Do not turn
Tone Arm Adjustment